A whimsical place to play, where paper and ink become one.

Friday, February 26, 2016

Polkadoodles Tic Tac Toe Challenge ~ Serenity

Hello Friends,

Today I have a really fun Polkadoodles Challenge for all of you. We are playing TIC TAC TOE.... Here is the TIC TAC TOE board so hope you will all play along.

 
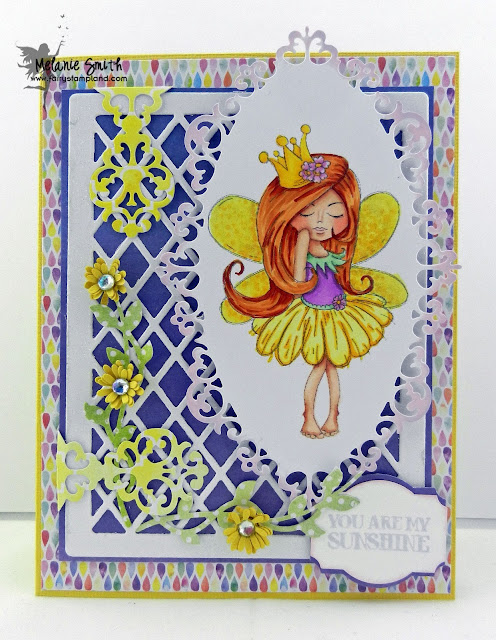
For my card I have used Serenity Princess from the Serenity collection. She has WINGS so for my TIC TAC TOE I have chosen "Wings, Nature, and a Sentiment"
 
I have used a lot of dies in this image. The beautiful Gilded Oval Die set is one of the newest additions to my ever growing collection. It was designed by my dear friend Tammy from Handmade by TLC. She designs amazing dies for LDRS Creative. you can see her entire collection HERE.
 

For my "Nature" portion I created this beautiful vine using two new dies I purchased from the Heirloom Rubberstamp Show. The vine is a part of the Spellbinders Floral Gazebo set (S4-535) and the amazing miniature flowers were made using the Impression Obsession (DIE042-I). The background lattice is also a new die from Ellentina Cutting Dies that I also got from the show.

I hope you all will come on over to the Polkadoodles Challenge blog to play along with us. I would love to see all your creations!!!

Melanie


Thursday, February 25, 2016

Stampin' UP! Flowering Fields Stamp Set Featuring Wildflower Field DSP ~ 2 FREE Sale A Bration Choices

Hi Friends,
 
I am back today with a coloring technique using the Stampin' UP! Blender Pens and Dye Based Ink Pads. The color pallet consists of Black Berry Bliss, Calypso Coral, Hello Honey, and Old Olive


Using the Stampin' Up! ink pads for my painting pallet I simply dipped the blender pen into the inked up lids and colored with them like a marker. This technique is so fun and it allows you to turn all of your ink pads into markers with just the use of just one blender pen.


Both the Flowering Fields Stamp Set (Wood #141300 or Clear #141303) as well as the Wildflower Fields Designer Paper (#141022) are available as free items during Sale A Bration. With EACH $50 you spend between now and March 31st you will earn 1 free item. As soon as I saw these two items together I just knew I had to color these flowers up.

Thank you for stopping by this week. Check back with me next week when I share some awesome Botanical Garden Projects. Happy Stamping my friends!

Melanie

Tuesday, February 23, 2016

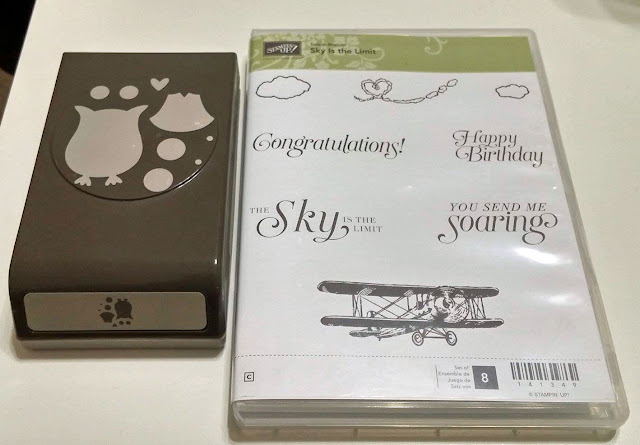
While Supplies Last ~ Sky Is The Limit!

Hi Friends,

I thought I had missed the boat with this adorable card. The reason I say that is because this stamp set "Sky Is The Limit" was only suppose to be available until Feb 15th, but I have heard through the grape vine that it will continue to be available "WHILE SUPPLIES LAST" So if you did not get a chance to earn this FREE stamp set you may still have a chance. Simply place a $50 order and choose it as your FREE Sale A Bration item.


My color scheme for this card consists of Basic Black, Whisper White, Island Indigo, Soft Sky, and Cherry Cobbler. I had such fun creating the background of this card using a large scallop punch and ink daubers. Just begin at the top of your paper sponging the die cut scallop using it as a mask. It creates such a fun cloudy sky.


If you notice I also punched a small circle using the Owl Builder Punch and punched out a small piece of Stampin' UP! Vellum Cardstock for the propeller and I used the 1/8" Silver Mini Brads in both the center of the propeller as well as in the wheels.

I have stamped my sentiment in Cherry Cobbler and have punched it out using the Decorative Label Punch. used the Cherry Cobbler Bakers Twine to add a little extra dimension.

Don't forget this "Sky Is The Limit" Limited edition stamp set is ONLY available "WHILE SUPPLIES LAST" As of the typing of this blog post they are currently both still available in both Clear & Wood Mount, but they won't last long.


Friday, February 19, 2016

Polkadoodles "Green" Challenge ~ The Serenity Collection

Hi friends,

Everyone knows how much I love fairies so when I was asked to create using the "Polkadoodles Serenity Collection" I was in heaven.

I have chosen "Serenity Dancing" for this first project. Our theme this week is The lucky color green. I have decided to use a soft shade of green as my focal color.


All of the beautiful Serenity images have closed eyes which I find fascinating. The eye for detail in the drawn lines are just amazing. I have colored her in soft greens along with some pink florals. Isn't she adorable?
 
I Love working with dies and have used numerous dies with this design. Below shows some of that detail up close.
 

Thank you for stopping by today. Check back next Friday for another beautiful fairy from the Serenity Collection by Polkadoodles.

Melanie

Thursday, February 18, 2016

Luv 2 Stamp 2016 Occasions Framed Sampler ~ Including a Fun Photo Tutorial

Hello Followers,
 
I'm excited to bring you this fun project today. My up line, Patty Bennett, put together a fun 3x3" swap with the Stampin' UP! Luv 2 Stamp group. We were given a color theme using products from the 2016 Occasions Catalog. After getting the swaps back I put together this framed piece for my craft room.


Here is a close up of my personal square along with a step by step photo tutorial on how I created it.


As you can see I used The Botanical Blooms for my 3x3" card along with Blushing Bride Glimmer  paper and the Love Blossoms Designer Paper. This Botanical Blooms Bundle is a MUST have from the Occasions Catalog and earns you a FREE Sale A Bration item of your choice from now until March 31st!!! Don't Miss Out!


If you would like to join the amazing team I am on simply


We would love to have you as part of our interactive online group! Currently the starter kit costs $99 and you get to choose $155 in any product of your choice from the current catalogs. This is the most amazing deal of the year! If you have any questions about getting your starter kit OR about the photo tutorial above please do not hesitate to message me. I always love hearing from new crafty friends!

Melanie

Tuesday, February 16, 2016

Just For You ~ A Watercolor Resist Technique

Hi Everyone,

Today I am sharing a FUN water coloring technique. I took a piece of water color paper and stamped this large 'Just for You' Sentiment on it with VersaMark Pad. I then heat embossed it using our gold embossing powder. Once embossed I die cut the piece of paper using the Lots of Labels Framelits using my Big Shot. Once cut out I simply used my Aqua Painter dipped into some of our dye based inks to create a water color effect in the background.


::::::: Please Note::::::

I have also used the Limited TIME ONLY Perfectly Artistic Designer Series Paper. This paper is ONLY available for FREE with a $50 Stampin' UP! purchase until FEB 15th 2016. 

Here is a close up of both Sale A Bration Items. Get them BOTH free with a $100 purchase. 

Thank you for stopping by today. Don't miss out on a single post.... "Follow Me" or simply add your email to the side bar to receive my posts directly to your inbox. 

Melanie 


Built for Free Using: My Stampin Blog


Thursday, February 11, 2016

Part 2 of the Paper Pumpkin Alternative Projects

Welcome back to Part Two of my Paper Pumpkin Alternative projects. I love designing and making things so the monthly kit by Stampin Up is perfect for this. My elderly mother is also a member and we make our Paper Pumpkin's together each month. She see's that orange box show up and gets giddy with joy. 

Today I have 3 dramatically different looks compared to those I showed on Tuesday. 


First up is a simple Valentine's Treat bag. The top of the heart opens to reveal the little goodies. I used the Rose Garden Framelit from the Rose Wonder Bundle to cut the overlapping hearts here. 


This second card I used the same Rose Garden Framelits set using a Stained Glass Effect. I also used the Timeless Elegant Designer Paper Collection for the background along with Basic Black Card Stock for the card base and die cuts. The word "Cheers" is cut using the Greeting Thinlits Dies Set. This set was also used below.

For my favorite card of the series I have made this "Thanks" Card using the elegant Bloomin' Heart Thinlit once again. Doesn't it dress up any project? I've used some Stampin' Dimensionals
to give this project some depth. I have also used the Glimmer Paper, Go Wild Designer Series 6x6 Paper Stack, and of course some added Rhinestones for that finishing touch.   

Now after seeing these 6 cards all of which used pieces from January's Paper Pumpkin Kit Below. Don't that make you want to sign up? Don't forget there is a special until the end of March.... Simple click the JOIN NOW button Below.


Tuesday, February 9, 2016

Fun Paper Pumpkin Alternative Projects Part 1

Hello Friends,

Anyone who knows me knows that I do not always follow the rules and I like creating even more out of even the simplest of items. This is the main reason I personally subscribe for The Paper Pumpkin Monthly Kit by Stampin' Up! I like that the kit was created with the beginner in mind, in yet even the most advanced artist can create the most beautiful things from the kits. If you haven't already joined make sure to check out the facebook group called PAPER PUMPKIN FAN CLUB.   It gives you ample ideas for creating this amazing kit into so many magical ways. 

Here is what January's Motnth's kit was designed to create....


This adorable banner as well as cute little Valentines. Both today and Thursday I will be sharing my ALTERNATIVE projects. If you would like to JOIN My Paper Pumpkin I would be honored to have you sign up. Once added I will also add you to my exclusive PAPER PUMPKIN Facebook group as well. :-) 


In this first one I have added some Basic Black Card Stock and some adorable Cherry On Top designer paper. This set comes in a fun 6x6 size. 


In this second card I have used Whisper White Card Stock and The Bloomin' Hearts Thinlet Die from the Bloomin' Love Bundle as well as some Rhinestone Basic Jewels.
In today's last card I added some Venetian Crochet Trim and a small bit of Cherry On Top Designer Washi Tape as well as some designer paper from the Pretty Petals 6x6 paper pad. I also use the Hearts Border Punch for the little confetti on top. 

Now see how much fun one little project can become? Your in luck too because there is a SPECIAL on joining the Paper Pumpkin from now until March 31st!!! See below and then click JOIN to join the FUN!

See my alternative projects at www.fairystampland.com


Thanks for stopping by today.... Check back on Thursday for a completely different Alternative look for this adorable project in a box subscription. 

Melanie

Thursday, February 4, 2016

Rose Wonder to DIE FOR Week ~ IN Colors ~ Don't Miss Out!

I have to say this has been a FUN week. I have really enjoyed the Rose Wonder bundle and I will be using it AGAIN and AGAIN in the future. This is perfect for all flower lovers as well as Spring time which is just around the corner. 

Today I want to remind everyone that the 2014-2016 IN Colors will be retiring in May. Last year there was a lot of disappointment because the re-inkers for the retiring colors sold out EARLY. So please, if you have not already grabbed these amazingly rich colors please make sure to head on over to the shop to pick your set up so you don't miss out.


Here are the Rose Wonder Die cut cards that I made using the 5 IN COLORS. I had a lot of fun making these but even more stacking them like a house of cards. This took talent I tell ya!

Some In Color items are already marked down so don't put it off if there is something you can't live without...


thank you for stopping by today and for following along with my 
Rose of Wonder to Die for week! 

Melanie

Wednesday, February 3, 2016

Rose Wonder to DIE FOR Week ~ A Happy Accident!

Hi Crafty Friends,

Welcome back to day 2 of my 3 day installment using the Rose Wonder Bundle. I am in love with this bundle and I have not even began playing with many of the stamps yet. Today I have what I would like to call my "Happy Accident". When I was making the stencil card from yesterday when I lifted the stencil it revealed not only a beautiful card underneath, but also this drop dead gorgeous stencil.... So I instantly knew it was going to find its home on a second card and my first instinct was basic black card stock. 


The white card was made using the stencil that now resides on the black card. Here is a closer look at today's card...


Isn't it DREAMY????? I couldn't of asked for a happier accident. Both of these cards took minimal supplies...Just goes to show that WOW does not have to include a ton of product. I used the Birthday Blossoms Stamp Set for the "Celebrate You" Sentiment. along with a few added rhinestones. 

If you have any questions feel free to contact me. Also don't forget to sign up for my newsletter so you do not miss out on any specials. Happy Crafting my friends!

Melanie


Built for Free Using: My Stampin Blog

Tuesday, February 2, 2016

Rose Garden 3 Day Series... What a Surprise.... Using a DIE as a Stencil.... WOW!

Hi Friends,

This week I am playing with the Rose Wonder Bundle from Stampin' UP! I have barely touched the surface with these projects this week as this bundle has SO MANY possibilities. I haven't even used the stamp set yet and I already have 3 amazing projects to share with you this week.


With this card I used the AMAZING large Rose die from the  Rose Garden Thinlet Set. I die cut the large rose using my big shot and precision base cutting mat. Then I used the die cut as a stencil and my ink pads and daubers to dab over the die cut. When I lifted the die cut I was amazed with what I saw. This brilliant breathtaking card. But THAT IS NOT ALL..... Check back tomorrow to see what SURPRISE came from this above project....you will NOT want to miss tomorrows post......

 Here is a close up of the bundle and don't forget when you purchase the bundle you receive 15% off! 


Here are some of the ladies at my class where we made these beautiful cards. I love how everyone's Rose Wonder card came out a little different. We had A LOT of fun making these!!!!


Make sure to check back Wednesday AND Thursday this week for more Rose Wonder Beauty including tomorrow's SHOCKING happy accident that I had in my craft room while playing with this bundle ;-)

Melanie


Built for Free Using: My Stampin Blog