A whimsical place to play, where paper and ink become one.

Wednesday, August 31, 2022

Heartfelt Creations ~ Dragonfly Garden

Hi Friends,

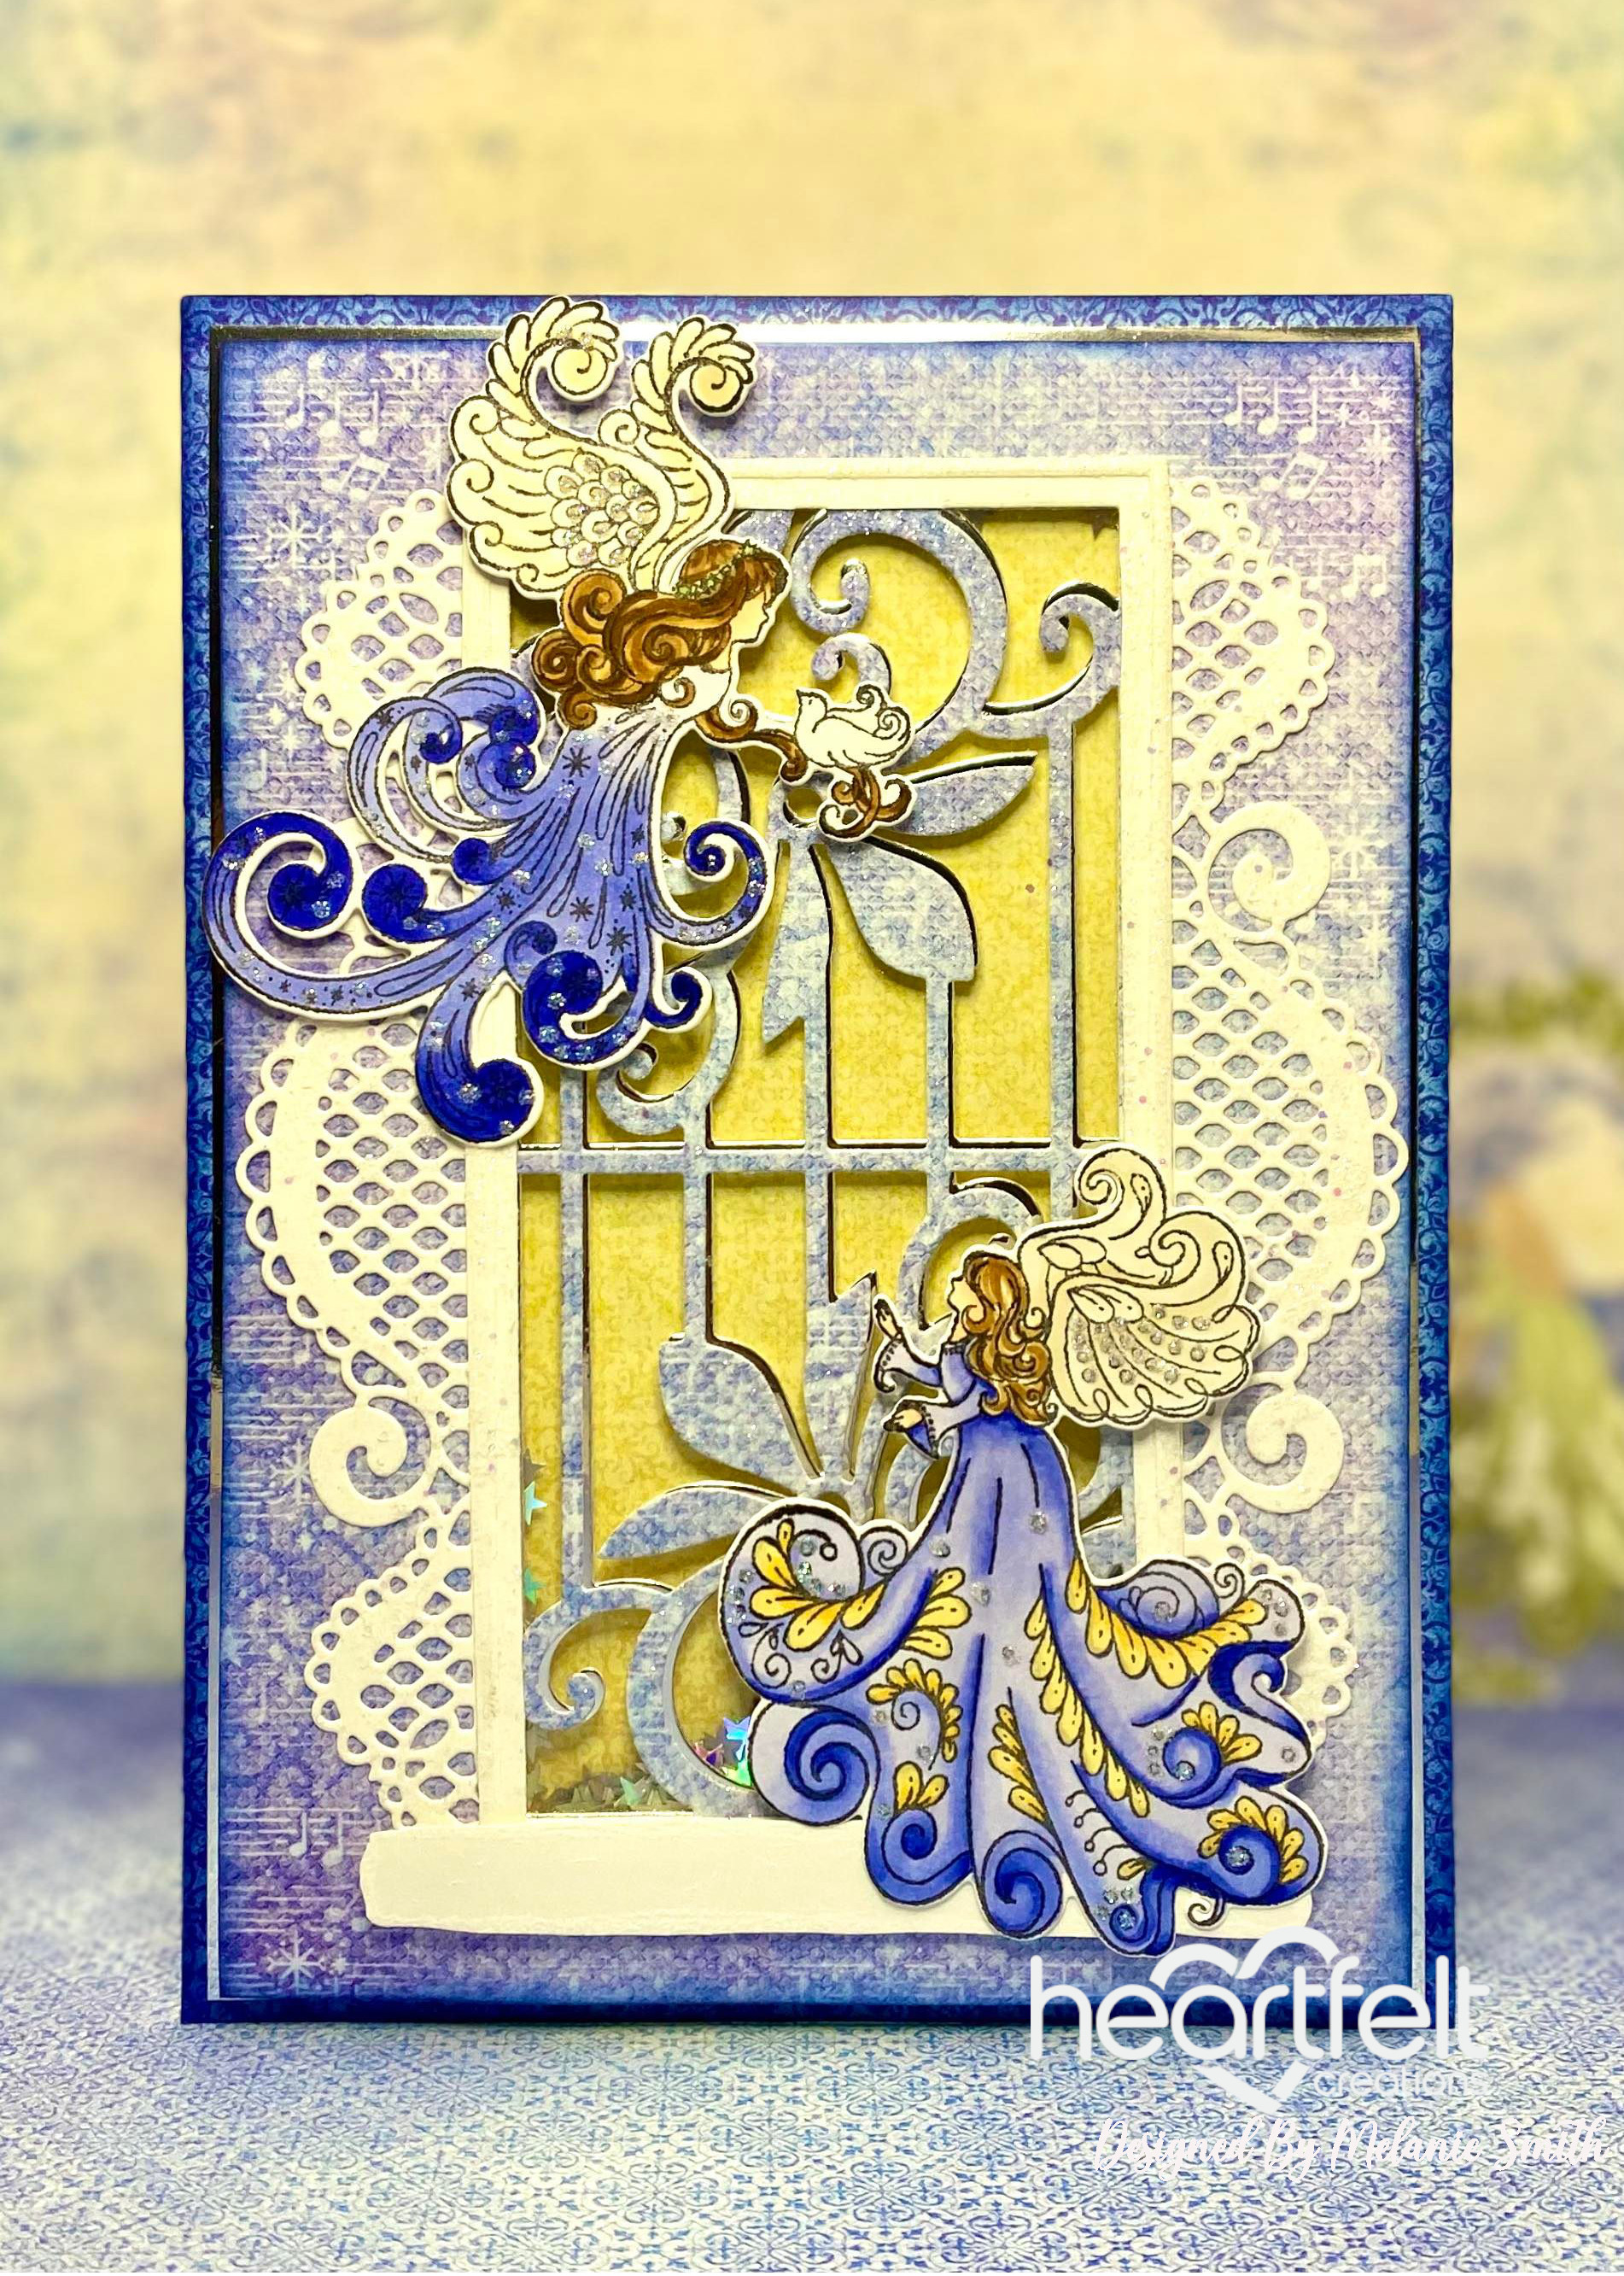
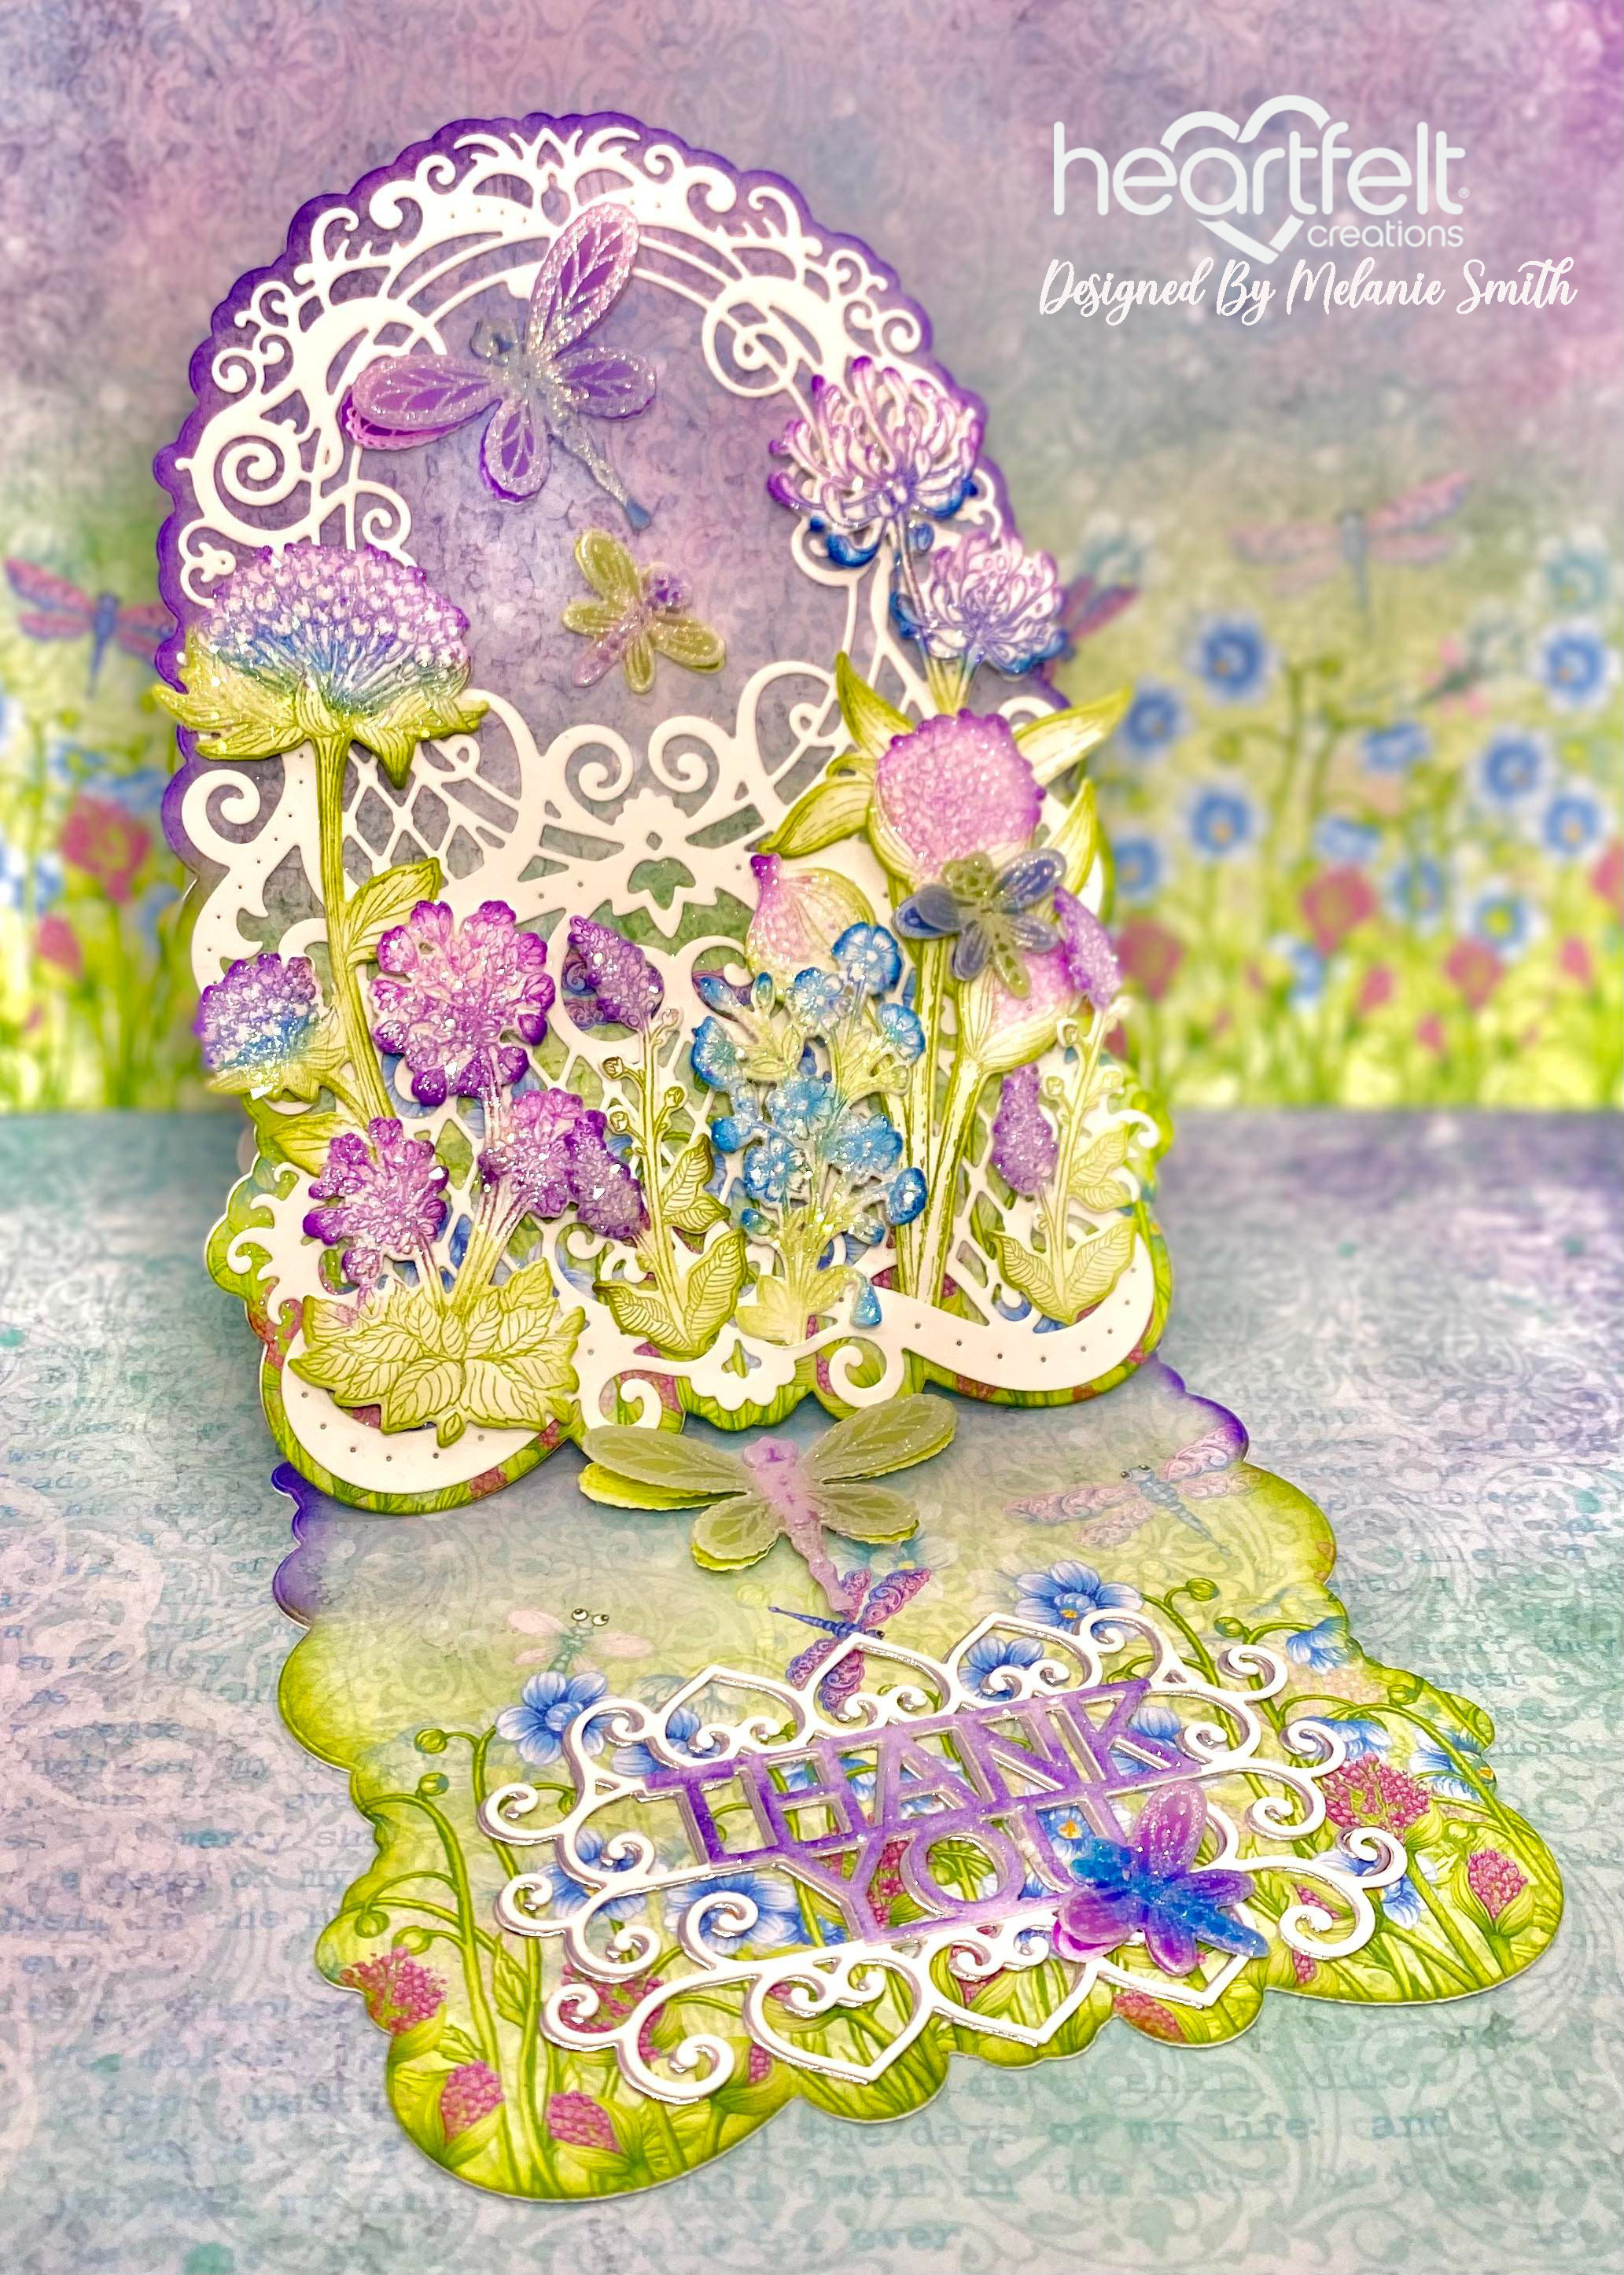
Today I have a fun Dragonfly Garden card featuring the beautiful Decorative Dragonfly Collection. I have created a garden scene 


Directions:

Cut the largest die from HCD2-7328 Lattice Swirl Gateway Die 3X from white Deluxe Flower Shaping Paper and 2X from sheet 5A of the Decorative Dragonfly Paper Collection. Taking 1 of the white die cut pieces from the top down, score at approximately 1 7/16 and 3 13/16. (Hint: Line up the score marks between scallops along the edge to make sure they are straight.). The top fold will be a valley fold and the second fold down will be a mountain fold. Lightly sponge the edges of the two patterned papers using Deep Purple ink along the top half and Leaf Green ink along the bottom. Adhere each of these inked papers to the remaining two white die cuts. Die cut the second largest die from the same die set and paper as before, and layer on top of one of these decorative layers, this is the card front. To create the easel take the scored layer and sandwich in between the two decorative pieces both faced up with the white die cut on top as shown. Glue the top fold to the top portion of the bottom panel and the bottom of the white piece to the bottom back of the front panel.


Stamp with Versa Mark Ink and Heat Emboss with Bridal Tinsel Embossing Powder the following images onto both flower shaping cardstock and Rajni Chawla’s Vellum, then die cut with coordinating dies. Stamp 2X the 2” Dragonfly from the HCPC-3983 Decorative Dragonfly Cling Stamp Set and color using the stack and store daubers with a mix of Night Sky, Majestic Purple, Cactus Flower, Manganese Blue, and Leaf Green Inks. (Color vellum from the back) Use this same technique 3X for the 1” dragonflies. Once all are inked, layer and glue the vellum layers on top of the paper layers just down the center. From HCPC-3984 Daydream Florals Cling Stamp set, using the same colors as listed in the previous step, the 3 largest florals using a stamping platform and the stack and store daubers to allow for multi color stamping.(Ink daubers to rubber, then stamp multiple times) From the HCPC-3985 Dragonfly Florals Cling Stamp set stamp 4 of those florals, as shown, and ink in the same way. Use coordinating dies to cut all the flowers out.


Ink the edges of the flowers and leaves with the daubers in the same color as they are inked in just to darken the edges and give dimension. Use the shaping stylus from the Deluxe Flower Shaping Kit to shape the flowers from the backsides on the shaping mat to round the flowers a little. Using a Hydra Sponge add some Dries Clear glue and dab all over the flowers and sprinkle with Rajni’s Chawla’s Crystal Clear glitter.


Arrange the dragonflies (saving one small and one large for the inside) and flowers and attach to the front of the card. For the inside die cut HCD2-7351 Ironwork Sentiments 2X from white cardstock and 1X from Luxe Silver Cardstock. Using Deep Purple ink sponge over one of the “Thank You” parts of one of the white die cuts and fussy cut it out. Glitter this piece as well before gluing on top of the second white die cut. Then attach the silver die cut slightly offset behind that to give the sentiment a 3 tone look. Glue it to the bottom of the inside of the card. Attach a small dragonfly to the sentiment and a large dragonfly above to serve as a stopper and to finish the card.


  I hope you enjoyed that as much as I enjoyed creating it for each of you! Check out my personal project in the Heartfelt Creations Gallery to find out what products I used for this project. 

Also, please be sure to visit the Heartfelt Creations Blog to see all of the gorgeous projects created by the other amazing design team members.

Love, Melanie

Wednesday, August 24, 2022

Heartfelt Creations ~ Angelic View

Hi Friends,

Welcome back to Wednesday's Inspiration post with Heartfelt Creations. I have a really fun card to share with you today. I had a vision when I first saw these Angels and I wanted to create a "window" scene but I wasn't quite sure how to achieve that. So I looked through the current dies by Heartfelt Creations and I decided to mix and match them to create my vision. This is what I came up with to create my sky/window scene where the angels are peeking in the window. I hope you like it!!!!


Instructions:

Cut white card stock to 11 x 7 1/2” and score at 5 1/2” to create a 5 1/2 x 7 1/2” card base. From the HCDP1-2142 Joyous Noel Paper Collection Select a dark blue piece of paper and cut to 5 1/2 x 7 1/2” then using the HCDA1-449 Stack and Store Daubers along with Night Sky Ink sponge around the edges and adhere to the card front. Cut a piece of 5 1/4 x 7 1/4” HCGP1-493 Luxe Silver Cardstock and layer on top of the dark blue paper. Next cut a piece of yellow paper to 4 3/4 x 6 3/4” and attach to the silver layer on the card base and set aside. Now cut a light blue patterned paper from the Joyous Noel Paper Collection to 5 x 7” and sponge in the same manner with Night Sky ink. Using the HCD1-7397 French Gate Die use one of the center panels to “cut in” a window into the center of the light blue piece of paper. Do the same using a piece of Luxe Silver Cardstock that measures 4 x 6 1/2”. Off set the Luxe Silver Cardstock slightly behind the light blue panel so that just a hint of silver shows, and glue it to the back of the light blue piece of paper. Cut a piece of Clear Cardstock measuring 4 x 6 1/2” and glue it securely behind the silver piece that was just adhered to seal up the back side of the window opening. From the same French Gate Die from the previous steps use the large rectangle die along with one inner panel to cut a piece of white cardstock, then trim out the inner decorative design to create a white frame for the window (see photo). Then also using white cardstock cut a thinner outer rectangle, for the window, by using the larger and smaller rectangle dies together without the inner die. These two frame pieces glued together create the window frame. Using HCD1-7211 Decorative Pocket Accents Die cut two pocket dies from white cardstock as shown.


Stamp both angel stamps from HCPC-3996 Joyous Noel Angels Cling Stamp Set onto Copic X-Press It paper and color with Copic markers. Cut with coordinating dies. Using white Versa Color Pigment Ink along with Opaque White Embossing Powder stamp and heat emboss the bottom portion of the HCPC-3908 French Doorway Cling Stamp and fussy cut out just the bottom portion to use as a window ledge.


To assemble the shaker card, using 3D foam tape add a double layer of foam tape to the back of the light blue window panel surrounding the entire window opening making sure not to leave any gaps. Also add the same double layer around the outer edges for extra support when it is attached to the card base in the next step. Use an antistatic tool inside the backside of the shaker window before removing any of the foam tape release paper. This will help with static electricity. Now with the card base laying flat on the work surface with the yellow paper facing up, add the shaker bits to the center of the yellow paper. Next remove the release papers from the 3D foam tape on the back of the blue window piece and add a little Dries Clear Glue to each of the foam pieces, then glue the window straight down onto the card base with the light blue window facing up trapping the shaker bits inside.


To finish the window glue the two window frames together and dab with Dries Clear Glue using a Hydra Sponge, then sprinkle with Rajni Chawla’s Crystal Clear Glitter. Do the same technique with glittering the Decorative Pocket Accent Dies after trimming off the actual pocket strip along the flat edge. Glue these around the window as seen in the photos. Using foam dots attach the windowsill along the bottom to complete the window. Each of the angels have been glittered using Dries Clear Glue applied directly to the images with a metal applicator tip, then sprinkled with Ultrafine Transparent Glitter. The angels are then adhered with Dries Clear Glue and foam dots to complete the project.


  I hope you enjoyed that as much as I enjoyed creating it for each of you! Check out my personal project in the Heartfelt Creations Gallery to find out what products I used for this project. 

Also, please be sure to visit the Heartfelt Creations Blog to see all of the gorgeous projects created by the other amazing design team members.


Love, Melanie

Wednesday, August 17, 2022

Happy 25th Anniversary Heartfelt Creations!!!!

 Happy 25th Anniversary Heartfelt Creations!!!!!

Today we celebrate Heartfelt Creations SILVER Anniversary. 25 years of bringing you beautiful t stamps along with other products to create elegant designs with time and time again. I am honored to be a part of this beautiful Heartfelt family and want to wish them many many more anniversaries in the future.

To commemorate this special occasion they have designed a Limited Edition Anniversary Die called the Diamond Fleur Die. I have created a special 25th Anniversary easel card with it. lets take a look...


 Instructions:  

Measure and cut a piece of white cardstock to 6 1/4 x 8 3/4” and score along the longer side at     2 3/4” and 5 1/2” creating a 3 segmented cardbase. The largest section measuring 3 1/4 x 6 1/4” is the base/bottom of the card. For the bottom section of the card cut a piece of HCGP1-493 Luxe Silver Cardstock measuring 1/8 x 6 1/4” and a light green patterned paper from the HCDP1-2137 Sweet Pea Paper Collection measuring 3” x 6 1/8”. Layer and glue these to the bottom section of the card. Next using the HCD2-7423 Diamond Fleur Die, cut the larger die 2x from white cardstock and 2x from Luxe Silver Cardstock. Cut the smaller die 1x from white cardstock and 1x from Luxe Silver Cardstock. Using the Dries Clear Glue adhere each Luxe Silver piece behind the coordinating white cardstock piece offsetting slighting so that the silver peeks out behind the white. Take the smaller die and attach it to the bottom of the card as pictured.


For the top portion of the card, Adhere a large Diamond Fleur Die to both the top and bottom of the top segment of the card base with Dries Clear Glue. (see photo) Then cut a piece of Luxe Silver Cardstock to 5 14/16 x 2 11/16” and a piece of striped pattern paper from the Sweet Pea Paper Collection that measures 5 12/16 x 2 9/16” and glue these two papers together. Using 3D foam tape on the back, adhere between the two Diamond Fleur Dies that were just attached to the top portion of the card. Using a secondary patterned paper from the same paper collection die cut using a decorative die from the HCD2-7307 Royal Elegance Frames Die set. Also from that set cut an oval piece of purple patterned paper and lightly ink around the edges with Deep Purple Archival Ink. Glue both layers directly to the top portion of the card as shown. Using the light green paper chosen earlier, stamp the “Happy Anniversary” stamp from the HCPC-3847 Celebrate Love Sentiments Cling Stamp Set then die cut using the small decorative die from the Royal Elegance Frame Die set. Also cut the same die from Luxe Silver Cardstock to layer behind, slightly offsetting it. Using 3D Foam Tape attach the sentiment to the center of the purple patterned paper on the top section of the card. Die cut a tag from the Sweet Pea Paper Collection using a die from the HCD1-7203 Ornamental Tags Die set and lightly ink around the edges with Deep Purple Archival Ink. Add the numbers “25” die cut out of Luxe Silver Cardstock using the HCD2-7371 Letters and Numbers Die and glue to the tag. Glue to the card top and attach ribbon using glue dots.

To create the stopper on the bottom portion of the card simply die cut a filigree sentiment die cut from the Ornamental Tags Die set from Luxe Silver Cardstock. Add the “Let’s Celebrate” sentiment from the Celebrate Love Sentiments Cling Stamp Set stamped in Deep Purple Archival Ink onto a piece of light green patterned paper measuring 3 x 5/8”. Border that paper with a slightly larger piece of dark purple patterned paper measuring 3 1/8 x 6/8” to finish off the color coordination of the card. 

Please visit my personal project in the Heartfelt Creations Gallery to find out what products I used for this project. 

Also, please be sure to visit the Heartfelt Creations Blog to see all of the gorgeous projects created by the other amazing design team members.

Crafty Hugs, Melanie

Wednesday, August 10, 2022

Heartfelt Creations August release ~ Joyous Noel Collection

Hiya Friends,

Super Excited to debut the NEW RELEASE today from Heartfelt Creations. This is the Brand New Joyous Noel Collection and boy is it beautiful. Just think of all the possibilities..... My card here is titled "Joyous Sounds From Above" and I have used the gorgeous NEW die from this collection to create a brand new shaped card. Lets take a look and don't forget all the step by step instructions are below...


Instructions:

To create this shaped, top fold, card base cut a 5 X 12” piece of white cardstock and score at 7 1/4”. Next cut a second piece of white cardstock at 7 1/4 X 6. Using the third largest die from the center from HCD2-7381 Fancy Classic Oval Frame Die set cut through the folded 5 X 12” piece making sure the fold line is at the top, and the die is slightly over the fold so that it does not cut threw the fold. Next use this same die to cut the 7 1/4 x 6” piece of cardstock. Take the first white piece with the larger side facing the front. This is the card front. Attach the second white piece to the back with the seam (shorter piece) on the inside. Using the same die cut a light green piece from sheet 1B of decorative paper from the HCDP1-2142 Joyous Noel Paper Collection. This will Cover the seam on the inside. Lastly using that same die one last time, cut a piece of dark green from Sheet 11B . From the next smallest die in the Fancy Classic Oval Frame Die set cut one from white cardstock and one from HCGP-488 Luxe Gold Cardstock. Glue these together with Dries Clear Glue with white on top, slightly offsetting them, then glue to the dark green paper cut in the previous step. From the small oval die in the center cut 1 from Luxe Gold Cardstock and cut in half vertically. Next cut the HCD1-7416 Noel Decorative Die 2X in White and Luxe Gold Cardstock. Glue these together with white on top, off setting them slightly so the gold shows nicely behind the white. Glue these two pieces to the back of the dark green piece, by lining up the side and top details, see photo. Then attach card base to the back matching up the edges to the back of the dark green piece on the front.


Using a stamping platform and a piece of paper from sheet 1B, use the HCPC-3998 Joyous Noel Background Cling Stamp and using the masking technique, mask off lines using scotch tape above and below just two lines of music and stamp with Encore Gold Ink and heat Emboss with Ranger Gold Embossing Powder. Do this multiple times so that the paper ends up being covered with musical notes. Then use the small oval die from the Fancy Classic Oval Frame Die to cut it out. Place the Vertically cut Luxe Gold Cardstock oval die cut behind this piece to give it a slight golden border. Attach this to the card base with 3D foam tape.


Stamp an angel from the HCPC-3996 Joyous Noel Angel Cling Stamp Set with Moments Tuxedo Black ink onto Copic X-Press It Paper. Color with Copic Markers and cut with coordinating dies. Using the Dries Clear glue with the metal tip add small dots of glue to each of the dots in the angels dress and sprinkle with Crystal Ultrafine Transparent Glitter. Then cover the angels wings completely with Dries Clear Glue and sprinkle generously with Rajni’s Chawla’s Crystal Clear Glitter, let sit for a moment, then shake off. Allow to dry completely. Stamp the Harp stamp from the same stamp set in Encore Gold Ink onto Luxe Gold Cardstock and heat emboss, then cut with coordinating die. Glue the harp into the angels arms and add 3D Foam Dots to the back before applying the angel to the center top of your oval. Lastly, Stamp the “Noel” stamp from the HCPC-3997Starry Noel Angel Cling Stamp Set in Encore Gold Ink and Heat Emboss in Ranger Gold embossing powder then cut out with coordinating die. Attach this to the bottom center of the oval to finish the card.

  I hope you enjoyed that as much as I enjoyed creating it for each of you! Check out my personal project in the Heartfelt Creations Gallery to find out what products I used for this project. 

Also, please be sure to visit the Heartfelt Creations Blog to see all of the gorgeous projects created by the other amazing design team members.


Love, Melanie


Wednesday, August 3, 2022

Heartfelt Creations ~ Purple Courtyard Roses

Welcome back friends,

Guess what day it is??? That's right! It is Inspiration Wednesday and I have a brand new card design for you all featuring Heartfelt Creation Products. This card was a really special card design as I created two cards at once. Both cards turned out differently but similar. The other one a little more masculine as it was given to my husband for our 29th Wedding anniversary back in May. It was his first official Heartfelt Card and the first time I attempted making 2 cards at once. They turned out both individual in their own right but both special. I hope you like this one as much as he liked his. Lets take a look...


Instructions:

Cut a 6 X 12” card base and score at the 6” mark to form a basic 6X6” card base. From the HCDP1-2110 Calla Lily Paper Collection choose a soft lavender 6x6” paper panel and with the HCDA2-450 Stack and Store Daubers, ink the edges with Deep Purple Archival ink. Glue this panel to the card front. Using the HCD1-7398 French Courtyard Die, cut 2 of the largest dies, once in white cardstock and once in HCGP1-493 Luxe Silver Cardstock. Glue these together using Dries Clear Adhesive so that the white is on top and the silver is offset underneath. From this same die set, create the center medallion by cutting the smallest circle die and the medallion die together out of Luxe Silver Cardstock. For the purple happy birthday layer, use 3 dies together; the happy birthday die along with both circle dies, one smaller and one larger. Lastly to create the silver that lies behind the happy birthday sentiment, remove the happy birthday die from the 3 dies in the previous step and just cut the 2 circles together. (Hint: It is best to use lots of tape to secure dies from moving when working with multiples). Glue the purple happy birthday sentiment to the Luxe Silver ring created and add 3D pop dots to the back. Glue down the center medallion flat against the card base using the sentiment as a guide to center. Then attach the sentiment.


Stamp the Roses 3X in Deep Purple Archival Ink from HCPC-3906 Small Wild Rose Cling Stamp Set. 3 medium and 4 small flowers will be needed to complete the card. With a Makeup sponge applicator brush, ink the centers lightly with Tea Rose Archival Ink and then cut with coordinating dies. Using the Stack and Store Daubers ink the edges of each petal with Blue Violet Archival ink and run through the coordinating 3D Mold. Using the Deluxe Flower Shaping Kit use a circular motion with the stylus tool and press down into the center of each petal center. Lastly poke a hole in the center of each flower using the Grooved Golf Tools. For the Large Flower alternate 3 petals and use the Medium Pastel Stamen in the center. Using hot glue, glue in place. For the smaller flowers alternate 2 petals and use the Small Pastel Stamens and also secure in place with hot glue.


Stamp the smaller flowers 1 time using the HCPC-3900 Cottage Garden Hydrangea Cling Stamp Set. This one stamp stamps multiple petals, I used the smaller set of flowers. Stamp in Versacolor White Pigment Ink onto Rajni Chawla’s Vellum paper and heat emboss with white embossing powder. Die cut with coordinating die and add Lettuce Surprise You Prills to the center with hot glue. For the leaves stamp 2X in Leaf Green using the HCPC-3835 Leafy Accents Cling Stamp Set. Cut with coordinating die and then lightly color the edges with Leaf Green.


To finish the card simply arrange the leaves and flowers around one corner of the center sentiment making sure to still be able to read the sentiment. The glue gun was used to attach flowers and leaves. Finish the inside of the card as desired.


  I hope you enjoyed that as much as I enjoyed creating it for each of you! Check out my personal project in the Heartfelt Creations Gallery to find out what products I used for this project. 

Also, please be sure to visit the Heartfelt Creations Blog to see all of the gorgeous projects created by the other amazing design team members.


Love, Melanie