A whimsical place to play, where paper and ink become one.

Friday, September 29, 2017

Elizabeth Craft Designs Spooky Tree

Welcome back friends,

Before receiving these Halloween dies from Elizabeth Craft Designs, I would of said "I don't make Halloween cards" but now that I have played with these dies and stamps from this collection I am hooked. These dies are amazing and if you like doing scenes then make sure you check out all the others from this collection. Especially the Haunted House Set that I used in my previous Elizabeth Craft Post.


To create a card similar simply follow these steps:

Step 1. Cut yourself a piece of watercolor paper to 4 1/8" x 5 3/8" and a card base 4 1/4" x 11' and fold in half.

Step 2. Die cut a circle from a post it note and add it where you would like your moon to be.

Step 3. Using Distress Oxides Inks in spiced marmalade, black soot, and fossilized amber add ink directly from the pad onto your craft sheet.

Step 4. Then spray the craft mat with water to activate the oxidation.

Step 5: Smoosh the paper directly into the ink puddles on your craft mat. Every time you do this part you will get a different effect. dry with a heat tool between layers.

Step 6 Keep smooshing & drying until your get your desired look.

Step 7. Peel away your mask and color the circle using a yellow marker.
After your background is completed continue the remaining steps.

Step 8. Die cut the tree and using the black soot ink, sponge the edges. Attach to card front using foam tape for added dimension.

Step 9. Lastly die cut the fence and bat and adhere to your card to complete the scene.

Click HERE to see the Technique Friday with Els You tube tutorial that uses this technique.
Elizabeth Craft Supplies:
Halloween Scenery Die Set
Iron Fence
Grey and Black Soft Finish Card stock
Kids Choice Glue

Other Supplies:
Ranger Distress Oxide inks in Spiced Marmalade, Black soot, and Fossilized Amber
Sponge or dauber
Foam Tape
Glue pen
Post it Note
Yellow Marker

Thank you for stopping by today. I hope I have inspired you to create Halloween cards this year. Happy Crafting!
Melanie

Monday, September 25, 2017

LDRS Creative ~ Wild Flowers

Hi Friends,

Today I am sharing a new card I designed using Little Darling Rubber Stamps "Wild Flower" background stamp along with a TLC word die.


For my card I used a yellow and purple scheme which really allow for the card to pop. I have colored the background stamp with Copic markers.


For the "Hello" Sentiment die by TLC I cut it die cut it 3 times in purple and once in yellow. Using a fine tip glue I glued the 3 purple pieces together and then carefully cut out the yellow flowers and glued those on top. I then finished by adding gold brads to the flower centers.

I hope you have enjoyed today's project. I'd love for you to comment and if I have inspired you today sign up for my email to get a notification when a new post goes live. Happy Stamping my friends!
Melanie

Friday, September 22, 2017

Elizabeth Craft Designs Farewell to Summer

Hello friends,

I'm just popping by to say hiya! With all the crazy hurricane weather and so many people being effected I don't know about you but I am ready for hurricane/summer weather to be over with. So here is my farewell card to summer.  


I have used multiple Elizabeth Craft Designs' items to create this fun scalloped card including the following:


I used the Dotted Scallop Rectangles die set to create the shaped card base. It is quite easy to do this by taking a standard 41/4"x51/2" folded card base and sliding the top portion of the die above the fold of the card before running it through your die cut machine. This creates the shaped card base with a flat fold across the top. Next using one layer of card stock cut another piece of card stock and with the entire scalloped die from it. Then simply attach the fully die cut piece to the front of your folded/scalloped card front. This gives you the scalloped edge across the top of the card as well. 

Lastly I did use copic markers for my coloring and foam tape to add some extra dimension. 

Happy crafting my friends & stay safe!

Melanie


Tuesday, September 19, 2017

Elizabeth Craft Designs Spooktacular Challenge

Hi Friends,

Today at Elizabeth Craft Designs we are kicking off our Spooktacular Challenge. Make sure to pop over to the Company Blog to see all the amazing projects by the entire Design Team. You can also enter the challenge for your chance at winning ECD Giftcards!!!!


My card today shows off some of the amazing dies that Elizabeth Craft Designs has just released. Check out all their new released products HERE. I was not much into Halloween cards until I set my eyes on these amazing die sets. The quality and variety cannot be matched anywhere else. I have used The Haunted House  teamed up with Halloween Scenery & Ghosts, . I also used Soft Finish Card Stock in the following colors:


I hope we have inspired you to put a little "Spooky" into your card making. 

For today's challenge Elizabeth Craft Designs are giving away a $20 Gift Card to use on our website to 3 winners.

To enter simply leave a comment on the Elizabeth Craft Designs Challenge post and tell us "What are some of your favorite products you choose when creating spooky scenes for Halloween?" Make sure to enter over on the actual Company Blog to be entered to win!


We will select 3 lucky winners in a random drawing


The winners will be announced on Friday, September 22nd on the Elizabeth Craft Designs blog.

********************
Hugs, Melanie

Friday, September 15, 2017

Magnolia-Licious, Introducing Foamiran Flowers

Hello Friends,

I am excited to share my very first Foamiran card for Magnolia-licious. This new product is so amazing to work with. 


The stamp I have chosen today comes from the BRAND NEW Country Girl Stamp & Die collection. The stamp name is "Tilda with a Flower In Her Pocket" , and I have colored her using Copic Markers.

The fence die I have used is from the Doohickey Business Collection 2017 and is called "Letter Fence"

The papers and floral dies are also carried by Magnolia-licious. The paper is from the Maja Designs Denim & Friends 6x6" paper stack.  


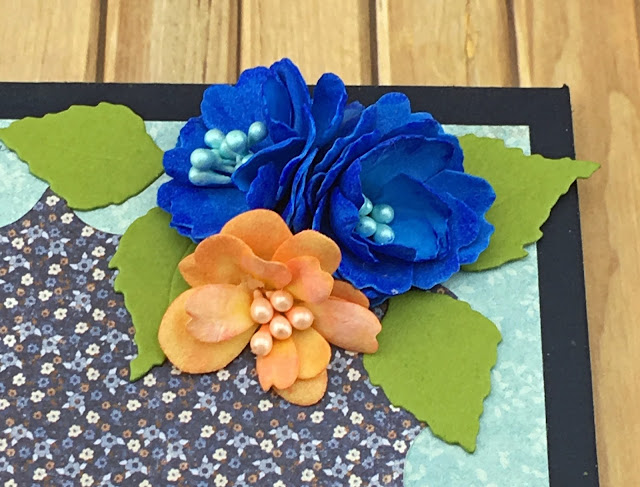
Lastly I have handmade the flowers using a new product called "Foamiran". It is a really light weight foam that you can use with dies or punches to create beautiful shaped flowers. I have used the Whimsy Peony Die Set. and also the Stamen which are also from the Magnolia-licious store. 


Want to give Foamiran a try.... Check out these affordable Starter Kits which include Foamiran, Stamen, AND the Whimsy Dies I have used here in my project!!! 

Have a crafty day! Melanie


Tuesday, September 12, 2017

LDRS Creative Posting Hedgehogs

Hello my friends,

Before I go into the details of my post today I would like to just spend a moment saying a prayer for those dealing with both Hurricane Harvey and now Hurricane Irma. Both of these have been devastating storms and I have many friends dealing with the effects. I just want you all those know you are in my thoughts and prayers. 


Today I am sharing another Hedgehog stamp from LDRS Creative. I just love these Candibean stamps. they have such detail and stamp perfect every single time. 

I am using Candibean's Posting Hedgehogs for today's card. 

 
I have used papers from both the
and

I also used two of our die sets 
and also

 
 Here us a close up of my coloring. I have colored the stamped image using Copic markers in the following colors:

C00, C01, C02, C04
R20, R22
YR12, YR14
E11, E13, E15, E18, E23, E27, E50, E51
YG21, YG23, YG25
B00, B01, B02, B04

Thank you for visiting today. I wish you a safe & blessed day!
Melanie

Monday, September 11, 2017

Elizabeth Craft Designs' "Give A Hoot"

Hi There Friends,

Today I would love to share some fun fall coloring with all of you. I am using the new Krista Schneider "Give A Hoot" stamp and die sets along with numerous other die sets by Elizabeth Craft Designs.


How to create this card:
  1. Stamp owls from the "Give a Hoot" stamp set onto White Soft Finish Cardstock using black ink. Color images using Copic markers. Die cut images using coordinating dies.
  2. Cut a piece of Rust Soft Finish Cardstock down to an A2 size (8 1/2 x 5 1/2) score and fold to create the base card.
  3. Using the "Corners 1" die set cut 4 corner pieces from Dark Goldenrod Soft Finish Cardstock.
  4. Using the "Dotted Scallop Rectangles" die set, cut a rectangle from the ModaScrap "Thinking About ~ Grand Canyon" Patterned Paper.
  5. From White Soft Finish Cardstock cut a rectangle measuring 3 1/2" x 2 1/4". You will use this as your background layer.
  6. Before assembling the card add a border around the outside of the card front using "Peel Off Stickers ~ Lines Dots"
  7. Adhere the corner die cut pieces just inside the sticker border. Than layer the scallop and white background pieces.
  8. Stamp the white background piece with "Thank You" from the "General Sentiments" clear stamps.
  9. Arrange the owls and adhere, for the large owl use some foam tape to give him a little extra dimension.
  10. If you have extra owls colored and die cut add them on the inside .

Check back each day for more inspiration over on the Elizabeth Craft Designs' blog. 
Hugs, Melanie

Wednesday, September 6, 2017

Magnolia-Licious Challenge #13 ~ The Country Girl Collection

Hello sweet friends,

Today I am sharing some exciting news. I am again working for Magnolia-Licious. The Magnolia brand of stamps are the ones I originally fell in love with. They inspired me to purchase my very first Copic marker, which ultimately changed my life.  I am super excited and proud to be promoting these products.

This month's Magnolia-licious Challenge #13's theme is "Anything Goes with an Option of using Pearls". We would love for you to click on over and post your cards. This is a fun way to get crafty together.


Here is my card for the challenge... Can you spot my pearls? They are playing hide and seek. (grin!)

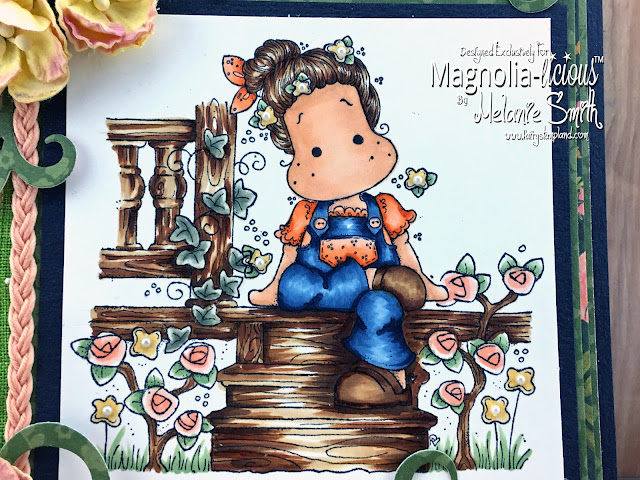
I have colored "Sitting Tilda with Clogs" using my Copic markers. She is perfect for sitting on the "Grandpas Porch" stamp. I stamped Tilda and then using a full stick post-it note I masked her and then stamped the porch stamp over her. These two stamps are from the Country Girl Collection


Looking more closely at my coloring here and now you can spot my mini pearls that I have added to the centers of all the yellow flowers. I loved creating this scene and am really proud of how she turned out.

Make sure to stop by the Magnolia-Licious Store for your stamps and dies. We are now carrying Foamiran, beautiful papers, and other stamp and die brands as well. Leave me a message when you join us in the challenge so I can see your entry. Crafting together is what makes this business so fun. Happy stamping my friends! Melanie