A whimsical place to play, where paper and ink become one.

Thursday, October 28, 2021

Amoungst the Stars!!!

H Friends,

Today I would love to share one of my favorite cards I think I have made lately with TLC Designs products. This is the Gift of Joy and I am sharing her the only way I know how. The moment I saw this stamp I knew exactly what my plan was going to be. I knew her size was perfect and I could just envision her flying amongst the twinkling stars for all of you to see.

Isn't she magical? To make one of your own you simply need to get a few items from the TLC designs store. You will need the following items...

TLC Designs Shopping List:

It is as simple as that!

These measure approx 4x4" so would make cute Christmas ornaments too!!!!


Thank you for stopping by today! If you want to see even more inspiration, please join us over on the TLC Designs Creative and Sharing Facebook Group and check us out our YouTube channel as well. Have an amazing day and thank you for supporting my work! Melanie


Tuesday, October 26, 2021

Heartfelt Creations ~ Home for the Holiday

Welcome back my Friends,

Today I have a fun holiday scene for all of you featuring one of this years new Christmas released sets by Heartfelt Creations. This collection is titled Home for the Holidays and portrays beautiful snowy scenes including a classic stepside truck and a quaint church. Here are photos from my first scene of the year with this new collection.


Heartfelt Creations Supply List:

 
I hope you have enjoyed todays project and it inspires you to create with Heartfelt Creations Products. If you are new to Heartfelt Creations I have a 50% offer for you. Simply follow the below link and spend $40 on your first time order and you will automatically receive $20 off!!!! I in turn will also receive a $20 store credit. Win Win!!! http://fbuy.me/v/melanie_10154
 
Hugs & Crafty Joy!
Melanie


Thursday, October 14, 2021

TLC Designs ~ Angel of Love

Hello and welcome!

Today I am back to share with you my newest creation. This is one of the three newest released angel stamps featured in the store over at TLC Designs. These medium sized characters color up beautifully and are perfectly sized to fit so many of your layering dies perfect for easy holiday card making. Lets take a look at my first card design with the Gift of Love...

This card is A2 in size which is perfect for mailing. I am featuring the Snow Family Fun Digital Paper Pack in my project along with the Oval Lily Frame Die Set to create a focal point for my stamp. The Gift of Love stamp is colored in Copic markers and is surrounded by die cut hearts from the Loving Petals Square Die Set.

The little hearts were so much fun I kept on cutting the scrap paper I was using so I decided to save them for another project. Aren't they adorable??? I think it was a perfect embellishment to complete the Gift of Love project.

Thank you for stopping by today! If you want to see even more inspiration, please join us over on the TLC Designs Creative and Sharing Facebook Group and check us out our YouTube channel as well. Have an amazing day and thank you for supporting my work! Melanie


Tuesday, October 12, 2021

Heartfelt Creations ~ Rustic Sunflower Collection in Vellum Pastels

 Hi Friends,

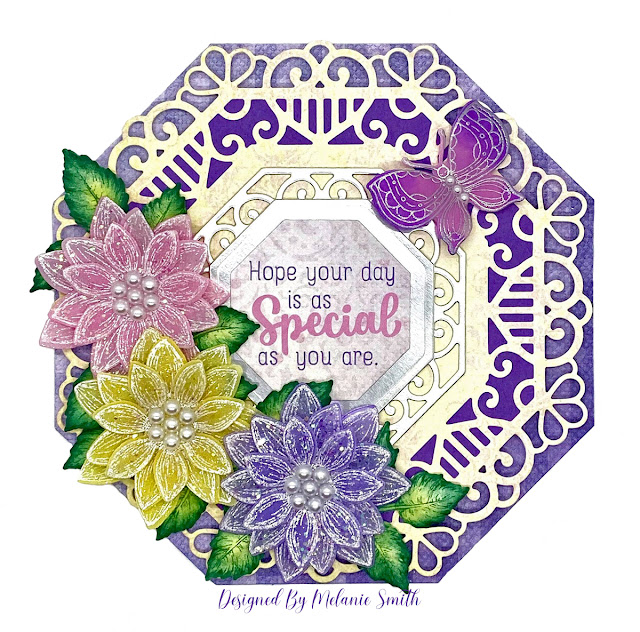
I am excited for today's post. I have worked on this card a little bit at a time over the past couple of weeks as I have been busy with other obligations. Now it is finally ready to share. I have used the Rustic Sunflower collection along with the Centerpiece die collection newly released by Heartfelt Creations. Lets take a look...


I really had a lot of fun with this card. From thinking outside the box when creating these floral using the Rustic Sunflowers, to designing using the new hexagon shaped Centerpiece Dies for the very first time. Every moment was enjoyable. 


For my flowers I stamped my sunflowers using Versa color white ink onto vellum card stock and heat embossed with white embossing powder. Using a sponge I colored the vellum on the reverse sides of the flowers and let dry. I then die cut and hand shaped using my shaping kit. Using dries clear glue and a sponge I added glue to each petal and sprinkled Crystal Clear glitter to achieve a very sparkly effect. For each flower I glued 3 varied sizes from largest to smallest then attached the flat back pearls in the centers.


Heartfelt Creations Supply List:

HCD1-7369 Elegant Hearts Centerpiece Die

HCD1-7367 Simple Centerpiece Die

HCPC-3962  Rustic Sunflower Stamp

HCD1- 7364 Rustic Sunflower Die

HCPC-3953 Small Floral Butterfly Stamps

HCD1-7354 Small Floral Butterfly Dies

HCPC-3835 Leafy Accents Stamps

HCD1-7193 Leafy Accents Die

HCFB1-467 3D Leafy Accent Shaping Mold

Tea Time Collection Paper Pad

Deluxe Flower Shaping Paper

Deluxe Flower Shaping Kit

Silver Lux Paper

Stack & Store Daubers

Papericious Vellium Cardstock

Papericious Crystal Clear

Versa Color Pigment White

Ranger Archival Ink Library Green and Leaf Green

Other Items:

Distress Oxide Inks in Mustard Seed, Squeezed Lemonade, Wilted Violet, Kitsch Flamingo

Flat Back Pearls

White embossing powder

Silver Embossing Powder

Versa Mark Ink

I hope you have enjoyed today's project and it inspires you to create with Heartfelt Creations Products. If you are new to Heartfelt Creations I have a 50% offer for you. Simply follow the below link and spend $40 on your first time order and you will automatically receive $20 off!!!! I in turn will also receive a $20 store credit. Win Win!!! http://fbuy.me/v/melanie_10154 

If at any time you have any crafty questions along your journey please never hesitate to reach out to me. I am always willing to help if I can. Crafty Hugs! Melanie


Thursday, October 7, 2021

Frolicking Little Fellow

Welcome Back Friends,

Today I am back with you sharing a childs card featuring a fun paper pieced background along with a frolicking little fellow from the Tiptoe Fairy Dance Stamp Set by TLC Designs.

For the background I simply used up some precious scraps of some of my favorite TLC papers. (Blooming Medley and Watercolor Naturals) and I cut strips and then adhered them to a piece of white card stock precut using the second largest die from the Daisy Frame die set. Then I simply trimmed off the overlapping edges.

The smaller background diecut that the little boy fairy is on is cut from the Scalloped Rectangle Garden die set along with the tree stump. I used a simple scallop punch from my stash to mask the cloudy background and that gave a nicely coordinated backdrop for my fun dancing fairy friend.

Lastly the sentiment is from the "Sweetie the Dragon" Stamp Set.

Thank you for stopping by today! If you want to see even more inspiration, please join us over on the TLC Designs Creative and Sharing Facebook Group and check us out our YouTube channel as well. Have an amazing day and thank you for supporting my designs! Melanie