A whimsical place to play, where paper and ink become one.

Tuesday, March 28, 2017

LDRS Creative & All Dressed Up "Gal Pals"

Hello My Friends.

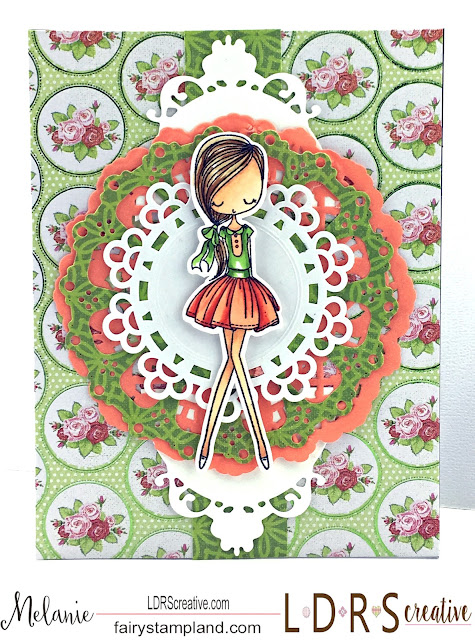
Today I have a card for you that is ready for spring.... I am using LDRS Creative's "Gal Pals" stamp set and a couple different dies by LDRS including "Gilded Die & Embossing Collection"


I have used a clean and simple card and with a few different layers of dies and doilies along with some beautiful designer paper helped jazz up this lady just a bit.


I used Copic markers to color this adorable All Dressed Up stamp set. This set has 3 full stamps in it which can be used together or apart. See the full stamp set HERE.

Thank you for stopping by today. Happy crafting! Melanie

Tuesday, March 21, 2017

Magnolia-Licious Picnic Tilda

Hi Friends,

I am excited to bring you this card today. Unfortunately it is my last card for Magnolia-licious for the time being but they will ALWAYS be my go to place for all things Magnolia.

I am excited about this card for a couple of reasons. First off I don't believe I've ever designed a card with this type of perspective. She is laying looking up to the sky which is something I use to do as a child. I loved laying in my back yard with the pine trees above me swaying in the wind. Also over all I just like the way this card layout came together. I hope you like it as well.


The Picnic Tilda stamp is by Magnolia and is part of the Recipe Card Collection just released in 2017. Make sure to check out the entire release HERE.

Copic Colors used in this project:
Skin: E000, E00, E11, E21, R20 
Hair: E13, E23, E29
Clothing etc: GB10, BG11, BG13, Y13, Y17, Y19

I want to publicly thank Shawn and Candy for their on going support. I am excited what the future has to hold and I will always be a part of their lives if not as a DT member, then as a happy shopper. Thank you both so much! I wish you and Magnolia-Licious the very best. 

Melanie

Elizabeth Crafts Celebrate YOU!

Hi Friends,

Today over at Elizabeth Craft Designs challenge blog we are kicking off a new challenge. The theme is "Fab Florals" so get those markers & pencils ready and lets see some flowers!!!

I have colored a stunning flower which is part of the Spring Blooms Stamp & Die Set by Elizabeth Craft Designs. These florals are just breathtaking. 

The Copic colors I have used are:
YR12, R20, R22, R24, YG11, YG13

 All of the dies I have used are by Elizabeth Craft Designs including Karen Burniston's Labels and Circles, and Els van de Burgt Studio's word dies.

To submit your project into the Floral challenge simply visit the Elizabeth Crafts Designs Challenge Blog.

Friday, March 17, 2017

Elizabeth Crafts "Smile" Card

Hiya,

I hope your having a wonderful day today. I was playing around with my Elizabeth Craft Designs' dies and stickers at my last retreat and this is what I came up with. I just love how the added peel off Glitter Dots fit perfectly inside the Bead Strings 2 Dies.

 The four die sets used are Karen Burniston's Labels & Circles
 and Els van de Burgt Studio's Bead String 2, Stitched Rectangles & "Smile" Dies. 

I absolutely love Elizabeth Craft Designs' dies. if you haven't added any to your collection yet make sure to add them to your list :-)

Here is the link.... Elizabeth Craft Designs Online Store.

Melanie 


Tuesday, March 14, 2017

Elizabeth Craft Designs Tags & More 1 - Lace

Hello Crafty Friends,

Today I am here to share a "die inspired" project for Elizabeth Craft Designs. I decided to have a little fun with the "Tags & More 1 - Lace" die set along with numerous other sets. Lets take a look...


Easy Instructions:

Step 1:

Select papers for both the background as well as for the top lace layer of the tag. The sample shows yellow patterned paper the base and the wooden print paper for the lacy top piece. Using double sided adhesive on the back of your papers before die cutting allows for easy assembly later.

Step 2:

With the same yellow card stock, cut the hole support and corner pieces using the dies in the set. The "Tags & More 1 - Lace" set has a wonderful selection of pieces to strengthen up your tag. In the sample, the floral hole support along with the curve corner dies were used. For reference, the product pieces are shared below these instructions.

Step 3:

Assemble your tag pieces.

Step 4:

Cut a "Leafy Branch 4" die from a piece of green patterned paper.

Step 5:

Die cut two dancing butterflies, one from both the yellow and wood grain paper. Do not use double sided adhesive in this step.  Adhere the bodies of the butterflies down on your tag. The darker butterfly first, to give the butterfly a shadow, followed by the yellow butterfly. This gives an illusion of the butterfly flying.

Step 6:

Add the word "Smile" and glue to the tag.

Step 7:

Finish off your tag with ribbons and trim.

Elizabeth Craft Designs' Supply List:

Tags & More 1 - Lace

Leafy Branch 4

Dancing Butterflies

Double Sided Adhesive

Kids Choice Glue


Thank you for stopping by today. Happy Crafting, Melanie

Monday, March 13, 2017

LDRS Creative All Dressed Up With a Little Bling

Hello There,

I would love to share a super fun card with all of you today using the LDRS Creative All Dressed Up "A Girl Can't Have Too Many" This collection of stamps are so much fun to color. 


I have used a couple of our amazing dies here including Fancy Rectangles & Layers along with the Gilded Oval Die Set. 
I have also used the "Amazing Girls" Sentiment set.
I have colored this amazing stamp with Copic Markers in the following colors


Skin: E000, E00, E11, E21, R20
Hair: YR21, YR24, YR27
Clothing & Misc: YG13, YG17, R22, R35, R37, B26, B37, & B39 

Pop on over to the LDRS Creative Online Store to see their amazing offerings. 
Melanie

Tuesday, March 7, 2017

Magnolia-licious Wine Tasting Tilda

Hello My Friends.

Today I am sharing with you this adorable Magnolia Tilda Stamp called "Wine Tasting Tilda" She is from the new Recipe Card Collection by Magnolia.


I have used the an older Magnolia Stamp of the Grand {Piano because I thought she looked adorable perched up there while sipping her wine. 

Magnolia-licious is your go to store for Magnolia stamps in the US. Simply click HERE to visit the store. 

One last look...


Such a sweet little Tilda and so much fun to color. Until next time... Go get crafty! Melanie

Elizabeth Craft Designs Die Challenge ~ Boxes

Hello Peeps,

Today's Die Challenge over on the Elizabeth Craft Designs' blog has a fun theme. We challenge each of you to create a box of some sort. I have chosen to use the Triangle Treat Box die set. Look at how adorable they open up...


These are cleverly designed with score lines and the open pull already built in. 

To create this gift:

Step 1: Chose 6 coordinating designer papers. Then from each one I cut one box. This way each side of the hexagon gift box has a different pattern. 

Step 2: Using a bone folder crease all score lines.

 
Step 3: Using Elizabeth Craft Designs' 6mm Double Sided Adhesive attach all parts of the box except for one end. (Shown below)

 
Step 4: You can choose to stop here and fill this little box with some candy possibly for an Easter gift OR you can go a little further and make 6 of these boxes to create a Hexagon shaped box as seen below.


Step 5: To add ribbon I used the same double sided adhesive between the boxes and ribbon around the circumference.  This makes it really sturdy. The bow at the top was made separately and added on with the same adhesive.

Happy Creating,
Melanie

Friday, March 3, 2017

Elizabeth Craft Designs's Dreamers Stamp & Die Set

Hi Friends,

I am here today to share a fun birthday card that I created for a close friend of mine. Michelle has an adorable little long haired dachshund named Sadie. She keeps us company when I am over crafting at her house


Directions on how to create this sweet card:

Step 1: Cut Card base from brown card stock to 4 1/4 x 11" then fold in half.

Step 2: From the Dotted Scallop Rectangle die set cut the largest die from a piece of patterned paper.

Step 3: The word "Happy" was cut from a card stock page of words and framed with coordinating brown card stock same as base card.

Step 4: Stamp out the dog, cloud, and bone from the "Dreamers" Stamp set.

Step 5: Color using these Copic markers, E53, E39, E59, RV11, RV14, Black Multi liner.  The liners was to darken the stamp lines after coloring in with such dark colors, see close up photo below. Use coordinating dies to cut the individual stamps. Even the bone has a die!!!


Step 6: Begin to assemble the card using foam tape under the dog and cloud.

Step 7: Using the "General Sentiments" stamp set, ink up half of the stamp as shown below and stamp below "Happy" on the card front.


Elizabeth Craft Designs' Product List:

Dreamers Stamp Set

Dreamers Die Set

Dotted Scallop Rectangle Die Set

General Sentiments Stamp Set

Other Supplies:

Brown card stock

Patterned paper of your choice

Copic Markers

Pink Ink Pad

I hope this birthday card inspires you to grab some stamps to color today. You can see all of Elizabeth Craft Designs' stamp sets in the online store.

Have an awesome day.

Melanie