A whimsical place to play, where paper and ink become one.

Wednesday, February 16, 2022

Exciting Announcement!!!!!

Hi Friends,

I am over excited to announce that Heartfelt Creations has chosen me to move forward to the 2022 Design Team Semifinals. Now you may ask what is the next step? That involves  

YOU!!! 

From now until midnight on February 23rd 2022 the public gets to vote for their 3 favorite designers from the 8 chosen semifinalists. Who do you want on the Design Team? You can visit Heartfelt Creations website for all the details HERE or go directly to   

VOTE HERE

Thank you everyone for your out pouring of support during this exciting journey. I am beyond ready for this adventure and look forward to bringing you all lots of inspiration!

My Favorite Close Up! 

Would you like to follow my work? I would love to have you follow me here on my blog as well as instagram @melaniesmithstamps as well as on YouTube under melaniesmithstamps

Lots of hugs, Melanie

Thursday, February 10, 2022

Heartfelt Creations Design Team Call Part 3 ~ Butterfly In Flight

Hi Friends,

Today's card features the beautiful Floral Butterfly Collection by Heartfelt Creations. I went out on my own and chose the color scheme of blues and yellows with the hint of green. I paired this collection with the Climbing Clematis flowers for a beautiful springtime vibe.

This card measures 5x7" and is so full of vibrant splendor!

Isn't the added butterflies body adorable? I just love how that added touch makes him come to life.


Directions:

Cut card base from Deluxe Flower Shaping Paper 7x10" and score in half.

From the Floral Butterfly Paper cut a piece of 5x7" green paper and lightly ink around the edges with Archival ink in Leaf Green. Attach to card front.

From both Deluxe Flower Making Paper and Luxe Silver Card Stock cut 1 each from the Fancy Flourish Border Die using all 3 dies taped together. Cut a piece of yellow card stock measuring 1/2"x61/2" from the Floral Butterfly Collection paper pad and glue to the back side of the lattice strip section of the white die cut. Glue the Luxe Silver die onto the back making sure to offset it a little so that the silver shows just a little on both the left and right sides. This allows for the center to fit together nicely. Attach to card front using glue dots for added dimension.

Using your Large Floral Butterfly stamp and die set. Cut the base from a light blue piece of paper from the Floral Butterfly paper pack. Stamp the Floral Butterfly stamp in Cobalt Blue Archival ink onto Deluxe Flower Shaping paper and die cut using the coordinating die. Ink around the edge using Night Sky Archival Ink. Die cut both a Luxe Silver and a white detailed butterfly layer from the Large Floral Die set. Lastly stamp just the body of the butterfly onto a scrap piece of the Deluxe Flower Shaping paper and fussy cut out and ink around the edges using Night Sky Archival Ink. Next layer in the following order; Blue base with stamped image fully glued on; White and Silver layers glued together with silver offset behind, glued just in the center. Lastly the body of the butterfly affixed on top. Glue this fully layered butterfly at an angle onto your card front.

Using the Floral Butterfly Accents Stamp and Die set stamp out the floral spray in Olive Archival Ink onto Deluxe Flower Shaping Paper and die cut. Color with light and dark blue Zig Clean Color Real Brush markers. Using the Large and Medium Climbing Clematis Stamps and dies, stamp in Night Sky and Color in Sky Blue Archival Inks, die cut, and shape using the 3D Shaping Mold. For the large clematis use two layers of petals and for the medium just use one. Add Rock Candy Stamens to the centers and finish with Rajni's Chawla's Crystal Clear glitter. Stamp small Climbing Clematis in Sunflower and color using Chrome Yellow Archival inks. Die cut and shape with the 3D shaping Mold. Add Go Mango Prills to the center. Finish them off with a little Art Glitter in Crystal. Lastly the leaves are stamped and colored in Leaf Green Archival ink and also come from the Climbing Clematis Collection.

 To finish your card simply arrange your floral arrangement to the top of your butterfly.

Heartfelt Creations Supply List:

Floral Butterfly Creative Essential Set

Floral Butterfly Accents Cling Stamp Set 

Floral Butterfly Accents Die 

Climbing Clematis Cling Stamp Set

Climbing Clematis Die 

3D Clematis Shaping Mold 

Fancy Flourish Border Die

Deluxe Flower Shaping paper

Luxe Silver Card Stock

Rock Candy Stamens

Go Mango Prills

Art Glitter Crystal

Rajni Chawla's Crystal Clear

Dries Clear Glue

Metal Tip for Adhesive Bottle 

Zig Clean Color  Real Brush Markers

Archival Inks in Sky Blue, Night Sky, Cobalt, Leaf Green, Olive, Chrome Yellow, and Sunflower 

This is the last of my 3 submission projects for the 2022 Heartfelt Creations Design Team application process. I hope you have enjoyed my week of posts as I share my 3 projects. I appreciate you following my journey. I have really enjoyed designing these projects for each of you and I hope they bring you joy and peace. God bless and happy crafting! Melanie


Tuesday, February 8, 2022

Heartfelt Creations Design Team Call Part 2 ~ Ruffled Roses

Okay Everyone.....

Who loves PINK???? Heartfelt Creations does of course :-) So I had to make a PINK card!!!!  I am quite partial to the flowers here because they were more challenging for me but they were so worth the time and energy and I loved learning and expanding my creativity because learning and growing is what crafting is all about. Lets take a look...


 The hand made extra large stamens were made by taking a single wire stamen and adding hot glue then rolling it into prills then hand shaping as the glue dried. I felt like the project needed a little extra PINK POWER so I made them to add an extra punch to the project. 
 
 
This delicate butterfly is simply heat embossed in silver onto Deluxe Flower Shaping Paper then die cut. Then the top die is die cut from Lux Silver Card Stock. I added a few pearls from my stash for some extra glitz. 

Directions:
 
To create your shaped card base you will start with a piece of Deluxe Flower Shaping Paper measuring 11" x 7 1/2" folding it in half to form a 5 1/2" x 7 1/2" card. Use the outer die of the Fancy Classic Rectangle Die set to die cut through both layers, hanging top of die over top fold by about 1/4" to retain fold. Use the same die and cut out the full front from the white card stock. Then another from patterned paper from the Sweet Peony Paper Pad. Glue the white layer and patterned layer onto the card base. 

From the Fancy Classic Rectangle Die set cut a Luxe Silver and white layer from all dies except for the smallest die in the set. After cutting, layer each set, offsetting the silver behind the white as seen in the sample. Glue the largest two layers down with dries clear glue and pop up the center layer using foam dots. From the Intricate Swirl Frames Die set cut a Luxe Silver die and a white die for the sentiment. Stamp a sentiment from the Sweet Lilac Scroll & Notes Stamp Set using Rose Madder Archival Ink and glue both with dries clear glue to the popped up center section of the card front.

The Butterfly is stamped from the Delightful Daffodil & Butterfly Cling Stamp Set using Versa Mark Ink then heat embossed in silver embossing powder. The intricate die is cut from Luxe Silver card stock and is glued atop with added pearls to the center. 

For the leaves the Classic Rose Stamps, and dies, along with the Leafy Accents Stamps and dies and both 3D shaping molds were used. The leaves are stamped and lightly colored in Leaf Green Archival ink. For the flowers the small white flowers were simply made from the smallest Classic Rose Stamp, Die, and 3D Mold stamped in Leaf Green. The pink flowers are from the Small Wild Rose Stamp & Die were used along with Rose Madder Archival Ink and the Deluxe Flower Shaping Kit. Rajni Chawla's Dry Clear Glitter was added using a sponge and dries clear glue and Bridal Bouquet Stamens were used to finish the flowers off. The large pink stamens were handmade using a single wire stamen covered in hot glue and dipped in Coral See Prills then hand shaped. Simply arrange your flowers and leaves to your liking and attach your butterfly to complete your card. 


Heartfelt Creations Supply List:
 

Thank you so much for following along with me this week as I share my three projects I have created for the 2022 Heartfelt Creations Design Team Contest. I will be back on Thursday to share the last in the series. Until then, happy creating! Melanie

Sunday, February 6, 2022

Heartfelt Creations Design Team Call Part 1 ~ A Vellum Garden

Hello Friend,

Today's project is like walking into a one stop flower shop. It displays one of my all time favorite color combinations, purple and green. I also love purple and yellow so decided to mix all three for an extra wow factor.  I absolutely love making vellum flowers and Rajni Chawla's Vellum is by far the best on the market for making these lovelies so lets dive in and look at this Vellum Garden I've created for you today. 

 
I have combined the Regal Lattice Gateway dies and the Teardrop Lattice Gateway dies to create the perfect place for the Climbing Clematis Flowers to roam...wouldn't you agree?


 Both stamens and prills are used for flower centers here in my design for a lovely contrast. 


Directions:
 
Cut card base from Deluxe Flower Shaping Paper 10 1/2" x 7 1/2"" and score in half.

From the Floral Butterfly Paper cut a piece of purple patterned paper 5 1/2" x 7 1/2" and glue to your card base. Cut a second piece of lighter purple paper from the same paper pack at 5 1/4" x 7 1/4" and lightly ink edges using Majestic Violet Archival Ink. Then glue to card base. 
 
From the Regal Lattice Gateway Die cut the largest die twice. Once from Deluxe Flower Shaping Paper and Once from Luxe Silver Card Stock and layer as shown, slightly offset. From the Teardrop Lattice Gateway Die cut the center section 3 times from Deluxe Flower Shaping Paper and once with just the center outline die from Luxe Silver Card Stock and layer as shown with the solid silver card in the background. Glue all layers to the card front. 
 
For the leaves using the Leafy Accents Cling Stamp set stamp in Leaf Green Archival ink, color in Sea Grass Archival Ink, and ink edges after die cutting with Leaf Green Archival ink. Lastly shape with the 3D shaping mold. Dries clear glue was added along with Art Glitter in clear got extra shine. The Vellum Leaves are stamped with from the Summer Wreath Accents Stamp Set on Rajni Chawla's Vellum in Versa Color White ink and heat embossed with white embossing powder. Then colored on the back with Leaf Green Archival ink before die cutting and shaped using the Deluxe Flower Shaping Kit. 

For the Flowers using the Climbing Clematis cling stamp set stamp on Rajni Chawla's Vellum with Versa Color White ink and heat emboss in white embossing powder. Color on the back using Majestic Violet Archival Ink before die cutting and shaping using the coordinating 3D mold. Using a sponge add dries clear glue to each petal and sprinkle with Rajni Chawla's Crystal Clear Glitter. For the centers simply add some hot glue to the center of the flower and sprinkle with Prills. Shake off excess. Lastly the little yellow flowers are made using the Lush Lilacs Cling Stamps and are stamped in Sunflower Archival ink and colored in Chrome Yellow. The center of each flower is then colored before die cutting with a yellow Zig Clean Color Real Brush Marker. After die cutting shape with the 3D shaping mold and add a single stamen to each flower. Arrange the flowers and leaves climbing up your gateway as desired.

For the sentiment a stamp was used from the Sweet Lilacs Scroll & Notes Stamp set and die cut out using the Ticket and Tags die set. 


Heartfelt Creations Supply List: 

Clematis Cling Stamp Set 

Clematis Die Set

3D Clematis Shaping Mold 

Lush Lilac Cling Stamp Set 

Lush Lilac Die 

3D Lush Lilac Shaping Mold 

Sweet Lilac Scroll & Note Cling Stamp Set

Summer Wreath Accents Cling Stamp Set 

Summer Wreath Accents Die

Regal Lattice Gateway Die 

Teardrop Lattice Gateway Die 

Ticket and Tags Die

Floral Butterfly Paper Collection 

Deluxe Flower Shaping Paper 

Rajni Chawla's Vellum 

Versa Color Pigment White Ink Pad

Opaque White Embossing Powder

Archival Inks in Sea Grass, Leaf Green, Chrome Yellow, Sunflower, and Majestic Violet

I'm A-maized Prills

Crystal Ultrafine Transparent Glitter

Rajni Chawla's Crystal Clear Glitter

Dries Clear Glue

Zig Clean Color Real Brush Markers

Deluxe Flower Shaping Kit

This is the first of three submission cards for the 2022 Heartfelt Creations Design Team application process. The submission date was February 4th and the semifinalists will be chosen on February16th 2022. This week I will be showcasing all 3 cards that I have submitted to Heartfelt Creations. No matter how far I get in this journey I have had a glorious time designing these pieces to share with all of you and I hope you will follow my journey into the future to see where it takes me. Happy creating my friends! Much love, Melanie

Wednesday, February 2, 2022

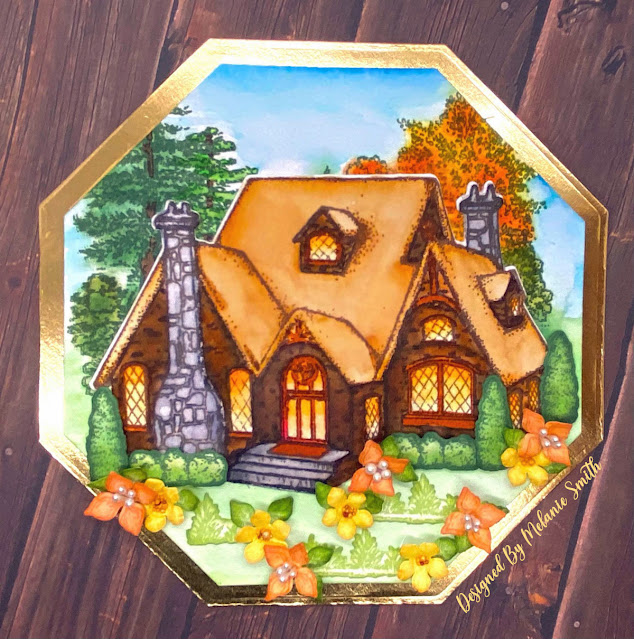
Heartfelt Creations ~ Countryside Cottage Scene

Hi Friends!

Today I am bringing you my first ever full water colored scene using Zig Clean Real Color Brush Markers. I am usually a Copic Colorist but I decided to give water coloring a real try and wow is it a learning experience. 

This scene begins with stamping the Heartfelt Creations retired stamp called "Haven of Daydreams" from the Cherry Blossoms Collection onto watercolor paper and die cutting it with the Simple Center Piece hexagon shaped dies. Then I stamped Country Cottage Stamp onto a separate piece of water color paper and colored both of these images with the Zig Watercolor markers.


While these were drying I created my card base also from the Simple Center Piece Hexagon dies and once dry I die cut the house using the coordinating Country Cottage die set from Heartfelt Creations. 

For the bushes and grass I stamped and colored these using archival ink along with my daubers and die cut them with my coordinating dies. These were accessory stamps and dies from the Countryside Cottage Collection. The bushes were attached with foam to add dimension and the grass was attached with dries clear glue as I knew the flowers would give a nice dimension there. 

Lastly I made two styles of flowers. The orange flowers were made from the Heartfelt Creation's Lush Lilacs Stamp, Die, and Mold and I am not 100% sure which flower I used for the small yellow flower but I did add Prills to the center of them rather than stamens like in the lilacs.

IF I am going to be 100% honest with all of you, I wasn't sure I should share this card with you when I made it last fall.  This was my very first attempt at a full colored scene with water colors and I do not feel confident with my efforts. But we all have to take a leap of faith and have a starting point right? Crafting is a learning journey and learning and growing as an artist is what makes this more than just paper. It makes it ART! 

Love, Melanie