A whimsical place to play, where paper and ink become one.

Wednesday, March 22, 2023

Hearetfelt Creations ~ Slim Diamond Floral

 Hi Friends,

Today I have a fun fully loaded slimline for all of you. I have used the Diamond Die sets by Heartfelt Creations to create this fur backdrop for these florals made from the Sweet Magnolia Blooms. Lets take a look....


Directions:

Cut a piece of white card stock to 9 1/8” x 7” and score in half at 3 1/2”.  Using the HCD3-7431 Slim Eyelet Rectangle Dies and Luxe Gold Card Stock cut one piece from the largest die and one from the second largest die from the set. Now from the HCD3-7432 Slim Basic Rectangle Dies cut the cut the largest and 3rd largest from the HCDP1-2149 Feathery Florals Paper Collection Sheet 3B (large) and 11B (Smaller). Glue these patterned papers to the Luxe Gold cut in the previous step. Layer these as shown using 3D foam tape to the card base. Using the HCD3-7449 Slim Eyelet Heart Rectangle Die Set cut the sentiment dies from both white and Luxe Gold Card stock. Glue these layers slightly off set so that the gold peeks out from behind the white top layer. Glue these along the bottom of the peach colored paper on the card front. Using the HCD1-7228 Lacey Diamonds Die Set use the two smallest dies together and cut two times out of white card stock. This will cut the inner portion of both diamonds. Using the 2nd largest die from the HCD1-7226 Diamond Basic Die Set, and the largest and 3rd largest dies from the HCD1-7227 Eyelet Diamond Die Set cut the outside portions of the diamond pieces. Before assembling as shown, apply dries clears glue with a hydra sponge to each of the die cuts and sprinkle with Art Glitter in Crystal. Once dry layer the diamonds, using both Dries Clear adhesive and Adhesive Foam Strips to achieve some depth and dimensions between layers. Attach the diamonds to the card base by over lapping them slightly. TOP TIP: Use 3D Adhesive and Double Dots Foam Circles to help with the multiple heights.

Using HCPC-3948 Sweet Magnolia Blooms Cling Stamp Set Stamp the medium flower 2x and the small flower 3x onto Deluxe Flower Shaping Paper using Carnation Archival Ink. Using HCD1-7453 Feathery Florals Cling Stamp Set Stamp the large floral spray 2x and then small floral spray 1x onto the same white paper with Olive Archival Ink. Now Using HCDA2-450 Stack and Store Daubers color the flowers using Pink Peony and Carnation Archival Inks. Then color the Floral Sprays using the Leaf Green and Olive Archival Inks. Then cut out with the coordinating dies. Before running the Sweet Magnolia flowers through the coordinating 3D Mold, ink the edges of the flower petals with Geranium Archival Ink. Once shaped with the shaping mold, use the Deluxe Flower Shaping Kit to press the centers of each flower and to pierce a hole into the center of each flower. Now add some Bright Pearl Stamens - Small into the center of each flower and secure with hot glue. Lastly, add Rajni’s Crystal Clear Glitter to the flower tips using a Hydra Sponge and Dries Clear Adhesive.

To complete the card simply arrange the floral sprays onto the card and adorn with Sweet Magnolia Flowers. Adhere with a glue gun for a secure placement. Lastly, add pearls with a glue gun strategically placed around the card and add a few sequins on the flower petals using Dries Clear Adhesive. Finish the inside of the card as desired.

I hope you enjoyed that as much as I enjoyed creating it for each of you! Check out my personal project in the Heartfelt Creations Gallery to find out what products I used for this project.

Also, please be sure to visit the Heartfelt Creations Blog to see all of the gorgeous projects created by the other amazing design team members.


Love, Melanie


Wednesday, March 15, 2023

Heartfelt Creations ~ Flowers For Ma Ma

Hi Friends,

Today I have a special bouquet of flowers I created with my mom in mind. She loved my cards and would of loved to have seen me making flowers with Heartfelt Creations. So I made these in memory of her. I have mixed beautiful Asters with Clematis and added them to a bed of foilage created by the new Feathery Floral Collection. The silver embossed feathers in the background are also from the collection. They were such fun to create on vellum for a different kind of look. 


Directions:

Cut a piece of white card stock to 7 1/2” x 11” and score in half at 5 1/2”.  Cut a piece from sheet 8B of the HCDP1-2149 Feathery Florals Paper Collection measuring 5 1/2” x 7 1/2” and adhere to the card front. Cut a piece of Luxe Silver Card Stock to 5 1/8” x 7 1/8” and a piece from sheet 6B measuring 5” x 7” and glue these two layers onto the card front. From sheet 4A cut a floral strip that measures 5” x 2”. Then with HCD2-7425 Filigree Border & Accents Die Set use the thin straight scalloped border and cut four pieces, 2x from white card stock and 2x from Luxe Silver Card Stock. Layer these together as shown and then trim them to match the 5” length of the floral strip cut in the previous step. Glue these at the top and the bottom and adhere to the card base approx. 7/8” from the bottom of the card.

Stamp the large vase from the HCPC-3982 Classic Floral Vase Cling Stamp Set with Majestic Violet Archival ink onto Sheet 12B from the Feathery Floral Paper Collection. Die cut with the coordinating die. Using HCDA2-450 Stack and Store Daubers ink the edges with Wilted Violet Ranger Oxide Ink. Now using the decorative die from the same set, cut one from white card stock and one from Luxe Silver Card Stock and layer these together slightly off set so that the silver peeks out from behind the white. Glue these to the front of the vase using Dries Clear Adhesive with the Metal Tip Applicator. Then attach the vase to the card with some 3D glue dots.

Stamp the large flower 3x and the medium flower 1x from the HCPC-3954 Clematis Cling Stamp Set onto HCPP1-475 Deluxe Flower Shaping Paper using Majestic Violet Ink. Color images lightly with Majestic Violet, then after die cutting with the coordinating die, ink the edges with Wilted Violet Oxide Ink. Shape flowers using the Grooved Golf Tools. To finish flowers,  add Rajni Chawla’s Crystal Clear Glitter to the petals using a Hydra Sponge with Dries Clear Adhesive. Then add Heart of Gold Prills to the center of each flower. Next stamp the larger flower 3x and the smaller flower stamp 3x from the HCPC-3887 Wild Aster Cling Stamp Set using Periwinkle Archival ink. Color images lightly with Periwinkle ink then after die cut with the coordinating die, darken flower tips with Periwinkle Ink. Finish the flowers as above by adding glitter then add both Lemon Chiffon and Ribbit Prills to the center of each flower.

Stamp the large floral 1x from the HCPC-31017 Feathery Florals Cling Stamp Set onto Deluxe Flower shaping paper with Olive Archival Ink and color just the leafy areas with Leaf Green and Olive inks. (Just the swirls will be added to the card) Stamp the HCPC-3835 Leafy Accents Cling Stamp Set 1x using the same green stamp combination as above. Die cut with coordinating dies. Ink the edges of the Leafy Accents leaf with Olive using the Stack and Store Daubers before shaping them in the coordinating 3D Shaping Mold. Now stamp the HCPC-31019 Floral Feathers Cling Stamp Set with Versamark ink onto Vellum paper making sure to treat the paper first with an anti static tool before stamping. Heat emboss using silver embossing powder. Die cut with the coordinating die. Lastly, stamp the small butterfly from the HCPC-31018 Petite Feathery Florals Cling Stamp Set onto vellum same as above only using white embossing powder, then cut out using the coordinating dies.

For the sentiment simply cut a sentiment strip from the paper pad and cut a piece of Luxe Silver Card Stock to nicely border it. Add the white butterfly to the front of the sentiment. Attach the completed sentiment to the vase with 3D foam dots. Now simply arrange the feathers, and leaves first to create a nice base for the flowers. Then glue your flowers with a glue gun for a secure hold. TOP TIP: Take a photo with a phone when arranging the flowers to help decide on the placement. It helps to look at the photo when deciding how to balance a large arrangement like this. Finish the inside of the card as desired.


I hope you enjoyed that as much as I enjoyed creating it for each of you! Check out my personal project in the Heartfelt Creations Gallery to find out what products I used for this project.

Also, please be sure to visit the Heartfelt Creations Blog to see all of the gorgeous projects created by the other amazing design team members.


Love, Melanie


Wednesday, March 8, 2023

Heartfelt Creations ~ Feathering Floral Thoughts

Hi Friends,

Welcome back to RELEASE DAY with Heartfelt Creations. Today we have a really cool collection to share with all of you titled the "Feathery Florals Collection". This collection is perfect for simple cards or to help you design your more extravagant cards buy giving you the foliage bases and fillers needed to make a gorgeous floral design on your cards. For my first design I have chosen to keep it more simple and I stamped out the main images and simply colored them and added them to my card base for an easy yet elegant design.


Directions:


Cut a piece of white cardstock to 6” x 12 and score in half at 6” to form a 6x6” card base.  From HCDP1-2149 Feathery Florals Paper Collection cut a pieces measuring 6 x 6” from sheet 7B. Ink the edges using the HCDA2-450 Stack and Store Daubers in Olive Archival ink. Next from sheet 1A cut out the 6x6” panel in the bottom right hand corner of the page. Using a paper trimer, trim off the outside border of the panel leaving the first thin green line as the outer edge of the frame. Now using HCD1-7155 Circle Basic Large Die Set cut the circle out from the center of the panel. Using Luxe Silver Cardstock cut a piece 5 5/8” square as well as a scalloped circle from the HCD1-7154 Eyelet Circle & Basics Small Die Set. Next glue the green cardstock to the card base. Then adhere the panel to the 5 5/8” square of Lux Silver Cardstock and adhere to the card base with 3D foam tape. Next glue the die cut circle from the panel to the scallop silver circle and attach it to the card base using 3D foam tape. These layers give the card lovely added dimension and makes it look like you didn’t use a panel at all.

Stamp the florals from the HCPC-31017 Feathery Florals Cling Stamp Set and the sentiment from the HCPC-31004 Elegant Rose Sentiments Cling Stamp Set onto Copic X-press It paper using Memento Tuxedo Black Ink. Color using various pinks and greens Copic Markers to coordinate with the paper collection. Die cut using coordinating dies. Adhere to the card with foam dots in both single and double layers. Add decorative rhinestones using Dries Clear Adhesive along with the Metal Tip Applicator for some extra shine. Finish the inside as desired.

I hope you enjoyed that as much as I enjoyed creating it for each of you! Check out my personal project in the Heartfelt Creations Gallery to find out what products I used for this project.

Also, please be sure to visit the Heartfelt Creations Blog to see all of the gorgeous projects created by the other amazing design team members.


Love, Melanie


Wednesday, March 1, 2023

Heartfelt Creations ~ Peacock Appreciation

Hi Friends,


Directions:

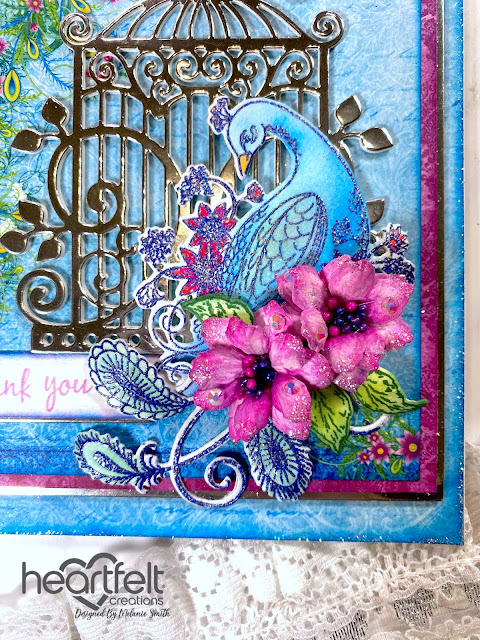
Cut a piece of white cardstock to 7”  x 10” and score in half at 5”.  Cut a piece from sheet 6A of the HCDP1-2148 Ornate Peacock Paper Collection measuring 5” x 7” and ink the edges using HCDA2-450 Stack and Store Daubers with Manganese Blue Archival ink. Using a Hydra Sponge and Dries Clear Adhesive sit the edges down into the sponge with glue in it and then sprinkle with glitter. Once dry, glue to the card front. Now cut a piece of Luxe Silver Card Stock to 4 3/8” x 6 1/4”. From the paper pad, cut Sheet 9B to 6 1/8” x 4 1/4” and sheet 10A to 4” x 5 7/8. Layer these 3 pieces together with Dries Clear Adhesive as shown and add to the card front using 3D foam tape. Using the birdcage die from the HCD1-7172 Sweet Lilac Scroll & Birdcage Die Set cut 3x in the HCPP1-475 Deluxe Flower Shaping Paper and 1x in the Luxe Silver Card Stock paper and glue these all together with the silver on top. Adhere this to the card front.

Using the HCD1-7451 Peacock Posies Cling Stamp Set, stamp in Versamark Ink onto Deluxe Flower Shaping Paper. Heat emboss using blue heat embossing powder. Color using both Zig Color Clean Markers as well as HCDA2-450 Stack and Store Daubers in Forget Me Not, Manganese Blue, and Viridian Archival inks. Add a little dimension to the peacock by using the Deluxe Flower Shaping Kit and shaping from the reverse side. Now stamp the flower from the HCPC-3976 Curvy Floral Frame Cling Stamp Set onto Deluxe Flower Shaping Paper 4x with Magenta Hue Archival Ink. Color using a variety of pinks including Magenta Hue, Pink Peony, and Vibrant Fuchsia. Die cut with coordinating dies. Shape using Grooved Golf Tools. Layer and add a mixture of Bright Pearl Stamens - Small to the centers. Add glitter and rhinestones for a finishing effect. Using the HCPC-3912 Cascading Wisteria Cling Stamp Set, stamp one leaf branch with English Ivy Archival ink and color with Leaf Green Archival Ink. Die cut with coordinating die then shape using the Deluxe Flower Shaping Kit. Use small pieces from this branch as the small foilage for the flowers.

Using the HCD1-7204 Arrows & Banners Die Set along with the HCDC-3846 Thank You Sentiments Cling Stamp Set, stamp out the “thank you” sentiment with Magenta Hue ink. Die cut it using the banner dies as well as a scrap of Luxe Silver Card Stock. Ink the edges of the white banner with both Magenta Hue and Manganese Blue inks for a two tone look. Then layer these flags and adhere a crystal using Dries Clear Adhesive. 

To complete the card simply arrange the peacock, flowers, and leaves as desired. Once everything is arranged glue in place making sure your sentiment shows. Add a few extra crystals on the background to finish the project. Complete the inside as desired.

I hope you enjoyed that as much as I enjoyed creating it for each of you! Check out my personal project in the Heartfelt Creations Gallery to find out what products I used for this project.

Also, please be sure to visit the Heartfelt Creations Blog to see all of the gorgeous projects created by the other amazing design team members.


Love, Melanie