A whimsical place to play, where paper and ink become one.

Friday, May 29, 2015

Focal Friday ~ Clearwater Marine Aquarium

Hi Friends,

Hubby and I are back from our vacation to Florida. We celebrated our 22nd Wedding Anniversary while away and our main event while there was visiting the Clearwater Marine Aquarium in Clearwater Florida. This is the home of the dolphins "Winter and Hope" from the movies Dolphin Tale 1 and 2. It was a very memorable visit and I would suggest it to all animal lovers.

For this week's Friday Focal I am using the amazing photos from that day as my focus for my card.


The very week we were in Clearwater, the Kit and Clowder Coloring Community I am involved with was hosting a fundrasier for the aquarium. I was able to pick up some limited editon digital images and all proceeds are going directly to the on going efforts of the "Rescue, Rehab, Release" program. Below is the image donated by Tiddly Inks Stamp Company and I really had a fun creating a ocean scene with it.


Here is a close up of the coloring of the image. The Copic Markers used are listed below.


Copic Colors: 
B01, B04, BG000, BG01. BG04, BG11, BG13, BG49, BG72
E000, E00, E11, E21, E31,E33,E35
C1, C3


If you would like to support our fundraising efforts head on over to get your Craft for Clearwater digi stamps! You can grab them over at www.youcaring.com/clearwater 

Thank you for stopping by this week. I will be back with a new project on Monday. Have a wonderful weekend!

Friday, May 22, 2015

Focal Fridays ~ The Paper Nest Dolls, Little Birdie Ellie


Hi Crafty Friends,

Today I have a really sweet card. While out house hunting with my mother we have ran across some beautiful flowers. I have snapped photos with my phone every chance I have gotten. I have always loved the purple and yellow combo but when adding the green it really has given it a fresh look. 


I am using the adorable Paper Nest Doll's stamp called "Little Birdie Ellie Isn't she just precious?


I adore using Wild Orchid Craft Flowers and they worked perfectly for this theme. I had a lot of fun with the birdie. My mother was with me in my craft room while coloring and she suggested to color her like a Robin so here is my attempt with it. How did I do?


I have used some fun dies with this card as well as Copic Markers.


Here is a close up of my coloring.


I even finished the inside to match.


Thank you for stopping by today. I'd love for you to join my Facebook Page to share your projects using this week's Focal Friday.

Friday, May 15, 2015

Focal Fridays ~ 3 Fun Hexagon Punch Tricks Plus a Surprise!

Hi Friday Followers,

SURPRISE..... Meet My Kitty!!!!

Today I have a special treat I am sharing with all of you. This is Mr. Tuxedo, Or "Tux" for short. He showed up in my cul-de-sac last fall and my dear husband gave him a can of tuna.... Yep you guessed it....He adopted us. With the cold of winter heading our way we decided to give him a forever home. Here he is in all his glory!


As you can see Tux helps me all over the house. In The top left photo he was ready for his dinner meal. His vet put him on a diet when we took him in to be treated for his ear hematoma.  So now each morning and evening he stands next to his serving cup on the counter of our bathroom and speaks to us until we put his serving in the bowl. He has such a personality! In the top right and bottom left photos he was helping me process my AVON order. Finally in the bottom right photo he is perched high in my craft room observing my creative side. 


Here is today's card using Tux as my inspiration. I want to thank Becky Bakely for sharing her Stampin' Up! Back to Black Designer Paper with me. It is a wonderful pack and includes 12 different B&W patterns. I wanted to show off as many of them as I could so I used the Hexagon Hives Thinlit Die along with the Hexagon Embossing Folder and Hexagon Punch to create this card. Check the photos below for some neat techniques for using YOUR Hexagon Punch from Stampin' Up! or Order it by clicking HERE!


Use the punch to make a banner


 Or Arrows


  Or even a sweet banner for your sentiment

I love punches because they are so versatile. I am always looking for new fun ways of using them. Check out the world of punches on my website by clicking HERE! 


Built for Free Using: My Stampin Blog

Wednesday, May 13, 2015

9 Simple Steps to Coloring Blond Hair With Copics.

Welcome Paper Nest Friends,

My husband and I are celebrating our 22nd wedding anniversary next week and headed to Florida for a much needed vacation. Between my mother's 8 week Rehab from knee replacement, and Randy and I purchasing a new home we need a week away to just RELAX. So my project today has a bright and cheerful summery feel to it. I have used one of the newly released Paper Nest Dolls stamps called "Pinwheel Ellie"


Here is a Copic Color Progression Tutorial using E51 for the highlights, E53 for mid-tones, and E57 for cast shadows. In the first photo I am simply mapping out where I envision my lightest shades will land. This is where the sun is hitting the hair. (In this stage think of the hair as mountains and valleys. Your mountain areas will get hit by the sunlight and the valleys will be left in the shadows.) After the highlights are added I then begin with my darkest shadow and work from darkest to light meeting where my highlights were placed in the first photo. After laying all three colors down I like to go back with my darkest color again to deepen up those beautiful valleys in the hair. 


Below is a close up of my coloring of the entire image. I have used the following Copic Markers:

Skin: E000, E00, E04, E11, E21, and R20
Hair: E51, E53, & E57
Clothes: BG01, BG05, Y15,Y18,Y19,YR07, YR09, R24, & R29


Here is a close up of the flowers - These are such fun summer colors!!!


 Thank you for stopping by my website today. Leave a comment, I'd really love to hear from YOU!

Melanie


Friday, May 8, 2015

Focal Friday's ~ My Paper Pumpkin ~ "Step It Up"

Welcome back to my Focal Friday Series. Blues and Yellows have always been a favorite color combination ever since I fell into quilting years ago. The colors just pop when put together. I hope you will find this focal interesting and that it inspires you to create something this week.


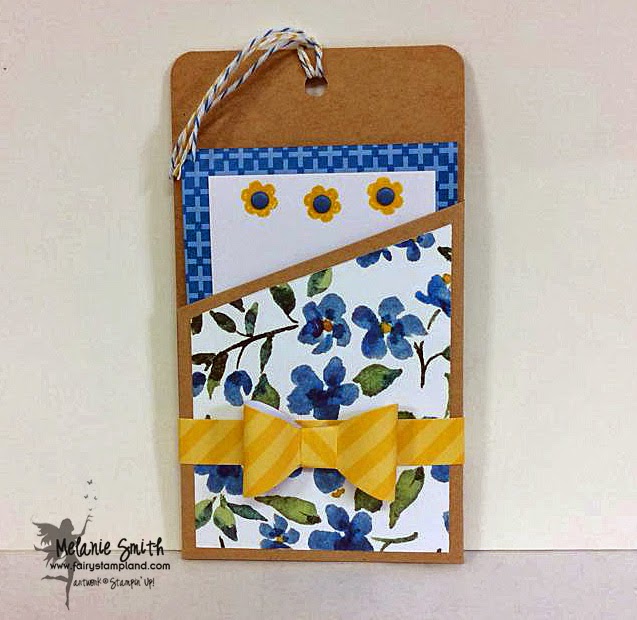
Today I am sharing My Paper Pumpkin crafting kit of the month from Stampin' Up! This was my very first one and I really had fun opening my happy mail. This month's kit features every supply you need to create a fun set of little pocket card/tags.


Each kit includes ink, stamps, and all paper supplies to make 6+ projects. It is well worth the subscription price of only $19.99 a month!!!


The above two photos show you the basic design included in the kit. There are lots of exclusive photo polymer sentiment stamps so you can actually make the inside phrase say numerous things. I just think these little paper bows are just adorable. The kit even included two colors of twine for that little bit of coordinating detail.

 
In this "Stepped Up" version of the card/tag I simply added a few matching candy dots to the stamped flowers and a coordinating piece of floral designer series paper from the Painted Blooms Collection. This collection is a limited set of DSP which is available ONLY until June 2nd from our Occasions Catalog. Here is a closer photo of this amazing paper. It has to be my all time favorite from Stampin' Up!


On a FUNNY note... did not realize I used the "Love you DUDE" with the floral "Girly" paper....Too funny! Sometimes you just have to roll with it ya know?


Just one last matching item totally not related to the Paper Pumpkin Kit but since the colors matched I thought I would share. THANKS for stopping by and visiting again :-) If you would love to receive a monthly dose of surprise happy mail from Stampin' Up! simply Click HERE! to sign up :-)


Friday, May 1, 2015

Focal Friday's ~ House Hunting!!!

Hi Friends,

A lot has been going on in my personal life this week so I apoligize for not having a project for you today. I do have some photos to show and I'd like to share my week with all of you.

My family is currently looking at moving so all this past week we have been house hunting. We have always lived with the belief that everything happens for a reason, even if, at the time you do not realize it. Well after 3 days of looking at homes we found the perfect one. As of this morning we are under contract. Here is our FOREVER home!


This Ranch style home has 3 bedrooms 2.5 bath on the main floor and two rooms upstairs with a full bath. A couple weeks ago my husband and I were talking about planting a Japanese Maple tree in our new yard. Low and behold this house already has one near the front door.


While showing the house to our son this afternoon we ran across a couple really neat things... Above is a beautiful dragonfly decoration. Everyone knows how much I love "Winged Things".  I just fell in love with it so had to grab a photo really quick.
 

Above the immediate landscaped backyard there is a wooded area that has a really neat trail through it. My son said it felt like he was camping. I can just see him putting up a tent back there. As we explored the property we ran across this Bowling Ball Garden. We said this had to be a sign, because my husband and both of our son's love to bowl. :-)

I will be back next Friday with a new Focal Friday post. I have it completed I just need to edit it so it is ready to share with you. I'd love to hear from all of you.... Have you ever seen signs that the decision you were making is the right one??? Feel free to post a message below to tell me all about it. 

Melanie