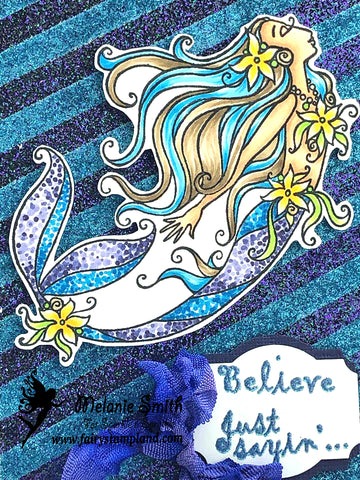
A whimsical place to play, where paper and ink become one.

Wednesday, January 23, 2019

LDRS Creative Hanging Out ~ A Shaped Card

Hi Friends,

I have a fun shaped card to share with you. My favorite craft supply in my craftroom are dies and my big shot. I use them in almost every project. This die set is a crafty girls dream come true. Being able to make a shaped card and all the embellishment dies the set comes with. It is an amazing set to work with.


LDRS Creative Products Used:

For this card I colored the "Hanging Out" Stamp with alcohol markers. This stamp is super fun to color with any medium. Here is a close up of my coloring.


I choose to use the "Build a card" die set because I absolutely love creating scenes with my cards and these critters were perfect for this.


Make sure to check out the stores MARKED DOWN items... there are some amazing sales going on over at www.LDRScreative.com


Tuesday, January 22, 2019

LDRS Creative ~ Cloud No. 9 Card

Welcome Back Everyone,
Today I have a fun card to share with you. I have used the  'Cloud No. 9" stamp set and have created a cheerful card using  LDRS Creative products. 


LDRS Supplies Used:
 
For this card I played around with the cloud stamp (see below) I simply stamped it numerous times, fussy cut numerous sections, and used foam tape to pop up pieces to really give a nice dimension. 


You can see some of the dimension on this angled shot of the card. It was fun paper piecing the clouds all around her.
The paper pack really was fun to play with and currently is ON SALE. Check out all of our awesome paper stacks HERE!
One last look... Notice the dies??? The background eyelet die and the tasg dfie are both part of the Eyelet Lace die set and are the perfect size for stamped characters. 


I hope you have enjoyed today's project. My goal is to bring a smile to others and to inspire YOU to reach for your crafty supplies and make something :-) 

Hugs! Melanie

Saturday, January 19, 2019

Sparkle N Sprinkle Serena Mermaid ~ Glitter Background Tutorial


Hi Friends,

Welcome back to Fairy Stamp Land... I have a really fun technique to share with you today using Sparkle N Sprinkle's Serena Mermaid Stamp Set. As soon as I saw her in the online store I immediately needed to color her so she was one of the first stamps I purchased. Here is a close up of my coloring......


Now lets show you how I created this glittery background...it actually is pretty simple and gives your project a "WOW" factor.

Step 1: Place your first piece of 1/4" Tear-ific Tape at a diagonal in the center of your card front. This will give your a starting point.


Step 2: Turn your paper so that your first piece of tape runs along a straight line (I have used my self healing mat for my straight line.) Then begin placing extra strips of 1/4" Tear-ific tape until you have the entire piece of card stock covered.


Below it shows you the entire card covered in tape.


Step 3: Using a piercing tool carefully lift the card w/ tape, off the surface it is stuck to.


Carefully lift until it all releases from your mat.


Step 4: Turn your piece over and carefully trim the excess tape using your Tim Holtz scissors.


Step 5: Now the fun begins.... Remove the release paper from every other piece of 1/4" Tear-ific Tape and burnish in the first color of glitter. Do this over a coffee filter so all the excess can easily be funneled back into your jar.


Step 6: Remove the rest of the release paper and do the same thing with the darker color of glitter. The result is truly magical!


Here are some close up photos of my work. To see more click HERE to go visit my personal blog.


SAVE 10% NOW, Simply use the link below.

Products Used:


Hugs, Melanie

Saturday, January 12, 2019

Copic Tutorial Featuring Sparkle N Sprinkle's Rose Heart Stamp Set

Welcome My Friends, 


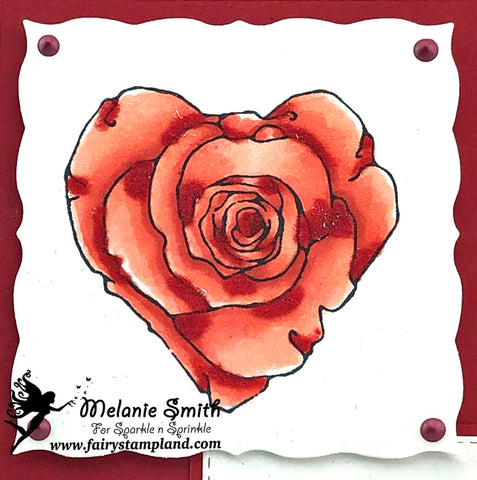
I am sharing with you a brand new stamp set by Sparkle N Sprinkle. They have a beautiful collection of stamps and this set is no exception. It is called "Rose Heart" and it is simply stunning.

Sparkle N Sprinkle Supply List:

This set is actually designed to do multi step stamping but I decided to use my alcohol markers with it instead. See tutorial below.
Step 1: Using your lightest marker think about where your going to want your shadows and lay down the maker in those areas sort of like a road map. In this case I have colored in where the flower petals are folding inward away from the sun.
Step 2: Using your mid tone marker begin in the shadows but do not pull the color all the way out to where the lightest shadow is.
Step 3: With your darkest marker color in just the creases. The areas farthest from the sun. Petals tend to be one in front of the other so a top petal will cast a shadow onto a petal underneath.
Step 4: Now we will repeat reversing the colors working dark to light. Since we just added the darkest we will use the midtone in this step. You will lightly extend the darkest shadow towards the light. My best descriptive way to explain this is to pull the dark into the middle. This allows the colors to blend.
Step 5: Now we do the same thing using the lightest color. Drag the medium color towards the lightest. I am purposely leaving the tips of the flower white.
Step 6: Sometimes when you go from dark to light you lost some of the wonderful contrast created by your darkest marker so in this step I have gone back into the shadows using the darkest marker.
Step 7: Here I just softened the lines left from the darkest marker. Just barely blending it at the tips where the two colors meet.

Lastly as you can see below I did use the lightest marker and I pulled the lightest color out just a bit closer to the edge but I still left a little white space. This is the reflection of the light and is the first area that the sunlight will hit.


Above I have used the brushable glue and added Berry Red Flocking into the very deepest ares of the flower. It gives it a nice softly raised feel to the rose and will awe your recipient.


For a finishing touch I used the sentiment from the Rose Heart stamp set and heat embossed it using the Black Detail Embossing Powder. I added Nuvo Crystal Drops in Autumn Red. I simply colored in the heart with a marker as well.


If you would like to grab some of these awesome products at a discount simply click on my badge below and save 10% using coupon code MelanieDT10 at check out.
https://sparklensprinkle.net/?rfsn=2090589.bd2ea8
Have an awesome day everyone ~ Melanie

Saturday, January 5, 2019

Early Spring Nest ~ Featuring Nuvo Embellishment Mousse

 Welcome back friends,

With a new year comes a new adventure. I am teaming up with Sparkle N Sprinkle in 2019 and I will be bringing you a minimum of 3 fun filled projects using their array of amazing products. They have a new release each month on the 5th of the month and my posts will be each Saturday. This stamp set here is called Early Spring Nest, which was released today. With the holidays behind us I jumped at the chance to work with a spring stamp set.

Sparkle N Sprinkle Products Used:
 
 
To create this shimmer background I have used a masking technique. I stamped the image twice and fussy cut the first one so that I could use it to cover the image I would be using. Then using a blender tool I applied the mousse to the background. See below...


Next I decided that I wanted to match the background under the image to Nuvo Mousse so I choose a Copic marker in a comparable color. E81 was used.


 Image was colored using the following Copic Colors:

B00,B01,B02
E21, E23, E23, E25, E27, E29, E81,
Y13, Y15, Y17,
R30, R32, R35,
YG61, YG63, YG67
 
 
Above I have double embossed the sentiment also from the Early Spring Nest stamp set. I used a positioner tool to re stamp the sentiment so I could add the extra powder.
 
 
For the glittered embellishments (Vine and Butterflies) I die cut them from
Sparkle n Sprinkle's wonderful sticker paper and used glitter to coat one side before adhering to my project.


Above is one last photo showing extra details including the Nuvo drops that I added to the flowers and background. Would you like to receive a 10% discount today on some of these products? Simply use the coupon code below when checking out.
 
 
Thank you for stopping by today. Happy New Year my friends!

Melanie