A whimsical place to play, where paper and ink become one.

Wednesday, June 28, 2017

LDRS Creative Inspired to Grow

Hi Friends,

Today I have a unique card idea. I have used the TLC Inspired Line for the stamped part of my card. These stamps are created for bible journaling but can also be used in both card making and in scrapbooks.


After coloring the stamp I played around with this design idea and came up with a mixture of LDRS products that all went together well.

LDRS Creative Products Used:

1. TLC Inspired Crafting "Inspired Edge Grow" stamps

2. Peaceful Dove Edge Die

3. Allifair Build a Card Die Set (for fence, clouds, and dragonfly)

My absolute favorite thing about LDRS Creative Products is that they are so versatile. For example; with a little trimming I was able to turn the Peaceful Dove Edge die to create the growing tree in my project and the fence etc from the Allifair set worked perfectly with this as well.

Have an awesome day my friends, Until next time... Keep Crafting! Melanie 


Tuesday, June 20, 2017

Elizabeth Craft Designs' Monthly Color Challenge

Hello Crafty Peeps!

Today we have a really fun Challenge over on the Elizabeth Craft Designs' challenge blog. Our Challenge this month is to create a set of 3 Clean and Simple (CAS) cards using 3 stamps from the same stamp set. A lot of the team rarely does CAS designs so it was so much fun designing for this challenge.


As you can see I have used some really fun coordinating papers which are BRAND NEW over at Elizabeth Craft Designs. They matched this stamp set perfectly. Couldn't you totally see this set of cards being perfect for a Tea Party?

Now lets look at the cards individually...


Each of these cards are featuring the brand new paper stack called "Cucina With Love". These papers are available in both 6x6" and 12x12" which makes them perfect for both card makers as well as scrapbookers!!!

I have used Copic markers to color in the stamped images and then used the coordinating dies to cut them out. To focus on each stamped image I popped the images up with foam tape then used the "Dotted Scallop Squares" and the coordinating squares die set to frame each image. I will link all of these supplies down below.

Elizabeth Craft Designs' Supplies: 


Thank you for stopping by today. Want to make a set of cards just like mine? Make sure to check out all the supplies above by clicking the above links. If you have any questions feel free to message me.

Happy Crafting!
Melanie

Tuesday, June 13, 2017

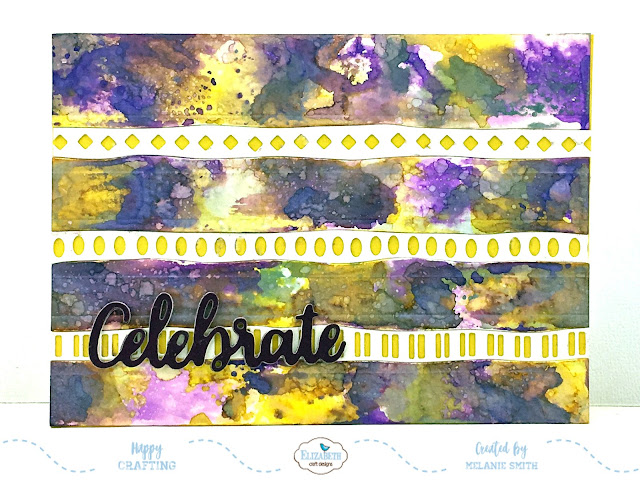
Elizabeth Craft Designs' Ribbon 1 Dies with Oxide Inks

Hi Friends,

I am back today to share a fun card made from the Elizabeth Craft Designs' Ribbons 1 die set by Els van de Burgt Studio. I decided to get out my Distress Oxide Inks and play with the pieces created from die cutting the Ribbons 1 dies from the card front.


Steps by Step Instructions:

1. Cut a card base to 5.5" x 8" and score in half.

2. Cut a piece of yellow card stock to 5.5" x 4" and attach to card front

3. Cut a piece of watercolor paper to 5.5" x 4"

4. Using the first ribbons die place it about .75" up from the bottom of the watercolor paper and die cut a ribbon. This will create 3 pieces. (card front, ribbon, and strip below the ribbon)
Repeat this process with two more ribbon dies until you have 7 pieces total. (3 will be ribbons and 4 will be the pieces of watercolor paper between the ribbons.)

5.  Put the ribbons aside and use Distress Oxide inks and water to create the inked effect. See Friday with Els post using Distress Oxide inks for more details on this technique.

6. Beginning from the bottom begin gluing pieces in place starting with first Oxide piece followed by the first ribbon etc. The pieces nest very closely together so there is really only one direction they can be put together.

7. When you get to the last piece it will hang over the top of the car. Simply cut the excess off.

8. Lastly cut 3 of the "celebrate" die and glue them together. This adds extra interest and texture to your card. Glue in place.


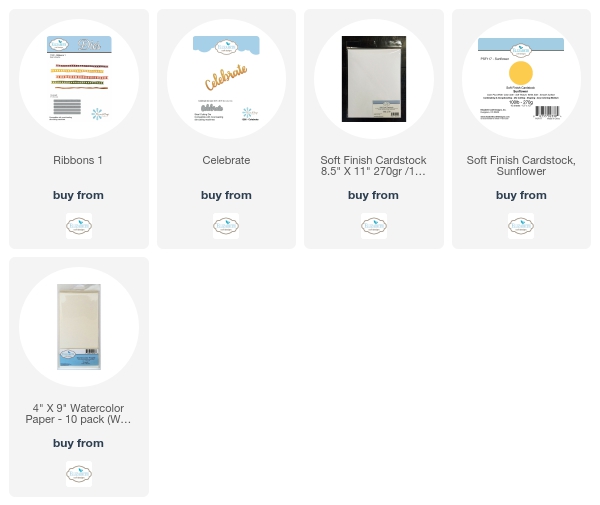
Elizabeth Craft Products Used:


Other Supplies Used:

Water Color Paper
Tim Holtz Distress Oxide Inks
Spray bottle

Thank you for stopping by today... Happy Crafting! Melanie

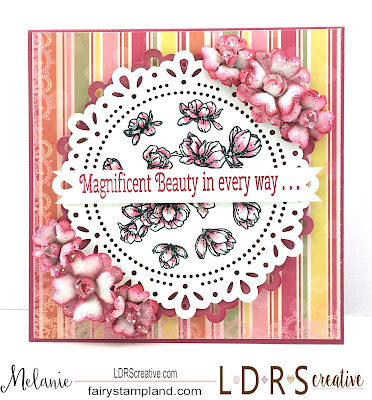
LDRS Creative Magnolia Splendor

Hi Friends,

Welcome back. I am super glad you choose to visit with me today. I am sharing a really sweet card today using some amazing products by LDRS Creative.

The paper and stamps are part of our TLC Inspired Crafting collection. I choose both the stamp set named "Magnolia Splendor" as well as the paper from the same collection called "Soft Blush"
Make sure to stop by the LDRScreative.com store to see all of the TLC Inspired Crafting coordinating collections.

Along with the above mentioned products from LDRScreative I also utilized the Dotty Doily Die Set by Polkadoodles. This breathtaking die set allowed me to create a beautiful doily that I was able to stamp and color on. I arranged all of the magnolia stamps from the Magnolia Splendor set and stamped them in the center of the doily. Then I colored them and added a little stickles to them to make them sparkle. Also from the Dotty Doily Die Set I also used the smaller dies to create these beautiful flowers. I have to say that was my favorite part. I inked their edges and added glitter to give them such texture. The sentiment I used was also part of the Magnolia Splendor set. It is a great set to have in your collection.


Above are some close ups of the hand shaped flowers using the small dies in the Dotty Doily Die Set. It is for sure a "Must Have" die set for sure!

Thank you for stopping by today and for viewing my work. If you have enjoyed yourself I would be honored if you would follow me by email. This way you never miss another post. Happy Stamping!

Melanie

Tuesday, June 6, 2017

Elizabeth Craft Designs' Die Challenge ~ Anything BUT a Card"

Hiya Friends,

Who wants to play in a challenge where they can win FREE product??? Make sure to read below to see all the details!!11

Today I am bringing you a really fun tag I created using Elizabeth Craft Designs' Tags & More 1 ~ Lace Die and Tim Holtz Distress Oxide Inks. I changed up the design though and tried the oxides on watercolor paper as it is thicker and I thought it being a tag that it would hold up better. I was quite happy by the outcome.


*******************

For today's challenge over on the Elizabeth Craft Designs Challenge Blog they are giving away .... two sizes of the Clear Double Sided Adhesive which will include: a pack of the 5” x 12” sheets and a 10 mm roll of tape, in addition we will also give away a pack of the new ModaScrap 12” x 12” Viaggi Vintage Patterned Paper Pack to 3 winners


To enter simply leave a comment on the Elizabeth Craft Designs Challenge post and tell us "Besides the classic card, what are some project ideas you like to play around with?”

We will select 3 lucky winners in a random drawing

The winners will be announced on Friday, June 9 on the Elizabeth Craft Designs blog

*****************

Here is an angled look at my tag. The watercolor paper really held up well and gives it a great textured feeling.

Elizabeth Craft Designs' Supplies Used:
Tags & More 1 ~ Lace
Small Butterfly
Leafy Branch 4
Kids Choice Glue

Other Supplies Used:
Water Color Paper
Tim Holtz Distress Oxide Inks
Stampin' Up! Card Stock in Peekaboo Peach, Wild Wasabi, Daffodil Delight, and Early Espresso.
Heat Gun

Thank you for stopping by today. Make sure to click on over to the Elizabeth Craft Designs' Challenge blog to enter this amazing give away.  I hope you have a crafty day. Melanie


Friday, June 2, 2017

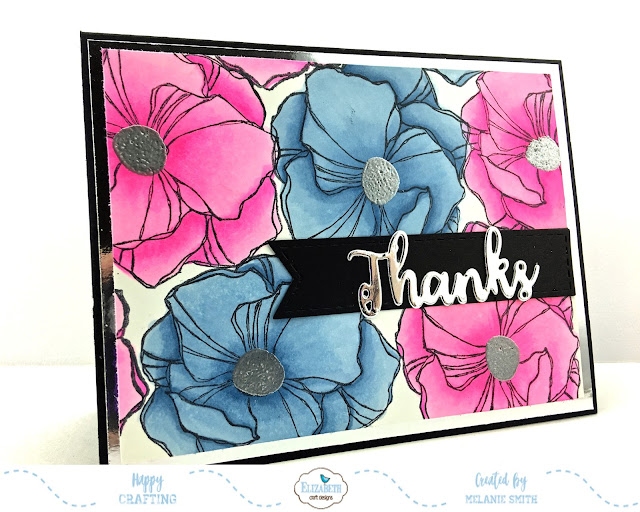
Elizabeth Craft Designs Flower Power Background

Hi Friends,

Today I am sharing a fun colored background using Elizabeth Craft Designs' stamps along with Copic markers. This was so much fun to stamp & color! I used the Clear Flower Power Stamp Set by Krista Schneider.


 Step by Step directions:

1. For card base cut a piece of black card stock to 8.5 x4.25"

2. Cut Silver Foil paper to 4 1/8"x 5 3/8"

3. For the white paper which will be colored. first begin stamping the flower power stamped image in a collage fashion to where the edges of each flower just barely touch each other. Stamp until you have a section of paper a little larger than your card base. Then trim the paper to 3 7/8" x 5 1/8 "

4. Color flowers using Copic Markers

5. Stamp each flower center with the flower center stamp from the same stamp set using Versa Mark. Heat emboss each center with silver embossing powder.

6. By cutting a small portion of the Stitched Fish Tail Banners you can easily shorten the banner while keeping all the stitching. See below.

7: Cut the "Thanks" word die with silver foil paper to coordinate with the embossed flower centers as well as the background layer.

8: Finally attach your banner and sentiment to finish the card.

Elizabeth Craft Designs' Supplies:

Flower Power Clear Stamp Set

Stitched Fish Tail Banners

"Thanks" die

Clear Double Sided Adhesive 5"x12"

Kids Choice Glue

Other Supplies Used:

Black Card Stock

Silver Foil Card Stocl

Copic Xpress It Paper

Copic Markers (RV02, RV04, RV06, B91, B95, B97)

Like my work? Id be honored if you would consider following me by email. Just click and add your email address where it says "Follow By Email" along the left side bar. Thank you so much! Melanie