Hi Friends,
Welcome back to another AMAZING RELEASE DAY with Heartfelt Creations. This month we are releasing the beautiful Hollyhock Garden Collection. This beautiful collection consists of 3 stamp and die sets including the main flower with coordinating 3D Shaping Mold and do not forget the beautiful paper collection. It is full of vividly bright and colorful papers in reds, yellows, Pinks and greens. I personally choose a more muted page from the collection and choose more fall colors but do not miss out on all the opportunities this paper pad gives you. Now lets take a look at my first project from this collection...
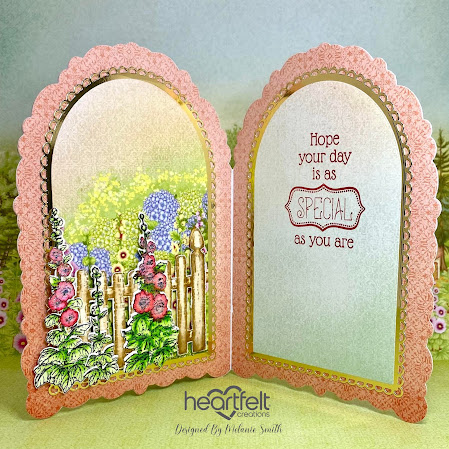
Instructions: Using one of the HCCB1-495 5x7” Gateway Fold Cards trim off 1/3 of the card and sit aside for second step. Take the 2/3 part and die cut through both layers using the largest die from the HCD2-7327 Elegant Swirl Gateway Die set making sure to let the die hang over the folded edge just a little so the fold line is not cut. This will create a nicely shaped card. Using the same die, cut the piece that was cut off in the previous step and glue it to the front of the card base. Then cut 3x from sheet 9B (peach patterned paper) from the HCDP1-2143 Hollyhock Garden Paper Collection and glue these 3 to the front and insides of the card trimming as needed to fit the inside panels. Using HCPC-3843 Special Birthday Sentiments Cling Stamp Set, stamp the sentiment to the inside of the card as shown. Using the second and third largest dies from this same die set cut one each from the HCGP1-488 Luxe Gold Cardstock. Glue down the second largest die just cut (the beautiful swirly one) to the peach card front. Using the third largest die cut a scene for the center of the card front from sheet 1B of the Hollyhock Garden Paper Collection. Using HCPC-3844 For My Friend Sentiments Cling Stamp Set, stamp the sentiment to the front panel as shown. Using the Luxe Gold piece that was cut with the 3rd largest die and as it as a guide, trace around it onto a piece of peach paper from sheet 9B, then fussy cut out. Next glue the Luxe Gold piece and the scene onto the peach piece to create your center section for the card front. Add 3D foam tape to the back and attach to the front of the card. Using the third largest die from the HCD2-7340 Eyelet Frame Gateway Die, cut 2x in Luxe Gold Cardstock and attach to the two inside panels. Using the fourth largest die from the Eyelet Frame Gateway die set cut 2x from sheet 1B and attach to the two inside panels.
Stamp the Large Hollyhock flowers 2x and the medium Hollyhock flowers 2x in Carnation Red Archival Ink using the HCPC-3999 Hollyhock Petals & Leaves Cling Stamp Set. Stamp the Large Leafy Stem 2x in Leaf Green Archival Ink using the HCPC-31000 Hollyhock Stems and Blooms Cling Stamp Set. Stamp the Fence in Coffee Archival Ink onto watercolor card using the HCPC-31001 Hollyhock Fence Cling Stamp Set. Also using that set and paper stamp the 3 floral and vine images in Jet Black Archival Ink. Cut all stamped items with their coordinating dies.
To create the flowers use the HCDA1-449 Stack and Store Daubers and begin by inking the flower centers with Prickly Pear Archival ink. Then ink the middle of the bloom with Carnation Red ink followed by Red Geranium Archival ink darkening as the edge gets closer. For the very tips of the flowers deepen the color by adding Mulberry Archival Ink. Run the flowers through the HCFB1-5012 3D Hollyhock Shaping Mold then using the HCST1-401 Deluxe Flower Shaping Kit press in the centers and pierce a hole in the center of each flower. Using HCS1-460 Bridal Bouquet Stamens, color the stamens using Prickly Pear Ink and add to the center of the flowers. Lastly add Crystal Clear Glitter with Dries Clear Adhesive and a Hydra Sponge. Shake off any excess. Color the leaves using Vivid Chartreuse Archival Ink and Leaf Green Ink. Shape with a stylus from the back to give a little dimension then add a little Ultrafine Transparent Glitter to the vining of the leaves by using the Metal Tip for Adhesive Bottles attached to the Dries Clear Glue. Dots of glue can also be added to the background papers and glitter can be sprinkled on for extra sparkle to the project. Color the Fence and other florals images with Zig Clean Color Real Brush Markers.
To assemble the card simply cut off one fence post and attach to the fence post on the front of the card front with Adhesive Foam Strips. The rest of the fence will be attached in the same manner on the inside of the card. Add the Leafy Stems and flowers with a glue gun to the front of the card. Arrange the floral arrangements on the inside of the card to the fence.
I hope you enjoyed that as much as I enjoyed creating it for each of you! Check out my personal project in the Heartfelt Creations Gallery to find out what products I used for this project.
Also, please be sure to visit the Heartfelt Creations Blog to see all of the gorgeous projects created by the other amazing design team members.


No comments:
Post a Comment