
Hi Friends,
Today Heartfelt Creations is debuting a beautiful new side release of gorgeous Filigree Frame & Border Collection. This collection contains 4 sets of dies which you can see by visiting the full collection page on their website HERE. It is a lovely collection with lots of opportunities to design in many versatile ways. Lets take a look at my first card using this collection...


Directions:
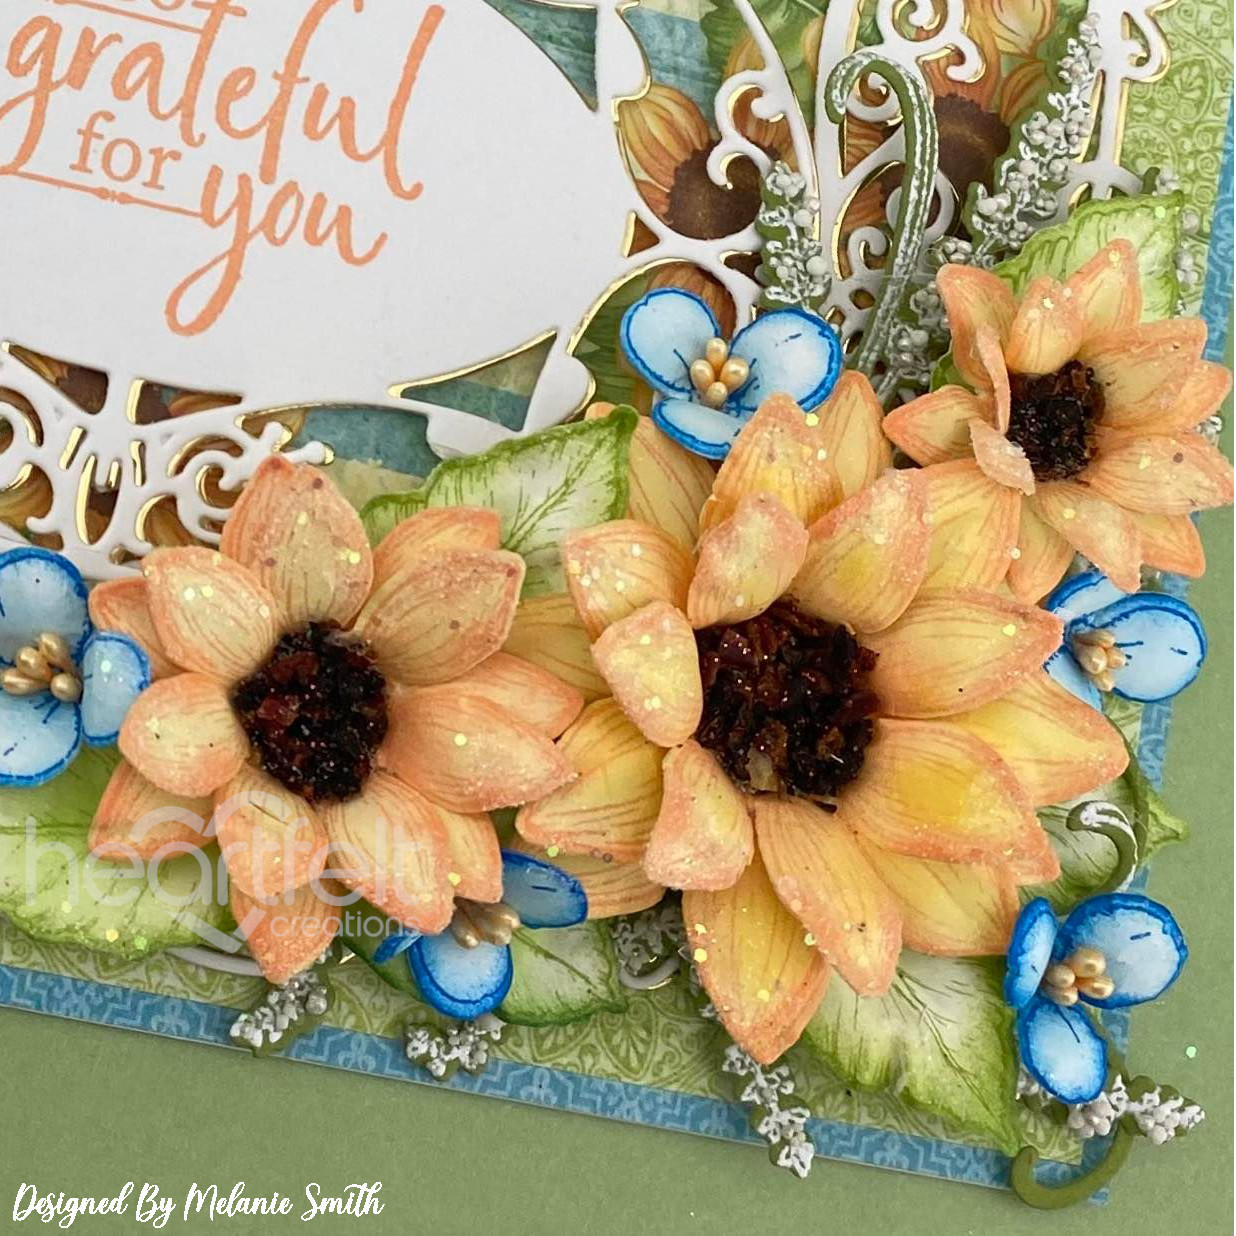
Cut a piece of white card stock to 6 1/2 x 7 1/2" and score the 6 1/2" side at 1". Cut a second piece of white cardstock to 5 1/2 x 7 1/2 and glue to the 1" scored section with the scored section to the inside creating a 5 1/2 x 7 1/2" card base. (Top Tip: HCPP1-475 Deluxe Flower Shaping Paper is perfect for all your card bases and white die cuts) Cut a piece from the top left hand corner of sheet 5A from HCDP1-2131 Rustic Sunflower Paper Collection to 5 1/2 x 7 1/2" to place on the inside of the card to cover up the seam created when making the card base. Now cut a piece from sheet 10B (Turquoise) measuring 5 1/2 x 7 1/2" and glue to the front of the card base. Next cut a piece from sheet 9B (green) measuring 5 1/4 x 7 1/4" and glue it to the card front. Using the largest die from HCD2-7424 Rectangle Filigree Frame Die cut the striped center decorative paper then set this aside until the following steps. Still using this same die cut 1x using white cardstock and 1x using HCGP1-488 Luxe Gold Cardstock. Glue these two pieces together slightly offsetting the gold beneath the white as shown in the photos. Do this same technique (cutting 1x with white cardstock and 1x with Luxe Gold Cardstock) with the next smallest die in this set, but this time use the inner cutting die so that the inside is cut out. Glue both of these gold/silver layers to the card base as shown making sure to add the previously cut patterned paper down inside the larger one before adding the smaller one. (see photos). From the HCD2-7426 Oval Filigree Frame Die cut the 4th smallest die 1x from white cardstock and 1x from Luxe Gold Cardstock and glue these together offsetting the gold behind the white as done in the previous steps. Stamp this die with a sentiment stamp from HCPC-3844 For My Friend Sentiments Cling Stamp Set in Archival Tiger Lily Ink. Attach this die to the center of the card using 3D foam tape.
Stamp the large Sunflower 2x, Medium 3x, and small 3x using the HCPC-3962 Rustic Sunflower Cling Stamp Set in Tiger Lily ink onto Deluxe Flower Shaping Paper . Stamp the small flowers 2x using the HCPC-3911 Wisteria Petals Cling Stamp Set with Archival Manganese Ink onto Deluxe Flower Shaping Paper. Then stamp the small leaves 4x and the large leave 2x using the HCPC-3980 Sweet Pea Cling Stamp Set using Archival Leaf Green Ink. Lastly stamp the HCPC-3933 Floral Shoppe Fillers Cling Stamp Set onto green cardstock using VersaColor white opaque ink, and then heat emboss with a white embossing powder. Die cut all the flowers out with the coordinating dies.
Color the sunflowers with Tiger Lily ink in the centers followed by Archival Sunflower Ink on the petals using the Stack and Store Daubers. Lastly add touches of Tiger Lily ink around the edges of the sunflower petals. Run the Sunflowers face down through the coordiating 3D Shaping Mold and then using the Deluxe Flower Shaping Kit simply press in the flower centers for a beautifully shaped Sunflower. For the largest flower glue together 2 large and 1 medium flower. The medium and small flowers both have 2 petals of the same size glued together, Apply Dries Clear glue with a hydra sponge and sprinkle on some Rajni Chawla’s Crystal Clear glitter on the tips of the petals. Then once dry add a puddle of Dries Clear glue to the center of the flowers and sprinkle in Earth Elements to the centers of the sunflowers for a perfect rustic and natural finish. For the wisterias simply color with the stack and store daubers lightly with Manganese Blue ink and shape using the Deluxe Flower Shaping Kit. Poke a hole in the center and add 2 of the Bright Pearl Stamens - Small to the centers of each adhering with a glue gun. The leaves are colored with Archival Vivid Chartreuse and then the edges are colored with Leaf Green. Then are then run through the coordinating 3D Shaping Mold and ready to go. For the Floral Shop Fillers add dots of Dries Clear Glue and sprinkle on some Minnie Pearls Prills.
To complete the card simply arrange the flowers and foliage as desired adhering with a glue gun.
I hope you enjoyed that as much as I enjoyed creating it for each of you! Check out my personal project in the Heartfelt Creations Gallery to find out what products I used for this project.
Also, please be sure to visit the Heartfelt Creations Blog to see all of the gorgeous projects created by the other amazing design team members.

Beautiful card, my friend! Love your gorgeous sunflowers!
ReplyDelete