A whimsical place to play, where paper and ink become one.

Wednesday, July 27, 2022

Heartfelt Creations ~ Cascading Trellis

Hi Friends,


Welcome back to Inspiration Wednesday with Heartfelt Creations. Today I have a really fun design I created using the beautiful Wild Asters. I decided to create a Trellis utilizing the Classic Companion Border Die setby using it in a slightly different way. It came out exactly the way I had envisioned it. Take a look at the directions below the photos for all the details.


Instructions:

Cut a piece of white cardstock to 11 1/4 x 7 5/8” and score in half at 5 5/8”. Next cut a piece of Luxe Gold Cardstock to 5 5/8” x 7 5/8” and attach to card front. From the HCDP1-287 Lush Lilac Paper Collection cut a piece of multicolored patterned paper to 5 1/2 x 7 1/2” and attach to Luxe Gold cut in previous step. From the HCD2-7189 Eyelet Rectangle & Basics Die use the largest die and cut one from Luxe Gold Cardstock. Next use the second largest die from the same die set and cut a light blue piece of patterned paper from the Lush Lilac Paper Collection. Using the same rectangle die, tape it down to a piece of 5 x 7” white cardstock and use the two inset dies from the HCD2-7400 Classic Companion Border Die set, taping one on each side, inside the rectangle, leaving a gap in the middle. There is exactly enough space for all 3 panels to be cut inside this rectangle die. Once outer two dies are cut, tape down one die into the center and rerun through the die cut machine to complete the full front panel. Using Dries Clear Adhesive, glue this white die cut piece to the blue background piece, then glue both of these to the Luxe Gold rectangle cut by the largest die. Lastly using 3D Foam Adhesive, tape this top layer to the card base previously made.


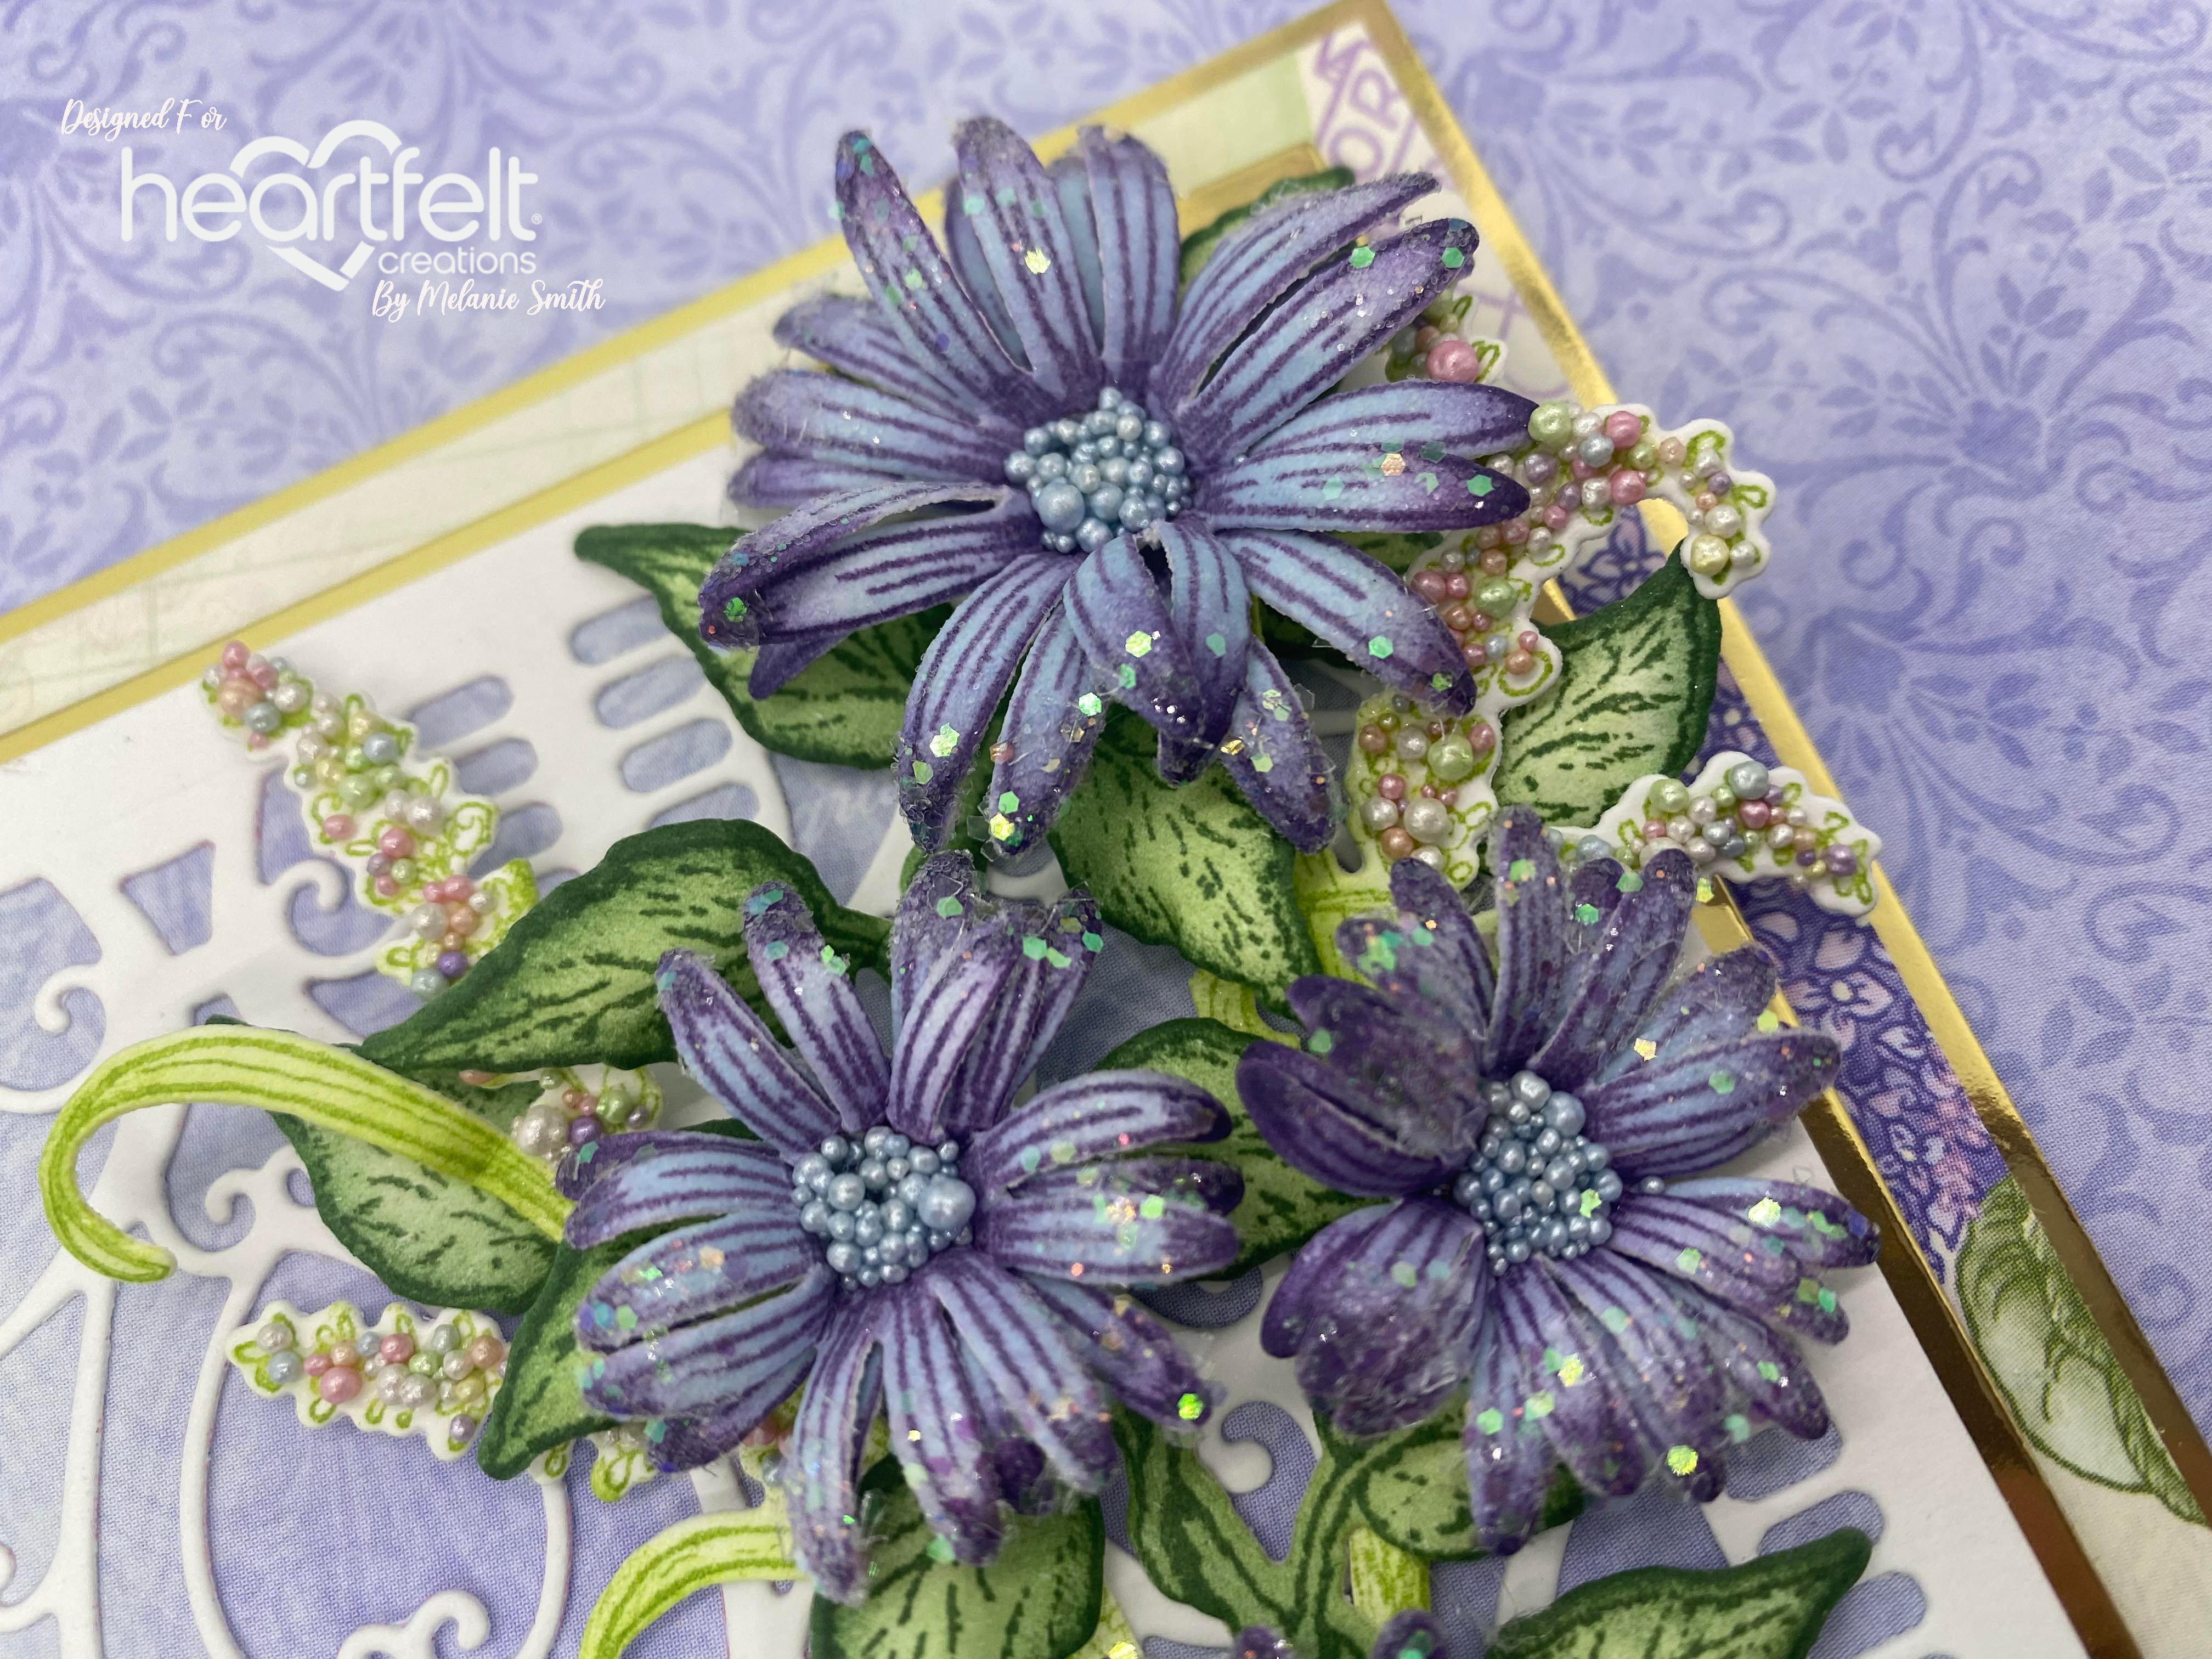
Stamp the small set of flowers 3x from the HCPC-3887 Wild Aster Cling Stamp set on Deluxe Flower Shaping Paper in Petunia Archival ink. Lightly color flowers, with blending brushes, in Sky Blue Archival Ink. Stamp the leaf vine stamp set 3x from the HCPC-3912 Cascading Wisteria Cling Stamp Set in Olive and lightly color in Leaf Green and a bit of Olive Archival Inks. Lastly stamp the floral filler stamp 3x from the HCPC-3933 Floral Shoppe Fillers Cling Stamp Set in Leaf Green and lightly color in Vivid Chartreuse Archival Inks. Cut all stamped images with coordinating dies.


Before shaping the flowers use the Stack and Store Daubers to darken the tips of each of the petals using the Petunia ink. Then use the Grooved Golf Tool Set to shape the Aster petals before pressing in the centers with a stylus from the Deluxe Flower Shaping Tool Kit. Each flower is made from two flowers of the same size. Finish off the flowers by using Dries Clear glue to add the Ice Queen Prills to the centers and Rajni Chawla’s Crystal Clear Glitter to the petals. For the vines simple darken the edges of the leaves with the daubers using the Olive ink and shape using the stylus tool and shaping mat from the back side. (For added dimension to leaves, use a Golf tool to run a crease from tip of leaf to vine.) The same shaping technique is used for the Floral Shoppe Fillers except the leaves will be darkened in leaf green ink and Candy Shoppe Prills will be added with Dries Clear glue in place of the little flowers. Allow to dry before attempting to arrange on the card.


To finish the card simply cut a sentiment from the Lush Lilac Paper Collection and frame in Luxe Gold Cardstock. Attach the Vines in a wandering pattern as if it is climbing a trellis. Attach the flowers to the vine with hot glue then add in the fillers and any extra leaves to fill blank spaces. Finish inside of card as desired.

  I hope you enjoyed that as much as I enjoyed creating it for each of you! Check out my personal project in the Heartfelt Creations Gallery to find out what products I used for this project. 

Also, please be sure to visit the Heartfelt Creations Blog to see all of the gorgeous projects created by the other amazing design team members.


Wednesday, July 20, 2022

Heartfelt Creations ~ Starry Holiday Greetings

Hi Friends,

Today I am sharing with you my second card featuring the Holiday Star Collections from Heartfelt Creations. For this card I added the small poinsettias for a lovely floral accent to this beautiful collection. Any of the Poinsettia sizes would be stunning with this collection and I cannot wait to begin seeing samples made by everyone online from this collection. Now lets take a look at today's card....


Instructions: 

Cut a piece of white cardstock to 7 x 10” and score at 5” to create a top fold card base. Using Sheet 12B (Purple), cut a 5 x 7” piece from the HCDP1-2141 Holiday Star Paper Collection. Ink edges using the Stack and Store Daubers with Majestic Violet Archival Ink before attaching to the card base. Cut a 4 7/8 x 6 7/8” piece of HCGP1-493 Luxe Silver Cardstock and layer on top of the purple card front. Then cut a card panel from sheet 2A as shown in the photos, and ink edges in Majestic Violet. Cut a 5 x 7” piece from sheet 10B (Light Blue), and die cut using the HCD2-7191 Intricate Swirl Frames Die. Ink the edges with Night Sky Archival Ink. Then cut a piece of white cardstock using this same die and glue behind the blue, offsetting it just slightly as shown. Attach this layer using 3D adhesive to the card front. Using the corner dies from HCD1-7213 Elegant Pocket Accents Die line up the corner edges with the card panel and tape to secure, run these through the die cut machine twice so all 4 corners are cut out. Then layer Luxe Silver Cardstock behind the open die cut spaces and glue to the back for an inlaid look. Attach this card panel to the project with 3D adhesive. Using the HCD1-7202 Album Tags and Accents Die choose the coordinating dies to cut a white cardstock border to outline the center area of the card panel to give it extra dimension. Glue in place with Designers Dries Clear Adhesive.

With a stamping platform, stamp the “Seasons Greetings” Stamp from the HCPC-3995 Starry Night Greetings Cling Stamp Set in Night Sky ink onto white cardstock. Once a nice rich impression is achieved, clean the stamp and stamp again using Versa Mark ink and heat emboss using thick clear embossing powder. Then color in the leaves with a purple Zig Marker. Die cut this with the coordinating outline die. Also cut a Luxe Silver Cardstock outline die out to layer behind, offsetting just slightly. Glue these layers together and attach the sentiment to the center of the card with 3D adhesive.

Using Versa Color Pigment Ink in white, stamp one poinsettia stamp of each size using HCPC-3881 Christmas Poinsettia & Holly Cling Stamp Set onto Rajni Chawla’s Vellum. Heat emboss using Opaque white embossing powder and die cut with coordinating dies. Cut a second set of die cuts from just plain white cardstock. Using the HCPC-3888 Wild Aster Spray Cling Stamp Set and stamp the small branch 2X with Versa Mark ink onto Luxe Silver Cardstock and heat emboss with silver heat embossing powder. Die cut with coordinating dies.

For the flowers, using the Majestic Violet ink and the Stack and Store Daubers Color on the reverse side of the vellum coloring in the centers of the flowers. Then using the Night Sky ink color the tips of each of the flowers. Lastly take the Majestic violet dauber and blend the two colors in the middle to mix for an ombre look. Using the Dries Clear glue, attach the white die cuts to the back of each flower before running them through the coordinating 3D flower mold. Glue the 3 sizes of flowers together to form each flower, offsetting the petals while pressing down in the center of the flowers gently with the stylus tool from the HCST1-401 Deluxe Flower Shaping Kit. Sprinkle on Rajni Chawla’s Crystal Clear glitter to the tips of the petals after applying a little Dries Clear Glue to the petals with a Hydra Sponge, tap off excess. Add Prills to the centers of the flowers and allow to dry.

To assemble simply snip apart the small branches to allow for the branches to lay in different directions under the flower, glue in place. Lastly adhere the flowers down with a hot glue gun. Finish the inside of card as desired.

 I hope you enjoyed that as much as I enjoyed creating it for each of you! Check out my personal project in the Heartfelt Creations Gallery to find out what products I used for this project. 

Also, please be sure to visit the Heartfelt Creations Blog to see all of the gorgeous projects created by the other amazing design team members.


Wednesday, July 13, 2022

Heartfelt Creations July Release ~ Holiday Star Collection

Welcome Friends,

I am excited to announce the NEW Heartfelt Creations Christmas in July Release. This amazing Holiday Star Collection is drop dead GORGEOUS!!!!! You will want to make sure you are well stocked up on silver and gold Luxe Cardstocks as well as embossing powders and glitters because these stars are going to knock your socks off! Lets take a look at what I came up with in my first design....


My vision for this card was to create a split front with a see thru shaker card. It took some trial and error but the end result turned out positively and the final instructions are shared with you below. I hope you have fun recreating it. 💗

Instructions: 

Begin by cutting the card base 5 x 9” from white cardstock and score at 2 3/8” to form the top flap. Cut a second piece of white cardstock for the bottom flap measuring 5 x 2 3/4”. From sheet 6A of the HCDP1-2141 Holiday Star Paper Collection cut a piece from the bottom right measuring 5 x 6 3/4” glue this using Dries Clear Adhesive to the inside of the card. Then for the front of the card using the same paper, cut a piece 5 x 2 3/8” & 5 x 2 3/4”. Attach these to the front two panels of the card. Now using the HCD1-7263 Swirly Accent Spray die using the straightest edge die, cut the curvy edge to the bottom of the top flap and the bottom piece of the card, the sides where the center star attaches. Also from this die set cut the right decorative corner and the left decorative corner in both white cardstock 2X and Luxe Silver Cardstock 2X. Glue these together offsetting them slightly so that the white is peeking out beneath the silver, set aside. From the HCD1-7411 Holiday Star Die set using the medium and smaller outline star dies taped together cut a star border from sheet 5A from the same paper collection referenced above. Lastly just using the medium outline star die cut Clear Cardstock stars 2X.

Stamp the large star 2X from the HCPC-3993 Holiday Star Cling Stamp Set with Versa Mark ink onto sheet 12B of the Holiday Star Paper Collection, making sure to treat the paper with an embossing buddy first. Heat emboss the star with silver embossing powder before cutting out with the coordinating die, HCD1-7411. Also cut the inner star out using the smallest outline star die from this same set. From this same large die cut Luxe Silver Cardstock 2X and white cardstock 1X and cut the center star from them as well. Using Sheet 5A along with Sky Blue ink stamp the small snowflakes 2X from HCPC-3994 Large Holiday Star Cling Stamp Set onto the patterned paper. Die cut with coordinating dies. Also with those dies die cut Luxe Silver Cardstock 2X and white cardstock 2X. Lastly cut a sentiment from Sheet 4A and cut a coordinating size of Luxe Silver Cardstock to add a hint of silver around it.

Using the Majestic Violet Ink and the Stack and Store Daubers ink around the edges of the card base both inside and out, since the inside edge will show from the front of the finished project. Also ink each of the small stamped snowflakes, the sentiment, and around the light blue star border. Using a Hydra sponge and Dries Clear Adhesive sponge the inked areas and sprinkle with Rajni Chawla’s Crystal Clear and tap off. Do the same for the tops of each of the snowflakes and completely glitter the top of the light blue star border, which will be added to the center star in the final steps. Lastly glue the glitter snowflakes directly onto of the white snowflakes and then onto the silver snowflakes off set a little to show a little silver on one side. Set these aside until after the center star is completed.

To begin the shaker take a silver star, a white star, and two pieces of acetate along with 1/8” double sided tape. Tape the acetate on the backside of each of these two stars. On the back of the silver star add the Foam Strips around the edge of the star window making sure to completely close off the star so the shaker bits do not fall out. Do two layers of foam tape to give ample room for the shaker contents. At this point use an embossing buddy or anti static tool inside the cavity to prevent as much sticking as possible. With the white star on the table add the shaker contents to the center and peel off the foam tape backing. Line up the stars and tape the silver star down onto the bottom star concealing the shaker bits inside. Next line up the bottom portion of the card with the back of the card base and lay the center star down on the card base. With a mechanical pencil from the inside of the card make marks onto the star itself to give an idea of where the two will over lap. The inside of the star will be covered so these will not show. Put double sided tape in all areas that will come in contact with the front of the card. Also put 1/4” double sided tape on the entire back of the second silver star which will cover the inside and give the front star support. Now lay the front star in place carefully and on the inside glue the full silver star to cover the white cardstock star. Once the star is secure add the decorative embossed purple star to both inside and out and add the glittered border star to the front. Glue the corner dies down with Dries Clear Adhesive, Arrange the snowflakes and adhere, and add the sentiment using 3D dimensional adhesive to finish the card.

 I hope you enjoyed that as much as I enjoyed creating it for each of you! Check out my personal project in the Heartfelt Creations Gallery to find out what products I used for this project. 

Also, please be sure to visit the Heartfelt Creations Blog to see all of the gorgeous projects created by the other amazing design team members.


Wednesday, July 6, 2022

Heartfelt Creations ~ A Sweet Pea Story

Hello My Dear Friends,

I have an Elegant Wednesday Inspiration post for all of you today. Are you all ready for this? It is titled "A Sweet Pea Story" and it goes a little bit like this.....


Instructions:

Cut a piece of white cardstock 6 1/2 x 10 1/2” and score in half at the 5 1/4” mark. Using the largest die from HCD1-7260 Booklet Basics Die, cut through both layers of cardstock making sure to allow the top of the book die to hang over the folded edge to preserve the fold. This will be the fold along the top of the card base. Using the same die, cut a piece of paper from sheet 6A (pink) of the HCDP1-2137 Sweet Pea Paper Collection. Using the card base as a guide trim the top and glue to the inside of the card using Designers Dries Clear Adhesive. Also using sheet 6A cut a piece with the 3rd smallest Booklet Basics Die for the top layer of the card base. From HCD2-7261 Booklet Frames Die cut 2 pieces, one from sheet 11B, and one from Luxe Silver Cardstock. Next do the same with the 3rd smallest Booklet Frame die with sheet 5B (Green), and Luxe Silver Cardstock. Before adhering these layers together ink the larger pink frame with Mulberry and the green frame in Olive Archival Inks. Then layer with their matching Luxe Silver pieces making sure to off set the silver behind the colored decorative paper. Now simply glue the layers all together using Dries Clear Glue and set aside.

Using the HCPP1-475 Deluxe Flower Shaping Paper, stamp the small set 4x, and the large set 1x using Rose Madder Archival ink from the HCPC-3980 Sweet Pea Cling Stamp Set. Also from this set stamp the calyx 5x in Olive and 8x in Chrome Yellow Archival Inks. Using a stamping platform along with the Stack and Store Daubers, for multi color stamping, stamp the smaller floral from the HCPC-3981 Vining Sweet Pea Cling Stamp Set in both Mulberry and Olive Archival Inks. Before die cutting each stamped image, lightly color each with the lightest archival colors that coordinates with the outline color using a make blending brush, then cut with coordinating dies.

Using the Stack and Store Daubers, ink the edges of the flowers, leaves, and parts of the vines with the darkest shades of coordinating ink colors before running each item through the coordinating shaping mold. The Sweet Pea flowers were hand shaped even more after coming out of the shaping mold using a HCS1-457-3 Pastel Bead Stamens- Medium in light pink along with a little water and hot glue. Then a Calyx was added to the backside of each. Lastly each Sweet Pea received a dusting of Rajni Chawla’s Crystal Clear by adding Dries Clear Glue to a Hydra Sponge before sprinkling, then just tap off.The yellow Calyx were turned into filler flowers by hand shaping them with a little water and the smallest Grooved Golf Tool. Then a single HCS1-457-1 Pastel Pearl Stamens - Medium in white was added and secured with hot glue before adding Ultra Transparent Glitter in Clementine in the same method as stated above. For the vines use the HCST1-401 Deluxe Flower Shaping Kit and simply add a little texture to them by using a stylus on the backside of the flowers and leaves.

Before beginning to assemble make sure to stamp the sentiment using the HCPC-3846 Thank You Sentiments Cling Stamp Set before attaching the flowers as these flowers are very full and may make stamping difficult. Arrange and attach the flower oasis with a hot glue gun to the card to complete.

 I hope you enjoyed that as much as I enjoyed creating it for each of you! Check out my personal project in the Heartfelt Creations Gallery to find out what products I used for this project. 

Also, please be sure to visit the Heartfelt Creations Blog to see all of the gorgeous projects created by the other amazing design team members.

Crafty Hugs, Melanie