A whimsical place to play, where paper and ink become one.

Saturday, March 30, 2019

LDRS Creative ~ If Friends Were Flowers

Welcome Back Friends!

Today I am here to share a special project with you. I created this card for HSN near the end of last year and I got wonderful feedback from it so I have held it waiting to share it with all of you. It has just been released in the LDRS Creative Online Store. I am absolutely in love with BOTH of the new floral sets that are now available. The set I am using today is called "If Friends Were Flowers" It is a stamp AND die set and is a MUST HAVE in my opinion ;-)


My focus with this card was to show off these beautiful floral.  I started my card with a thick white card stock for the base. Then I did a second layer of white card giving a large white framed look. I added a blue vertical card panel to add contrast for the flowers. The sentiment is from the die set that coordinates with this "If Friends Were Flowers" Set.

Here is a close up of my coloring...


My goal with my coloring was to create a multi stamped look without having layered stamps. I just love how they turned out. 

Make sure to check for not just this set, but all of the newly released items. Click below to find ALL the NEW products.


Have an AMAZING day! Melanie

Saturday, March 23, 2019

Sparkle N Sprinkle Swallowtail Butterflies

Welcome Back My Sparkle Friends,

I have been playing with a lot of Sparkle N Sprinkle products today!  I hope you find this Swallowtail Butterflies Stamp Set #856 as inspiring as I do.


I have used the following Sparkle n Sprinkle Products in this project:


Starting with a piece of our Sparkle N Sprinkle Water Color Paper, Stamp the outline butterfly stamp with Versa Mark Ink and heat emboss using our Detail White Embossing Powder. 


Using a watercolor medium begin filling in the butterflies to create a subtle butterfly background.


Cut the background die with a coordinating color of card stock using the Gothic Border Squares Die Set By Tonic.
On watercolor paper stamp the butterfly once more with Versa Mark Ink and heat emboss with the Black Detail Embossing Powder. Then water color like the background. Lastly fussy cut the butterfly and glue just the center to the die cut.


Take note of the glitter border around the finished card. It was created with 1/4" Tear-ific Tape  and Lacy Lilac Glitter 
The edges of the card were then dipped into the Versa Mark pad then sprinkled with the Super Thick Spring Lilac Embossing Powder
One last look :-)


 Thank you for stopping by today. Don't forget to add your email to the side bar to receive my blog posts in your in box. Hugs! Melanie

Saturday, March 16, 2019

Sparkle N Sprinkle Little Garden Cottage


Welcome Back My Friends,

Today I am here as part of Sparkle N Sprinkle's design team. This project is near and dear to my heart because I envision it as a "Fairy House" rather than just a  "Little Garden Cottage"


Sparkle N Sprinkle Supply List:

Below is a close up of all of my coloring in this project along with a list of all colors used. 


Copic Markers Used:
R22, R24, R27
YG61, YG63, YG67, YG91, YG93, YG97
E02, E11, E13, E15, E17, E18, E19, E23, E25, E27, E29, E31, E33, E35, E42, E43, E77 
 
Once colored I began embellishing the project using 3 of our awesome products. For the Mushrooms I used glue along with the Fire Engine Red Glitter to give to tops of the mushrooms some glam. Then I added just a few little flakes from the Super Thick Embossing Powder in white to create the spots on the mushroom. Our awesome Design Team Coordinator came up with this idea and it worked!!! Thank You Jess!!!


Lastly I glued on some of our Bronze Mica Flakes to the tree trunk to give added dimension. See the close up photos below...


Close up showing the Mica flakes added to the tree trunk....How fun right??

I hope my project today has inspired you today, I am really enjoying the Sparkle N Sprinkle product line. Simply use my code below to save 10% off your next order. 
 
http://sparklensprinkle.net?rfsn=2090589.bd2ea8
 
 Have a crafty day! Melanie

Thursday, March 14, 2019

LDRS Creative ~ If Friends Were Flowers

Welcome Back My Friends,

Today I have had fun coloring with my Copic markers. I have chosen to color the LDRS Creative's  "If Friends Were Flowers" Stamp & Die Set and use it along with the "Country Friends 6x6 Paper" by Polkadoodles. Both of these items are available on the LDRS Creative's  Online Store
 

The softness of the patterned paper drew me in and I used it as my color inspiration. This allowed for a seamless blend once the florals were colored.

Copic Markers Used:
RR81, R83, R85
YG41, YG45

Once colored I then used the coordinating dies to cut both the flowers and the sentiment. I layered the single flower and leaf sprig directly to the card using a liquid adhesive. Then I popped up the larger floral stamp using foam squares. This gives the card so much more dimension.
 
Here is a close up of the detailed stamps. This set is just beautiful to work with. 


I hope I have inspired you today. Just goes to show you do not need many Copic markers to create something beautiful. If you enjoy seeing my work please leave me your email along the side bar. You will then receive my posts via email a couple times a week. This ensures you do not miss a project. 

Hugs, Melanie

Saturday, March 9, 2019

Sparkle N Sprinkle Easter Parade

Hi Friends,

I have an adorable Easter card to share with you today. This stamp set called Easter Parade is by Sparkle N Sprinkle and it is available in both Digital as well as rubber stamps. I have linked all items below for your convenience.


I have used the following Sparkle N Sprinkle Products:
Here is the close up of my coloring... See below for the color combos that I have used.


Copic Colors:
YR01, YR02, YR04, YR07, YR09
Y11, Y13, Y18, Y19
BG10, BG11, BG13
E31, E35, E35

Here is a close up showing how I created the area around the stamp using both Nuvo Embellishment mousse and creating the embossed areas with Sparkle N Sprinkle Super Thick embossing powders. Now for the step by steps...

Step 1:
Using two colors of Nuvo  Embellishment Mousse ( Powder Blue and Aloe Vera) I mixed them to soften the color from the Aloe Vera. I was after a mint green.

Step 2:
I carefully sprinkled just the corners with the super thick white powder. Heating from underneath no need for any other items. I did one corner at a time. I was going for a framed look.

Step 3: Once finished I decided to try putting just the edge of the paper down into the versamark ink pad then I sprinkled the white Super Thick embossing powder and heated that with my heat tool. It formed a really finished look to the edges and I am very pleased with the look.

Step 4: Just for some added flair I sprinkled the Super Thick Embossing Powder in gold to each corner and heated it from underneath.


Here is one last look at the finished project. I added a couple of die pieces from the Tonic Garland Terrace Die set just for some added interest.

 Thank you for visiting today. Make sure to check out the Sparkle N Sprinkle Online Store for all of your crafty supplies. You can receive 10% just for being a friend of mine.... Simply click below.

https://sparklensprinkle.net/?rfsn=2090589.bd2ea8


Have a crafty weekend m friends!
Hugs! Melanie

Friday, March 1, 2019

LDRS Creative New Release Day 3 ~ Goody Gumdrops w/ Tutorial


Thank you for joining us on our LDRS Creative inspiration week blog hop! We are so excited to feature what was showcased at Creativation in January! There are lots of gorgeous projects using products from our new release. You can even see them in action with step-by-step projects by our amazing designers on their blogs and our own LDRS Creative Youtube channel (make sure you subscribe)!

In this release, we are introducing interactive stamp and die combos, fabulous paper doll dies, and TONS of products to fit everyone's taste!

There are two brand new full size stamp sets from Cre8tive Cre8tions, each combining 8 stamps; Celebration and Flower Power!

Next, we have something for all our Polkadoodles fans! We have two brand new characters, each featuring lovely scenes: Ruby (Celebration, Pretty Cute, So Sassy) and Holly (Delightful Daisy, Feathered Friends, Story Time, Watch It Grow). And fear not, Winnie is also joining the party with the mini set called Let's Go, and some amazing paper doll dies in the Die-licious collection to create to your soul content: A Gift For You, Miss Pretty, Puppy Princess, Super Scenes. What's best is that we came up with the perfect 6"x6" Die-Licious paperpack to combine all skin, hair and clothing patterns as a perfect complement!

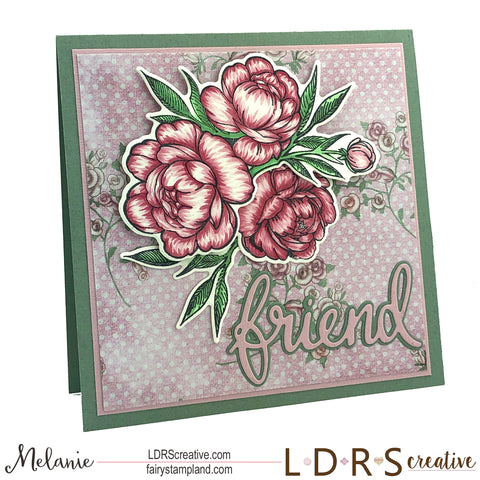
If you are more into flowers, then you will simply adore these brand new stamp and die combo sets: If Friends Were FlowersLove And Smell The Roses.

And did we say we were throwing a surprise party for you all? Thanks to these sweet stamp sets, you can have one, too: Wordalicious, Sweet Treats, Party Time, Life Is Sweet, Ice Cream Party, Goody Gumdrops!

What's even cooler are the interactive stamps (and some even as a die combo!) we are proud to have designed: Going Places, On The Move-NeighborhoodOn The Move-Landscape. Adorable critters? Yes! Right here: On The MoveHippo Hooray, Super Critters!

We also have FOUR new die sets that will help you get a professional look in no time, on top of being simply adorable: Twirling Pop-Up, Barber Stripes Rectangle, Fringe, Scalloped Borders.

Who's ready for mini hybrid inks? We are adding the latest two sets of our very popular Hybrid inks in a mini version, perfect for ink blending, stenciling, stamping, colouring and embossing: At The Beach and On The Farm!

Next, we have two new 6"x6" stencils that are sure to be as popular as the others: Playful Patterns and the Waffle!

Lastly, because we wanted to give you the perfect time with papers AND stamps, we created the new Playful Pattern collection that includes 6"x6" and 12"x12" packs: Homemade Happiness, Candy Counter, Sweet Sensations!

 And you can grab the entire release in bundles, because you KNOW you need them all!

Simply use the list at the end of the post to keep hopping!
Each day we are giving away a $25 LDRS Creative gift card to one lucky hopper! To enter leave a comment on each blog in the hop, plus follow us on Facebook and Instagram. Winners will be announced on the LDRS Creative inspiration blog on March 5th.

AND for the release event we are excited to offer some great savings!
Save 15% on the new release*, including already discounted bundles and use code FEB15
(*Coupon valid until midnight EST 3/6/18)

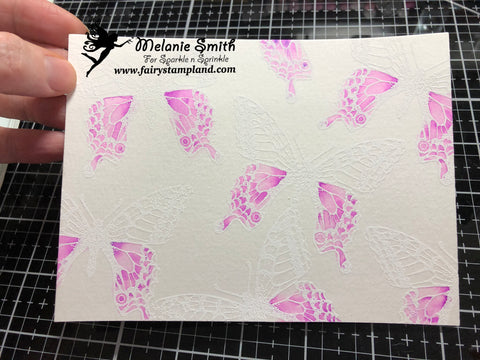
This is by far my favorite card using this new release. I had so much fun working with the rainbow theme. I have a few step by steps for you so you can easily create a card just like mine. 


 LDRS Creative Products needed to create this project...
Goody Gumdrops Stamp Set
Candy Counter 6x6" Paper Pack
Playful Patterns Stencil
Hybrid Inks

To create the stenciled panel just follow these easy step by step instructions...

Step 1:
Choose 3 complimenting colors of Hybrid inks which will match your paper.
I have used Kiss Me Red Hybrid Ink along with a blending tool. You want to cover about 1/3 of your paper strip using this color.


Step 2:
Repeat Step 1 using Dan-D-Lion Hybrid Ink.  Blend the two using the blender tool or any sponge you may have.


Step 3:

Repeat Step 1 using La La Lavender Hybrid Ink.  Blend like above.


Carefully remove your stencil and the beautiful pattern appears. I then cut the piece down to the size I needed for my project.


Make sure to pop on over to the LDRS Creative Shop to pick up your new goodies.


Hop along and leave a comment so you could win! ****(please add the brackets next to your name with ‘you are here’ so hoppers can easily keep track – add the specific list to each day; not all three at the same time ;-))

Day 3:
And make sure to be back tomorrow for more inspiration!