A whimsical place to play, where paper and ink become one.

Wednesday, October 26, 2022

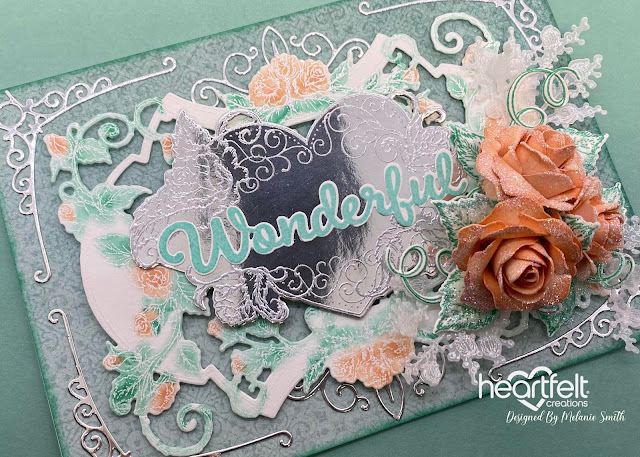
Heartfelt Creations ~ Wonderful Petal Pink Roses

 Welcome Back Friends,

Today I have another card featuring the gorgeous Elegant Rose Frames Collection by Heartfelt Creations. I am having so much fun with this collection. I love how you can create stunning simple flat cards for easy mailing or you can add lovely 3D flowers to dress them up even more. The sky is really the limit and no matter how you use these your cards will turn out stunning each and every time. This was a fun new color scheme for me and I really loved the way it turned out. Lets take a look....


Directions:

Cut a piece of white card stock to 7 x 10” and score in half at 5”. Cut sheet 9B from the HCDP1-2133 Floral Banners Paper Collection into 2 pieces of 5 x 7”. Ink the edges of this aqua decorative paper with Costal Cabana Ink using the HCDA1-449 Stack and Store Daubers. Glue these to the card front and to the inside of the card. Using
HCD2-7425 Filigree Border & Accents Die, cut out the corner die 4x and the center flourish 2x and glue to the card front as shown.

Stamp the frame from the HCPC-31002 Elegant Rose Frame Cling Stamp Set onto white cardstock with Versacolor White Pigment Ink and heat emboss with White Opaque Embossing Powder. Color over the embossed image using ink brushes and Coastal Cabana & Petal Pink ink pads. Stamp the Heart Banner from the HCPC-3968 Elegant Rose Banner Cling Stamp Set onto Luxe Silver Cardstock with Versacolor White Ink and Heat Emboss with Silver Embossing Powder. Stamp the “Have A Wonderful Day” sentiment with from the
HCPC-31004 Elegant Rose Sentiments Cling Stamp Set with Coastal Cabana ink onto white cardstock. Cut everything out with the coordinating dies and trim the sentiment so that the “Wonderful” fits perfectly on the heart banner. Adhere the Elegant Rose Frame using 3D foam dots and attach the heart banner using Double Dots 100pc. - 3D Circles. Then use Dries Clear Glue to adhere the sentiment.

Stamp the largest rose stamp 8x from the HCPC-3752 Classic Rose Cling Stamp Set onto Deluxe Flower Shaping Paper using Petal Pink Ink. Use sponges to color the center of the roses with the same ink. Die cut with coordinating dies and ink the edges with the same ink using Stack and Store Daubers, this will darken the edges. Hand shape using Grooved Golf Tools and apply Dries Clear Glue with a Hydra Sponge and sprinkle with Crystal Ultra Transparent Glitter. Next Stamp the leaf from the Classic Rose 3x onto Deluxe Flower Shaping Paper using Costal Cabana ink. Shape with the coordinating 3D Classic Rose Mold. Lastly Stamp the HCPC-3888 Wild Aster Spray Cling Stamp Set and stamp the spray 3x onto vellum with Versacolor White Pigment Ink and heat emboss with white embossing powder. Die cut with coordinating dies. Arrange the flowers, leaves, and sprays as shown to finish off the front of the card.

For the inside cut a piece of white cardstock to 3” x 7”. Die cut the coordinating border die from the Filigree Border & Accents Die set along the bottom of the cardstock. Using a stamping platform line up the “Have a Wonderful Birthday” sentiment from the HCPC-3843 Special Birthday Sentiment Cling Stamp Set and stamp in the center of the white paper. (Top Tip: Before cutting the bottom die, tape the die in place and use the bottom die as a guide to line up the stamp in the stamping platform) After sentiment is stamped, die cut the top portion of the border die creating a beautiful coordinating banner for the insider of the card. Adhere inside to finish the card.

  I hope you enjoyed that as much as I enjoyed creating it for each of you! Check out my personal project in the Heartfelt Creations Gallery to find out what products I used for this project. 

Also, please be sure to visit the Heartfelt Creations Blog to see all of the gorgeous projects created by the other amazing design team members.


Love, Melanie

Wednesday, October 19, 2022

Heartfelt Creations ~ Elegant Translucent Roses

Hi Friends,

Today I have a brand new card featuring the Elegant Rose Frames Collection. With this card I focused on vellum for both the frame and the flowers. I hope you enjoy it.


As you can see from the details of this Fancy Classic Rectangle Stamp and Die it is the true HERO of the show. Your card does not need much else to really stand out from the crowd. A lot of people are scared of using vellum and heat embossing but let me tell you this technique below could not be easier and gives you such a clean and elegant look every time. I hope you really give it a go and give me a shout out when you do and let me know how it goes. Remember don't be afraid to experiment with your alcohol markers, water based markers, even colored pencils. See what different effects you get.

Directions:

Cut a piece of white card stock to 7 1/4 x 10 and score in half at 5”. Using the outer die from HCD2-7384 Fancy Classic Rectangle Frame Die, lay the frame slightly over the scored edge so that the fold is preserved, tape in place, and run through a die cut machine to create the shaped card base. With this same die cut one piece from white card stock and another from sheet 12B from the HCDP1-2144 Elegant Rose Frames Paper Collection. Ink the edges of this green decorative paper with Majestic Purple Archival Ink using the HCDA1-449 Stack and Store Daubers. Now layer and glue the white onto the card front, followed by the purple layer. Next using the second largest die layer from the same die set cut a piece of white and green matte foil cardstock. Glue these two layers together off setting the green slightly behind the white and attach to your card front.

Take a piece of vellum and pretreat it with an anti static tool. Then stamp the frame from the HCPC-31002 Elegant Rose Frame Cling Stamp Set using Versacolor Pigment Ink and heat emboss with White Opaque Embossing Powder. Using the Zig Clean Color Real Brush Markers color in your roses and vines from the back of the vellum. Then Using the coordinating dies cut out the frame and cut out one extra piece from white card stock and glue to the back of the vellum. This will help the colors look more vivid. Designers Tip: When coloring on vellum it helps to use darker colors so that the colors show through to the other side. Attach this layer to the card front using 3D foam dots.

Using the same vellum techniques above, only using Rajni Chawla’s Vellum, Stamp the roses (Large 2x and medium 2x) from the HCPC-3752 Classic Rose Cling Stamp set. Using the HCDA1-449 Stack and Store Daubers color on the back of the roses in Majestic Violet Archival Ink. Shape either by using the 3mm tip from the Deluxe Flower Shaping Kit (Large Rose) or with the coordinating 3D Mold (Small Roses). Add Dries Clear Glue to the edges of the flowers with the metal tip and sprinkle on Ultra Transparent Crystal Clear Glitter. For the leaves, stamp 2x in Emerald Green Archival Ink using the HCPC-3835 Leafy Accents Cling Stamp Set. Color with Leaf Green, English Ivy, and Emerald Green Archival Inks. Shape using the coordinating 3D Mold.

Lastly using the HCPC-31004 Elegant Rose Sentiments Cling Stamp Set, stamp the “Thinking of You Today” sentiment onto Copic X Press It Paper and color using Copic markers. Cut out with coordinating dies and glue it down centered onto the card front. Arrange the leaves and flowers offset to only one corner so that the beautiful delicate vellum frame is still the main focal point of the card. Finish off the project by finishing the inside to match.


  I hope you enjoyed that as much as I enjoyed creating it for each of you! Check out my personal project in the Heartfelt Creations Gallery to find out what products I used for this project. 

Also, please be sure to visit the Heartfelt Creations Blog to see all of the gorgeous projects created by the other amazing design team members.


Love, Melanie

Wednesday, October 12, 2022

Heartfelt Creations New Release ~ Elegant Rose Frames Collection ~ Birthday Elegance

 Hi Guys,

Guess what day it is???? Its time to Debut a brand new collection from Heartfelt Creations. This is the Elegant Rose Frames Collections and boy does this collection give you a head start when designing the most beautiful cards. Take a close look at the elegance without any actual 3D flowers.....Lets take a look at my first design. I have created a full step by step video to share my card making process with all of you.


Directions:

Cut a piece of white card stock to 7 1/4 x 10 and score in half at 5”. Using the outer die from HCD2-7308 Majestic Swirls Frames Die, lay the frame slightly over the scored edge so that the fold is preserved, tape in place, and run through a die cut machine to create the shaped card base. With this same die cut one piece from white card stock and another from sheet 5A from the HCDP1-2144 Elegant Rose Frames Paper Collection. Ink the edges of this green decorative paper with Olive Archival Ink using the HCDA1-449 Stack and Store Daubers. Now layer and glue the white piece onto the card front ,followed by the green layer. Next using the second and third largest dies from this same set tape these securely inside each other onto a piece of white cardstock and die cut the decorative frame. Designer tip: This step can be broken up into two steps if there is a concern of dies slipping. Us ample tape if doing it in one step as a cautionary measure. Do the same exact thing with a piece of Luxe Silver Cardstock and glue these two layers together, off setting the silver slightly behind the white. Attach this layer to the card front using Adhesive Foam Strips.

Stamp the frame from the HCPC-31003 Stylish Rose Frame Cling Stamp Set and the “Happy Birthday To You” Sentiment from the HCPC-31004 Elegant Rose Sentiments Cling Stamp Set onto Copic X-Press It paper with Memento Ink in Tuxedo Black and color using Copic Markers. (Any medium and paper of your choice can be used here) Die cut using both coordinating die sets. Using the dies from the Stylish Rose Frame set, also die cut a Luxe Silver Cardstock piece with both frame dies to create a shadow layer for the rose frame. Cut this shadow layer in half vertically and line up the right and left hand edges of the Luxe Silver with the Decorative Frame already attached to the card base so that it just covers the holes along the edges on each side, glue in place. This will also allow for a silver edge to appear equally on both sides of the rose frame when it is glued down.

Using the metal tip added to the Dries Clear bottle dot on lots of little dots of glue onto the baby's breath areas of the rose frame stamped image and sprinkle with Baby’s Breath Ultra Transparent Glitter. Once dry glue the frame to the card front. Carefully cut apart the sentiment to allow the “Birthday” portion to fit inside the frame and glue it to the inside layer. Add the “Happy” to the top left and the colored roses to the card in desired locations. Decorate inside to complete the project


  I hope you enjoyed that as much as I enjoyed creating it for each of you! Check out my personal project in the Heartfelt Creations Gallery to find out what products I used for this project. 

Also, please be sure to visit the Heartfelt Creations Blog to see all of the gorgeous projects created by the other amazing design team members.


Love, Melanie

Wednesday, October 5, 2022

Heartfelt Creations ~ Angel Amoungst The Stars

 Hi Friends,

Today I have a super fun combination for your weekly Inspiration Wednesday with Heartfelt Creations. I have decided to combine the gorgeous Holiday Star Collection with the Stunning Joyous Noel Collection for a magical design which I just fell in love with while creating. I had planned on adding poinsettias to it but as I designed it I realized it did not need them so I will save them for another project. Aren't these colors from the Holiday Star Paper collection just beautiful and so striking??? I am truly in love....


Directions:

Cut a piece of white card stock to 7 x 10” and score in half at 5”. Cut sheet 3B from the HCDP1-2141 Holiday Stars Paper Collection to 5 x 7”. Ink the edges of this blue decorative paper with Night Sky Archival Ink using the HCDA1-449 Stack and Store Daubers. Glue this to the card front. Cut sheet 4B from the same paper collection to 4 3/4 x 6 3/4” and ink the edges using Deep Purple Archival Ink and adhere to the card front. Using the second largest die from the HCD2-7426 Oval Filigree Frame Die cut a blue oval from sheet 3B. Ink this oval in the same manner using the Night Sky ink. From white cardstock cut the 3rd largest die from the Oval Filigree Frame Die set and adhere to the blue inked oval and sit aside.

Stamp the Angel from the HCPC-3997 Starry Noel Angel Cling Stamp Set onto Sheet 9B from the Holiday Star Paper Collection using Ranger Oxides Inks in Wilted Violet for the angel and Faded Jeans for the trailing stars. Heat emboss this ink with Ranger Tinsel Bridal Embossing Powder for a glistening sheen. From the HCPC-3994 Large Holiday Star Cling Stamp Set Stamp all the stamps onto Luxe Silver Cardstock with Versacolor White Pigment Ink and heat emboss with Silver Embossing Powder. From the HCPC-3993 Holiday Star Cling Stamp Set stamp the large star onto white card stock with Versacolor White Pigment Ink and heat emboss with white ink. With this same set also stamp the large star onto sheet 3B of the Holiday Star Paper Collection using the Versacolor White Pigment Ink and Silver Embossing powder. Die cut all of these stamped images with their coordinating dies. For the white embossed star only die cut out the center decorative snowflake from the center and from the last star stamped on the blue paper use the inner star die to also cut the inside out. Layer this on top of the large Luxe Silver embossed star from the previous step, as seen in the photos.

For the sentiment, stamp the “Seasons Greetings” Stamp from the Holiday Star Stamp Set onto the precut sentiment die cut from white cardstock. Also cut this die cut using Luxe Silver cardstock and layer behind the sentiment off setting a little. Designers TIP: A blue piece of scrap paper was used behind the star opening in the sentiment die to show a solid star there rather than seeing the layers underneath. This gave it a more finished look.

To complete the card attach the angel to the center oval using foam tape and add trailing silver embossed stars to the top of her. This gives great dimension having multiple layers and heights. Before attaching this oval arrange the stars in the background so that the trail of stars continues behind her, some raised and some not. Same with the ones in front of her. All of these are set at a diagonal. Then the one large star was placed in the upper left corner. Once all stars are in place add the oval to the center also using foam tape. Lastly add the sentiment to the lower right hand corner using a double layer of foam dots on the right hand side and a single foam dot on top of the oval on the left side for an even and balanced sentiment.

 I hope you enjoyed that as much as I enjoyed creating it for each of you! Check out my personal project in the Heartfelt Creations Gallery to find out what products I used for this project. 

Also, please be sure to visit the Heartfelt Creations Blog to see all of the gorgeous projects created by the other amazing design team members.


Love, Melanie