A whimsical place to play, where paper and ink become one.

Sunday, January 30, 2022

Heartfelt Creations ~ Easel Card For a Friend

Welcome Back Friends,

Sometimes people come into your life and you just know instantly that "These are good people" That happened to me earlier last year. I won't go into details but out of the blue I went out on a limb and reached out to someone and we got together in a strange location and met for the very first time and it was like we had great conversation, nothing awkward or strange....you know how that can be with strangers...lol

Well today I am kicking off this week with a fun easel card I designed for that someone special who surprised me with a special gift last fall.  I wanted to make her something special to let her know I appreciated her generosity. So I sent her this card a few months back and I thought I would share it with all of you today.


This card was so fun to make as I was making it for someone specific and not just to learn my craft. I am not even sure which flowers I used but I think it was Wild Roses and Magnolias if my memory serves me right. I know the leaves were from the Leafy Accents Stamp. Die, and 3D Mold. And of course the die creating the beautiful easel shape is the Lattice Flourish Gateway die. For the stopper I combined two dies from the Ornamental Tags Die set.


Here is a close up of the flowers they are glittered up with Crystal Clear Glitter and are rockin numerous Heartfelt Creation Stamens. This was one of the first cards that I was super proud of and it couldn't of gone to a better person. Thank you once again my friend.  Love, Melanie


Thursday, January 20, 2022

A2 Sized Heartfelt Creation Cards

Welcome Back,

There has been some talk in the Heartfelt Creations Facebook group about mailing the beautiful floral cards that we all make and the cost of mailing them so I thought I would make a post sharing a couple A2 cards I have made and mailed to friends in regular A2 envelopes with little to no extra shipping cost.

This first card was made using the Cherry Blossom florals and Prills for the centers of the flowers. I just choose to use the smaller blossoms for my card. 


In this second example I made this card using the beautiful Lush Lilac Collection along with the Leafy Accents Stamp, Die, & Mold to create a vine effect. 

In both of these examples the card measures the standard 4 1/4" x 5 1/2"  and was able to be mailed in a standard A2 envelope. 

This just goes to show that beauty doesn't always have to be big and bold!!! For those of you that do wonder about how I mail the large a lush floral cards. Heartfelt Creations does sell clear gift boxes and those can be mailed in bubble envelopes and mailed for about $3.50-$4 pretty safely. When you put in the time to create a masterpiece the recipient is well worth the postage :-)

Until next time, Hugs, Melanie


Tuesday, January 18, 2022

Heartfelt Creations Floral Frame Collection

Hi Friends,

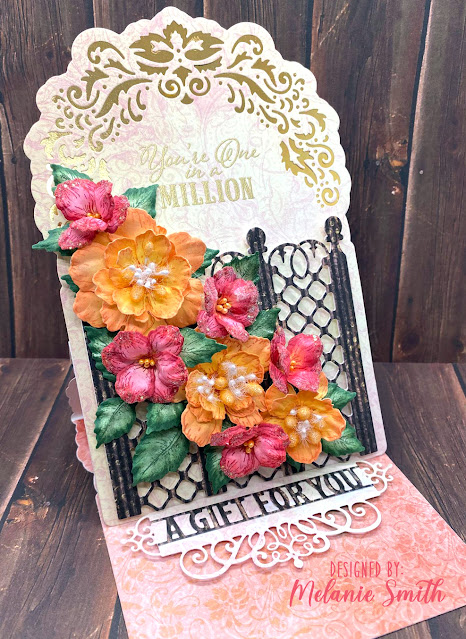
This month over at Heartfelt Creation's They have released this amazing brand new collection called "The Floral Frames Collection. It has a selection of 3 beautifully designed frames and multiple floral choices for your designing splendor. Along with a beautiful colorful paper collection. Lets take a closer look by looking at my first card from this collection.


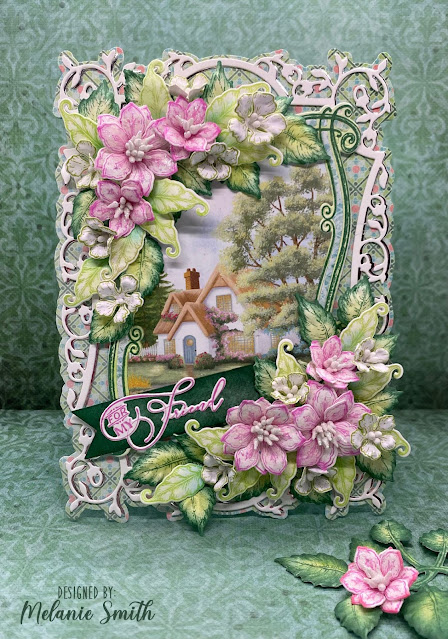
With this card I decided to use the Floral Frames paper pad to determine my color scheme. I have always thought that mint greens and pinks went well together so I chose a couple pieces of coordinating papers and began designing. 

Instructions:

For the base of this card I have cut 3 base layers using the Heartfelt Creation's Fancy Classic Frame Die. One from Deluxe Flower Shaping Paper (white) and 2 from patterned paper. One piece of patterned paper (a more solid piece of light green) was glued to the white and this double layered piece was scored across the top at about the 1/2" mark. This will be your card back/inside of your card. To finish the inside of the card you can cut a piece of white card stock using the second smallest die from the same frame die set and glue to the green side of this back/inside piece and set aside. 

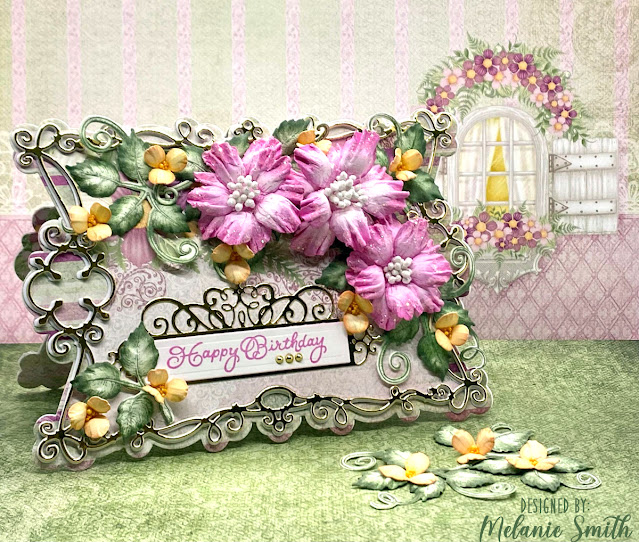
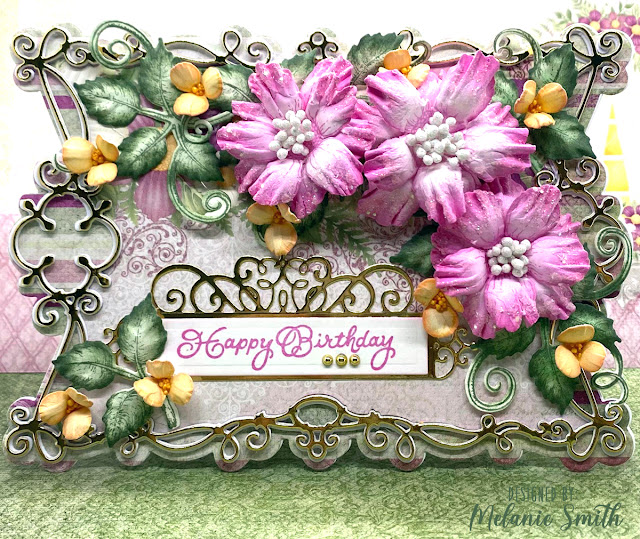
The other remaining base piece cut from the Fancy Classic Frame Die will be your card front. I have chosen the patterned side of the paper to face forward. Next cut 2 of the second largest die from this same frame set, one in Luxe Silver Card stock and one in white. Glue these together using your dries clear glue and off set them just slightly so the silver peeks out behind the white top layer. Then attach this layer to your card top. 

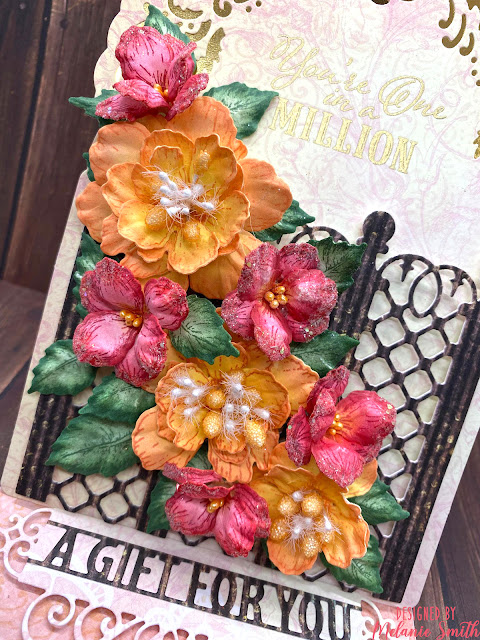
Next stamp your Curvy Floral Frame using Archival ink in Library Green. Die cut using the coordinating die. Find this same frame in the paper collection where it frames the thatched cottage and carefully die cut that image from the paper out as well making sure to save all the little pieces. Also cut the frame again using Deluxe Flower Shaping Paper to use as a base. Now you will layer these all together using dries clear glue to strengthen the layers together. White as base, frame, then inset the die cut pieces from the paper pack. Use foam pads to attach the frame to the front of your card.


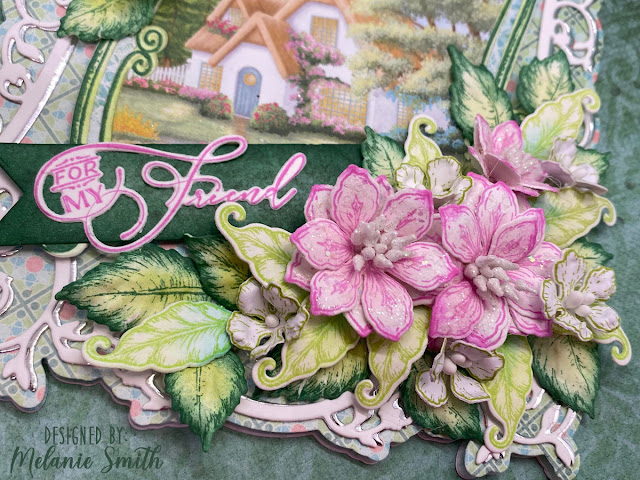
Stamp Flowers from the Floral Frames Collection in Archival Magenta Hue for main flower and softly sponge in same color before die cutting. Once die cut ink just one side of each petal with the Archival Magenta Hue ink with your sponge dauber to darken the tip of one side for added interest. Shape using your stylus and molding mat and add stamens from the Bridal Bouquet and then add Crystal Clear Glitter. For smaller flowers are from the Classic Rose stamp and die and shaped using the 3D Mold. These were stamped in Archival Vivid Chartreuse and not colored. 

Leaves with the curly ends came from the Floral Frames Collection and were colored using the Archival Ink in Vivid Chartreuse and Garden Patina. These were hand shaped. The other leaves are from the Leafy Accents Stamps and Dies and were shaped using the Leafy Accents 3D Mold. They are colored with Archival inks in Library Green and Leaf Green.

For the sentiment the "For My Friend" Stamp and Die from the Floral Frame Collection was stamped in Archival Magenta Hue ink and die cut. It was then added onto a banner cut from the Arrows ans Banner die set which was inked with Library Green Archival ink. Front panel was then glued onto the back panel along the top 1/2" section that was previously scored. 

Heartfelt Creation's Supply List:

Floral Frames Collection

Fancy Classic Rectangle Frame Die

Classic Rose Stamp Set

Classic Rose Die Set

Classic Rose 3D Mold

Leafy Accent Stamp Set

Leafy Accent Die Set

Leafy Accent 3D Mold

Deluxe Flower Shaping Paper

Luxe Silver Cardstock

Bridal Bouquet Stamens

Rajni Chawla's Crystal Clear 

Archival Inks in Magenta Hue, Leaf Green, Vivid Chartreuse, Library Green, and Garden Patina

Thank you for stopping by today and I hope I have inspired you in some way. If you are new to Heartfelt Creations and would like to get started with your first order I have a gift for you. $20 OFF your first $40 online order. Simply click HERE and place a first time order of at least $40 and you will automatically get $20 OFF!!!! Happy Crafting! Melanie

Friday, January 7, 2022

A New Year - A New Design Direction

 Hi Friends,

This year I am taking my designing into a different direction. I am absolutely in love with flower making and working with dies in elegant and creative ways. So this year I have decided to focus my efforts on those endeavors. 

My first design features an array of beautiful products by Heartfelt Creations. I have created a lovely shaped card using their newly released Simply Classic Rectangle Die. Lets take a look...


I was inspired by the Wild Rose paper collection so I continued with that and choose the Small Wild Rose Flower Stamps and Dies to work with also. I just love how these large petals allow for extra hand shaping when wet to give that extra crinkled effect.


For the flowers I used Archival Ink in Magenta Hue for both the stamping and coloring. After coloring I added Dries Clear Glue and Crystal Clear Glitter to the petals for the most beautiful shimmer. 

Lastly the leaves were from Heartfelt Creation's Leafy Accents Stamp, Dies, and Mold. I both stamped and colored them with Archival Ink in Peat Moss. I also added small Wisteria Petals flowers as accents using HFC Stamps and Dies coloring them with Archival inks as well in Tea Rose and Chrome Yellow.

Heartfelt Creations Supply List:

Wild Rose Creative Essentials

Wisteria Petals Stamp Set

Wisteria Petals Dies Set

 Leafy Accents Die Stamp Set

Leafy Accents Die Set

Leafy Accents Mold

Simply Classic Rectangle Die Set

Ornamental Tag Die Set

Special Birthday Sentiment Stamp Set

Deluxe Flower Shaping Paper

Gold Lux Cardstock

Go ManGo Prills

Bridal Bouquet Stamens

Crystal Clear Glitter

Archival Inks in Tea Rose, Chrome Yellow, Magenta Hue, Peat Moss Dries Clear Glue


I hope you have enjoyed today's project and it inspires you to create with Heartfelt Creations Products. If you are new to Heartfelt Creations I have a 50% offer for you. Simply follow the below link and spend $40 on your first time order and you will automatically receive $20 off!!!! I in turn will also receive a $20 store credit. Win Win!!! CLICK HERE to check it out! Happy Crafting ~ Melanie