H Friends,
With the sad news this week I wanted to say that I too am deeply saddened by the news that Heartfelt Creations has decided to close at the end of 2023. That being said that does not mean we have to stop being creative or even stop creating with Heartfelt products. I have seen people post on Facebook saying :These are my last Heartfelt Cards" I am asking myself "Why?" Your products in your collection are not going away. Your techniques and skills are not going away. Why not use those products and mix them with other brands and create a whole new crafty world for yourself? When God gives you lemons always remember you can make lemonade. It all depends on how you look at the situation. When I think of all I have learned over the last few years being in the Heartfelt Community and all the friends I have made I realize just how much I have grown for have knowing ALL of you. Not just the company, but all the followers of the company as well. WE ARE FAMILY! If you are reading this and feel like your losing something just remember that. The product line may end but you haven't lost anything you have gained over the years from knowing this company. Take a big step forward and decide for yourself that you want to grow in your crafty world and lets keep crafting together like we always have. Now lets talk about what we are really here for...... Heartfelt Creations, and this weeks project!!!
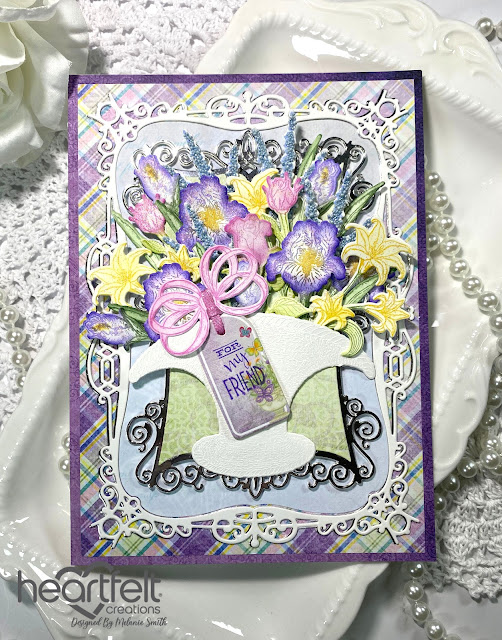
In this project I have mixed a few collections to create this gorgeous basket of blooms. When I first began seeing the sets have these little stemmed flowers I wasn't sure what to do with them, but as they came out in different flower styles this idea came to mind and I just love how this card turned out.
I felt like a true florist when putting this card together. Everything just felt right. The colors, the arrangement and I just love the basket collection. Make sure you grab what you can while you can because everything on the website is while supplies last.
Instructions:
Cut a piece of white card stock to 11 x 7 1/2” and score in half at 5 1/2” to form a 5 1/2 x 7 1/2” card base. Cut a piece from sheet 8B from the HCDP1-2127 Floral Butterfly Paper Collection measuring 5 1/2 x 7 1/2” and glue this to the card base. Now from sheet 11B cut a piece measuring 5 1/4 x 7 1/4” and adhere it to the card front. Next use the largest die from the HCD2-7424 Rectangle Filigree Frame Die Set to cut a piece of Luxe Silver Card Stock, white card stock, and a piece from sheet 1B from the Floral Butterfly Collection. Using Dries Clear adhesive and glue the white frame on top of the silver layer slightly offsetting them so that the silver peeks out from behind the white. Adhere to the base. Then using just the center piece from the piece cut from sheet 1B glue that inner piece in the center of the frame. Next use the second largest die from the same die set to cut out a Luxe Silver piece and the third largest die to cut out a piece from sheet 5A. Layer these two pieces together and adhere them to the card front using 3D foam tape.
Using HCPC-31008 Wicker Basket Cling Stamp Set, stamp out 1 basket with Versa Color pigment ink onto white card stock. Heat emboss using white embossing powder. Also Stamp out the bow onto a piece of pink scrap paper from the paper pack using Magenta Hue ink. Die cut with the coordinating die then lightly ink the edges with HCDA1-449 Stack and Store Daubers to give the bow some added dimension. Now stamp out the full size Iris, the Iris buds, and the Spray 4x each from HCPC-31022 Iris Garden Accents Cling Stamp Set using Deep Purple, Periwinkle (for the sprays), and Olive Archival inks. Die cut with coordinating dies and ink the edges using the same colors to darken the edges. Add a small amount of Goldenrod Archival ink to the centers of the Irises. For the Sprays add Dries Clear Glue and sprinkle on Ice Queen Prills, set aside to dry. Using HCPC-31010 Basket Blooms cling stamp set, stamp out the lily stem 3x using Golden Rod and Olive Inks. Color lightly with Chrome Yellow and Leaf Green inks before die cutting with the coordinating dies. Using HCPC-31009 Basket Florals Cling Stamp set, stamp out the Rose Stem 1x in Magenta Hue and Leaf Green. Color in the same colors and die cut with the coordinating dies. Using HCPC-31006 Budding Rose Heart Cling Stamp Set, stamp out 3x one of the rose bud stems with Magenta Hue and Leaf Green. Color with the same colors and die cut with the coordinating dies. Using a Hydra Sponge and Dries Clear Adhesive lightly sponge glue over each bloom and sprinkle with Crystal Ultrafine Transparent Glitter.
Now simply arrange the stems gluing small bits in at a time for a well balanced look. Before adding the bow, take a piece of 1/8” white ribbon and ink using the Magenta Hue ink pad and a Stack and Store dauber. Stamp out a sentiment from HCPC-3845 Just For You Sentiments Cling Stamp Set in Deep Purple onto a tag from the Floral Butterfly Paper Collection and die cut using the coordinating die available in the HCD1-7202 Album Tags and Album Accents Die Set. Attach to the bow and add to project to finish off the bouquet.
To give the card the perfect finishing touch, use a piece of coordinating paper on the inside of the card from the beautiful Floral Butterfly Paper Collection.
I hope you enjoyed that as much as I enjoyed creating it for each of you! Check out my personal project in the Heartfelt Creations Gallery to find out what products I used for this project.
Also, please be sure to visit the Heartfelt Creations Blog to see all of the gorgeous projects created by the other amazing design team members.


